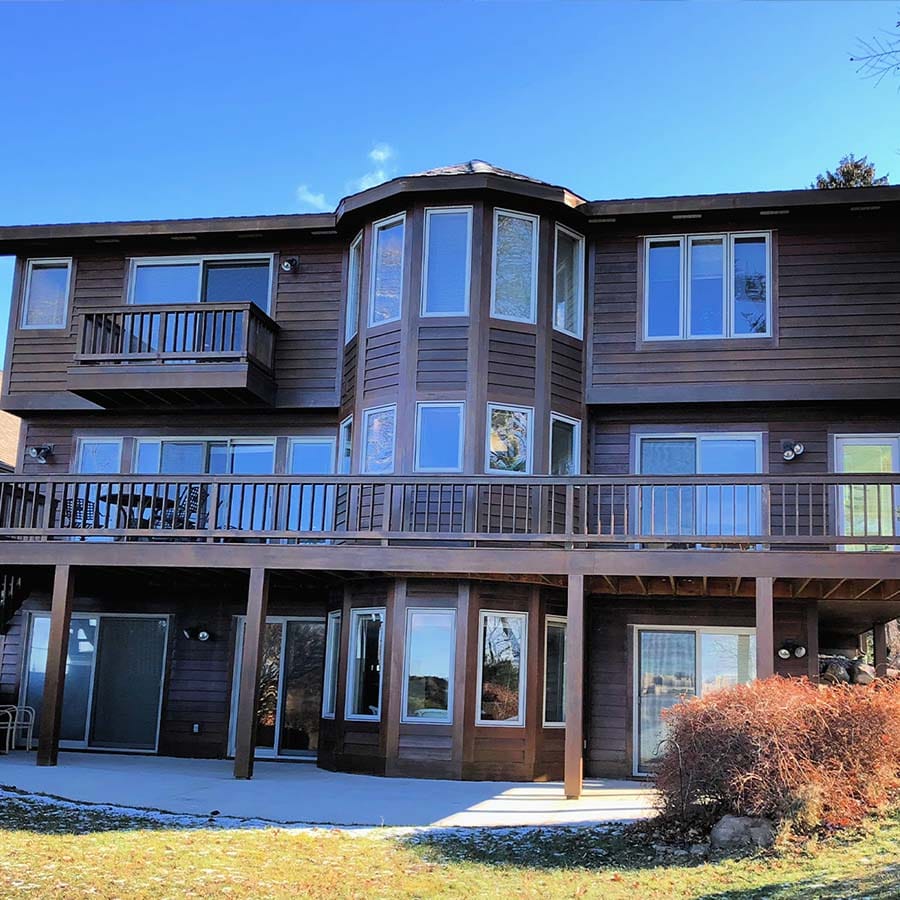
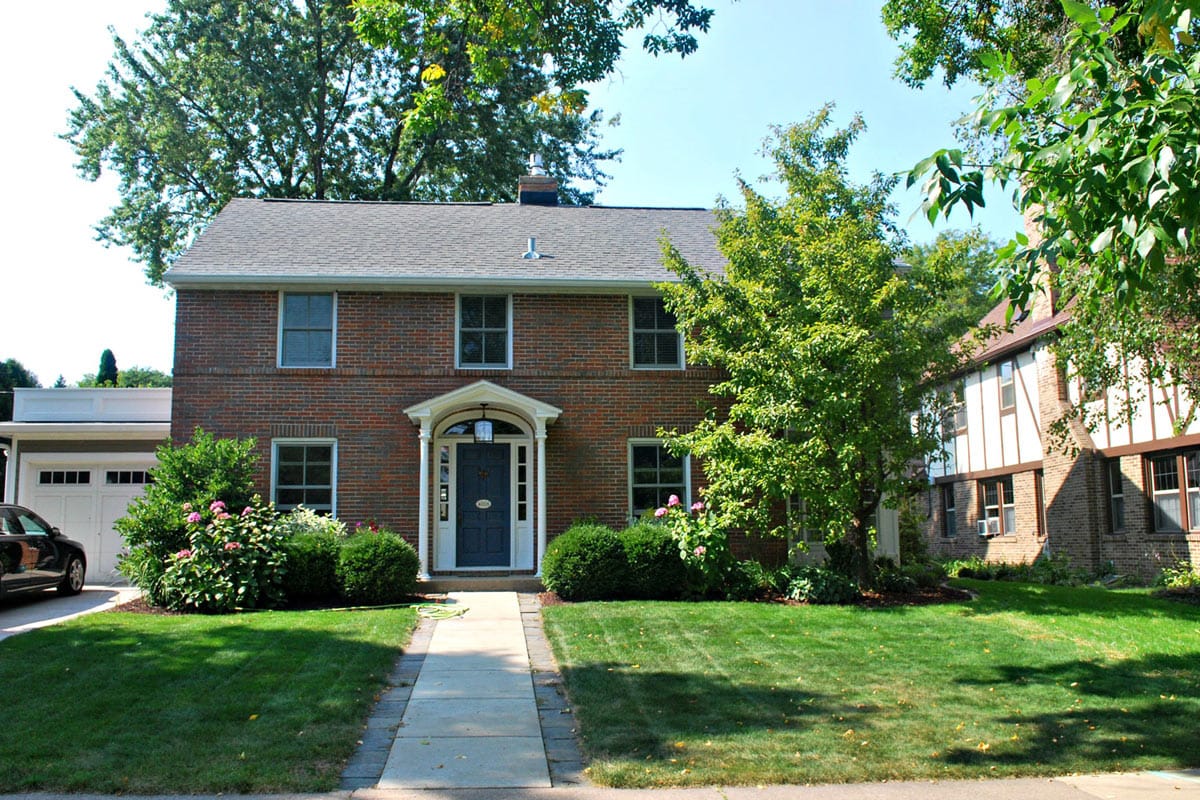
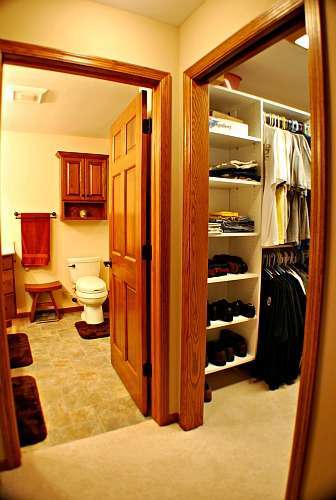
If you remember, our featured project from last month was this outdated lake house on Lake Monona. We focused on the structural changes that we incorporated to shift the floor plan to fit our homeowner’s needs better. This month we are going to continue in on our look at this project and present the final product!
Our homeowners for this project contacted us after purchasing a house on Lake Monona. There wasn’t much about this house that fit our homeowner’s style or preference other that it was right on the lake with stunning views of the capital skyline. They reached out to us and asked if we would be up for the challenge of touching every single square inch of this structure and turning it into the dream lake house that they envisioned when they purchased it.
They asked us to redesign the layout to have an open floor plan by shifting rooms to a more natural location that would better fit their needs. After that, they wanted to eliminate the dated finishes and update them to high-end luxury finishes. In addition, they were looking to add a significant garage addition onto the front of the existing garage and completely update the exterior, including new siding and stone, windows, doors, insulation, decking, and roof.
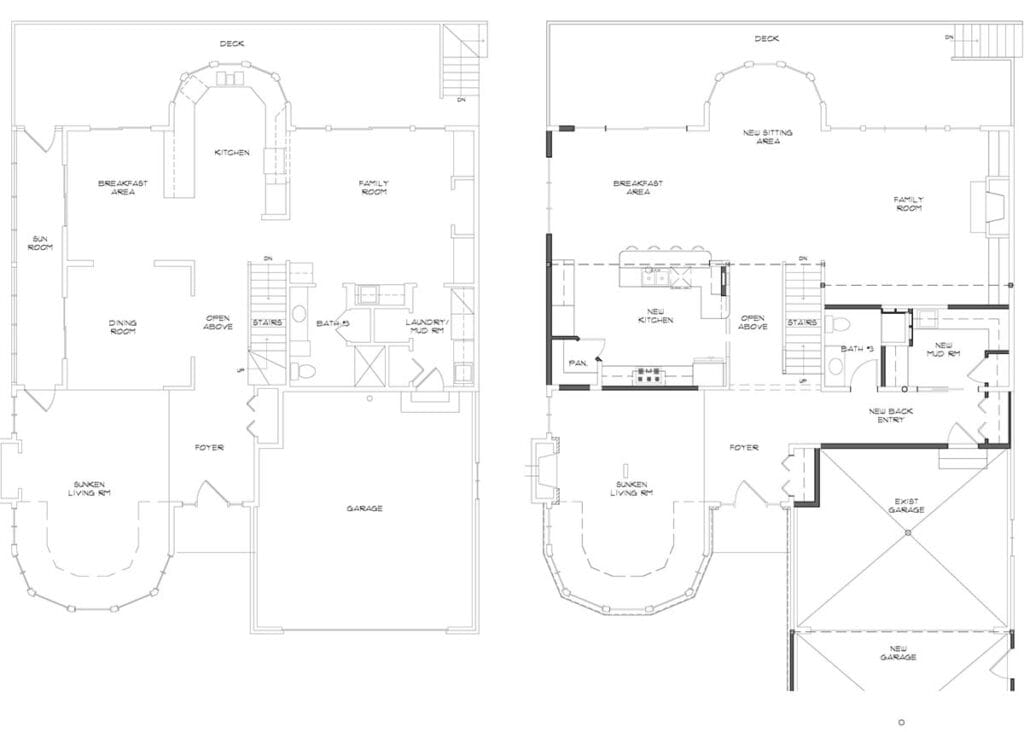
Existing Main Level / New Main Level Floor Plan
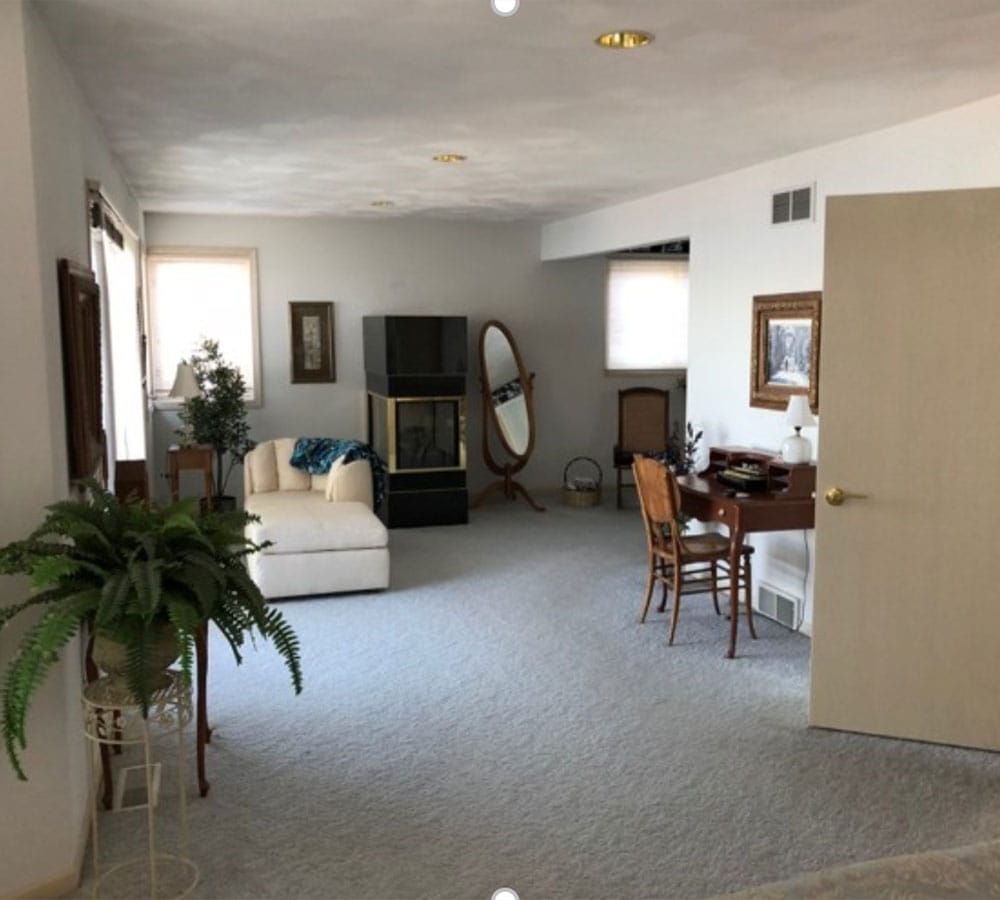
The overall plan was to make minor changes to the lower and second levels while removing a few unneeded rooms on the main level to create a space for the rooms that were going to shift location. The biggest changes were going to be to remove the formal dining room and solarium from the south side of the home and create a new pantry and kitchen in the area. A portion of the old garage would be framed in to create a new hallway so that new entries could be made for the mudroom and powder bath so that the entrances for these rooms could be removed from the main living room, creating a larger space. Finally, the laundry currently located in the mudroom would be relocated in the master closet upstairs, creating a larger mudroom.
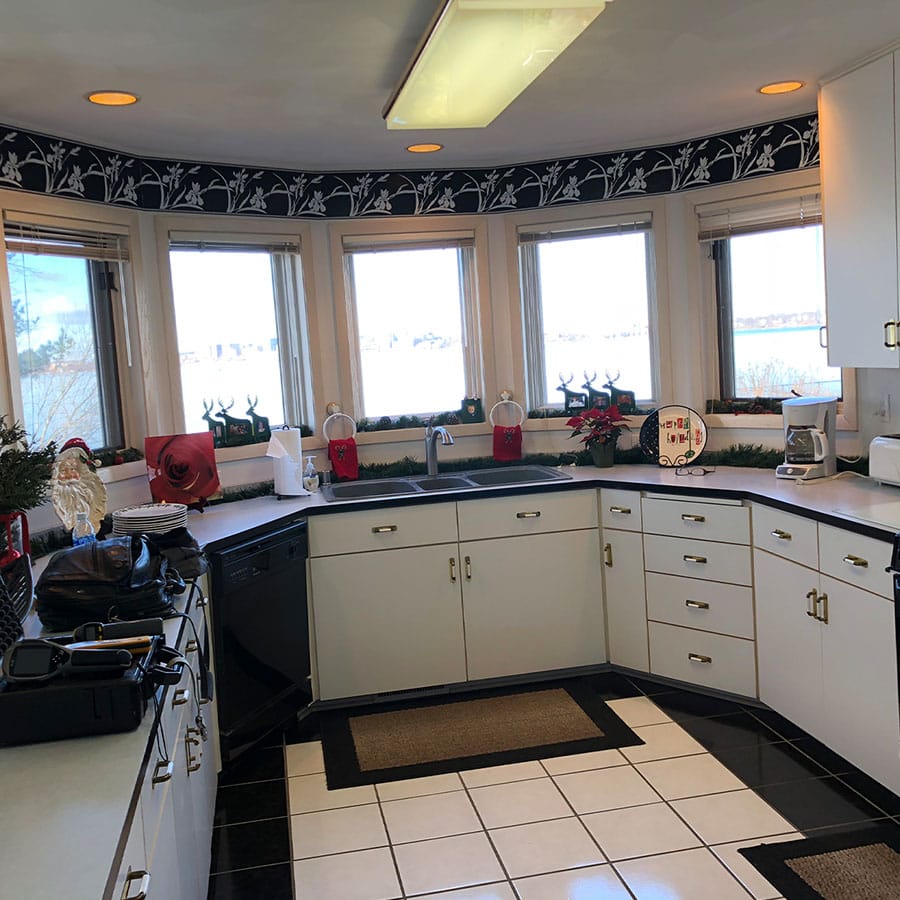
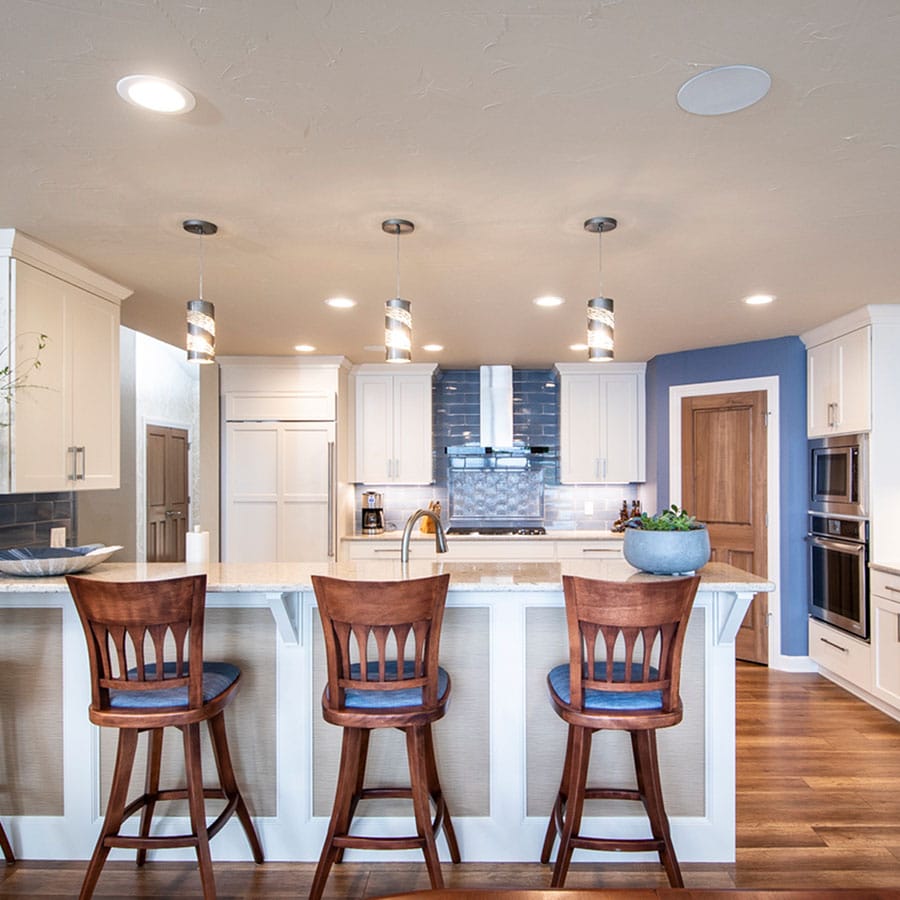
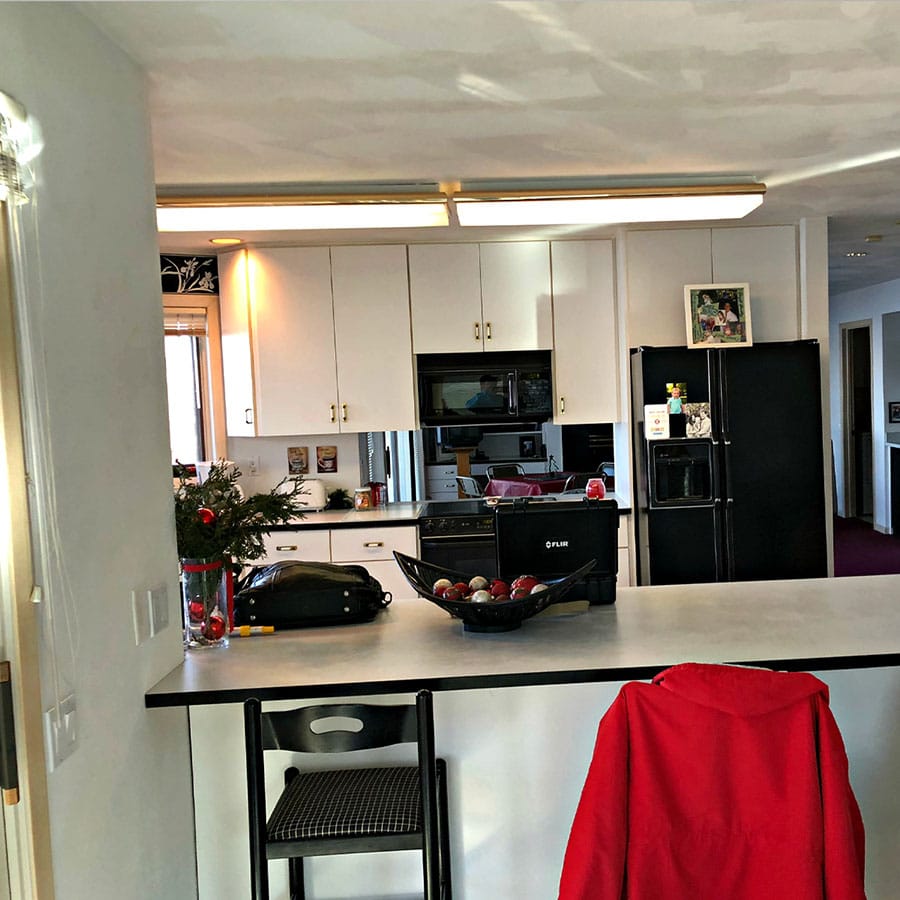
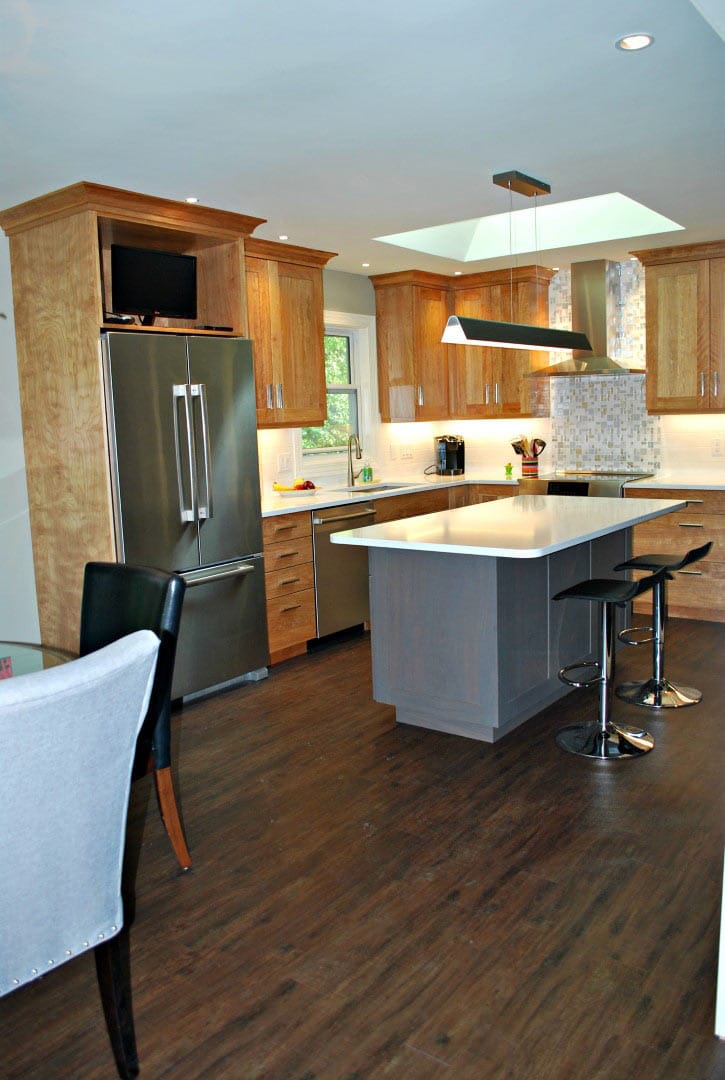
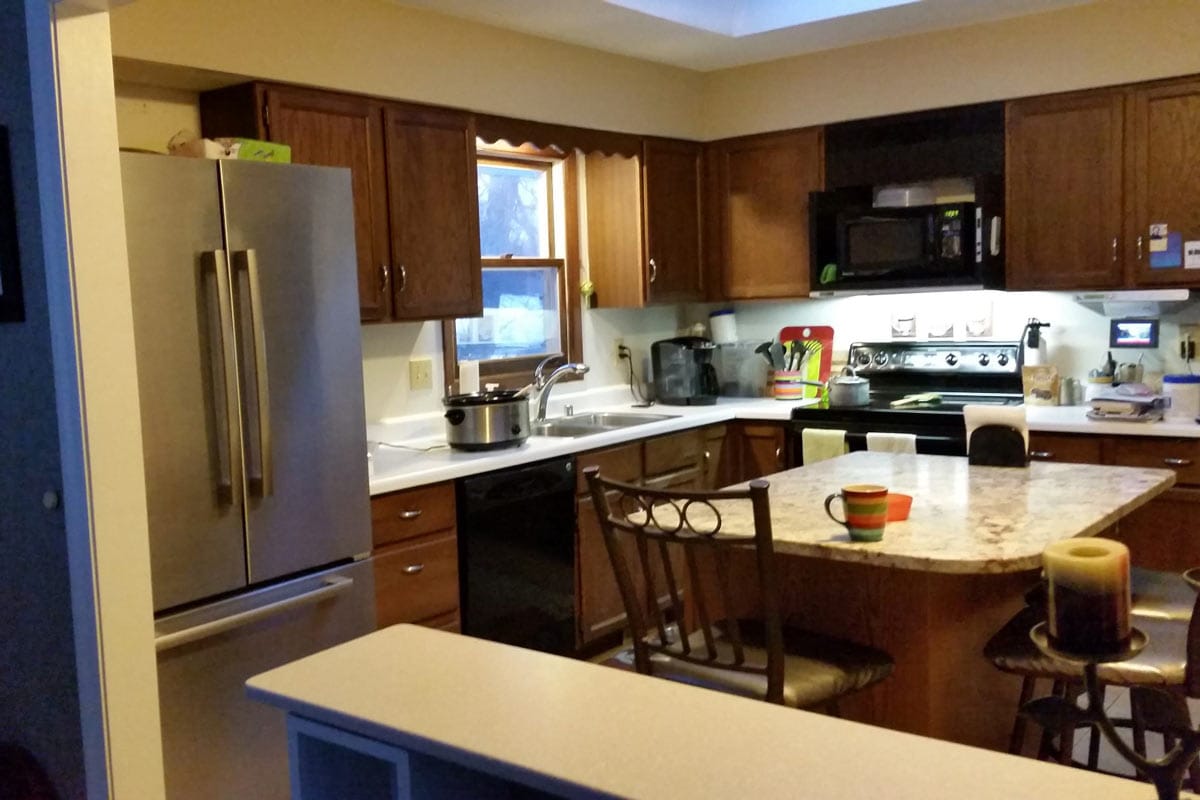
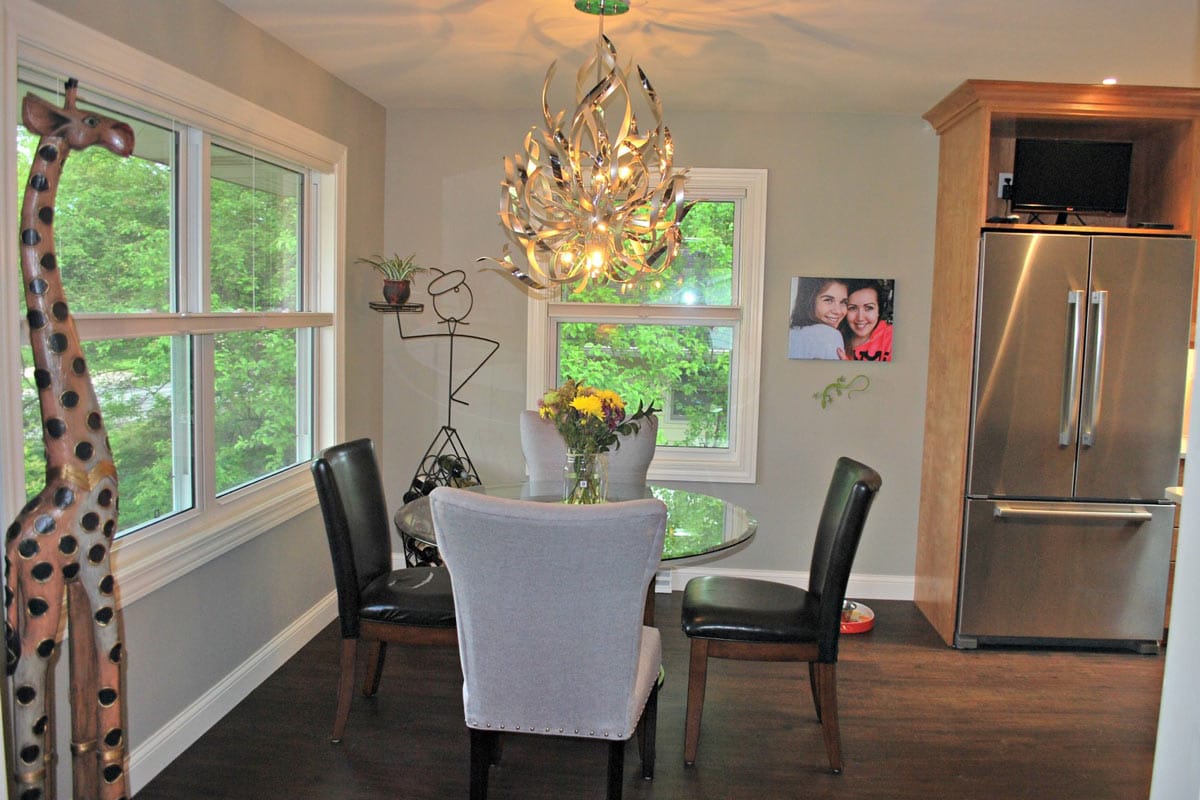
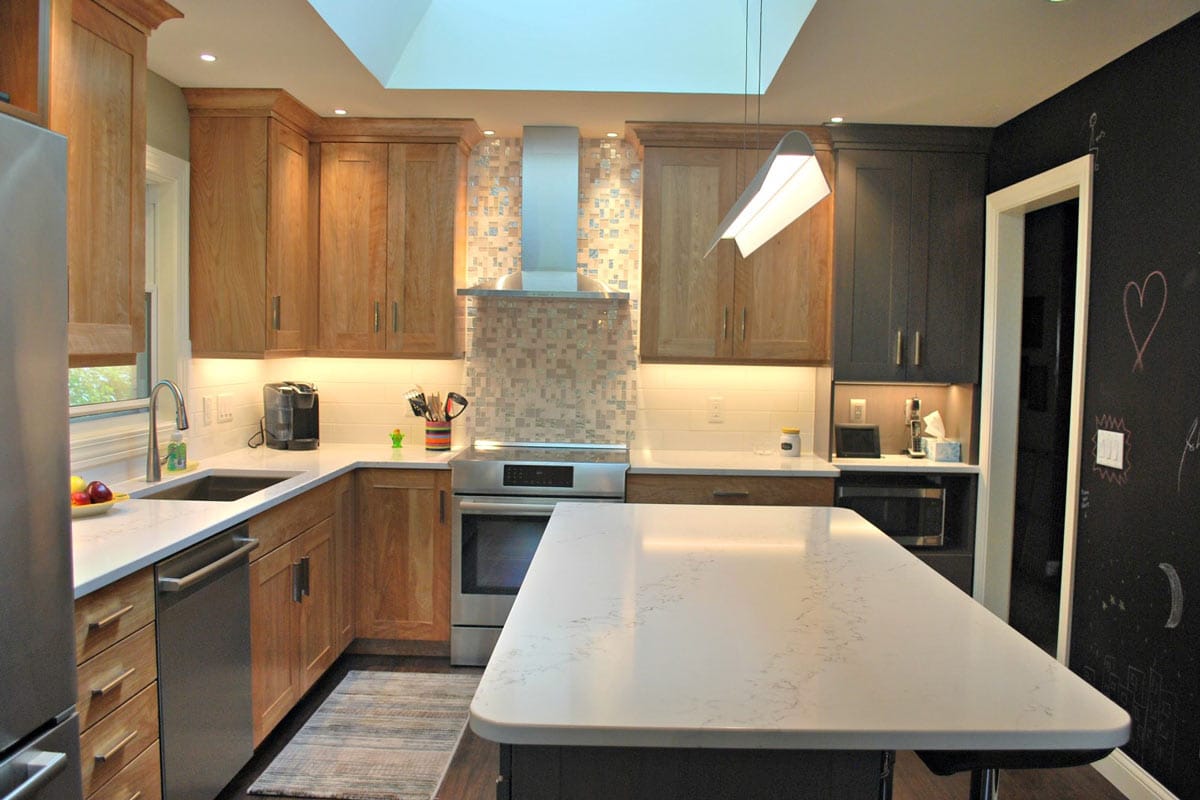
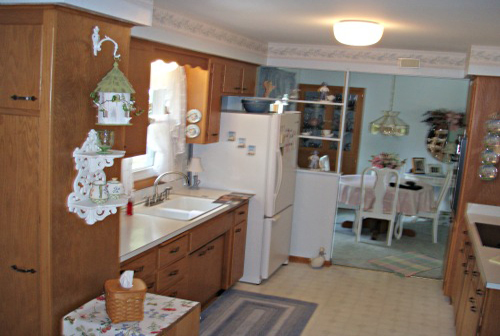
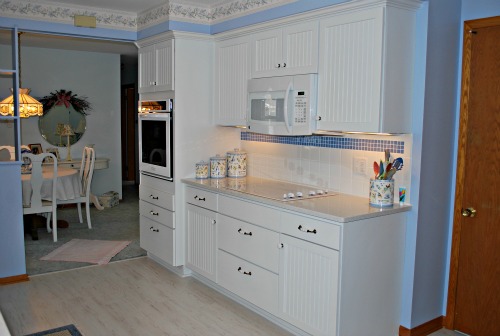
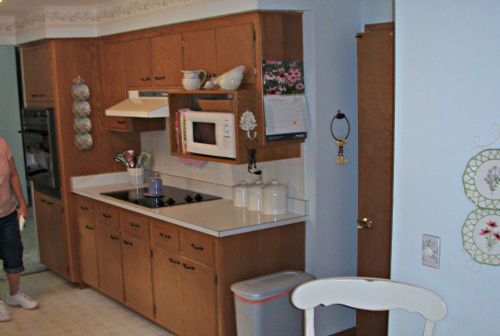
The Kitchen
Before
After
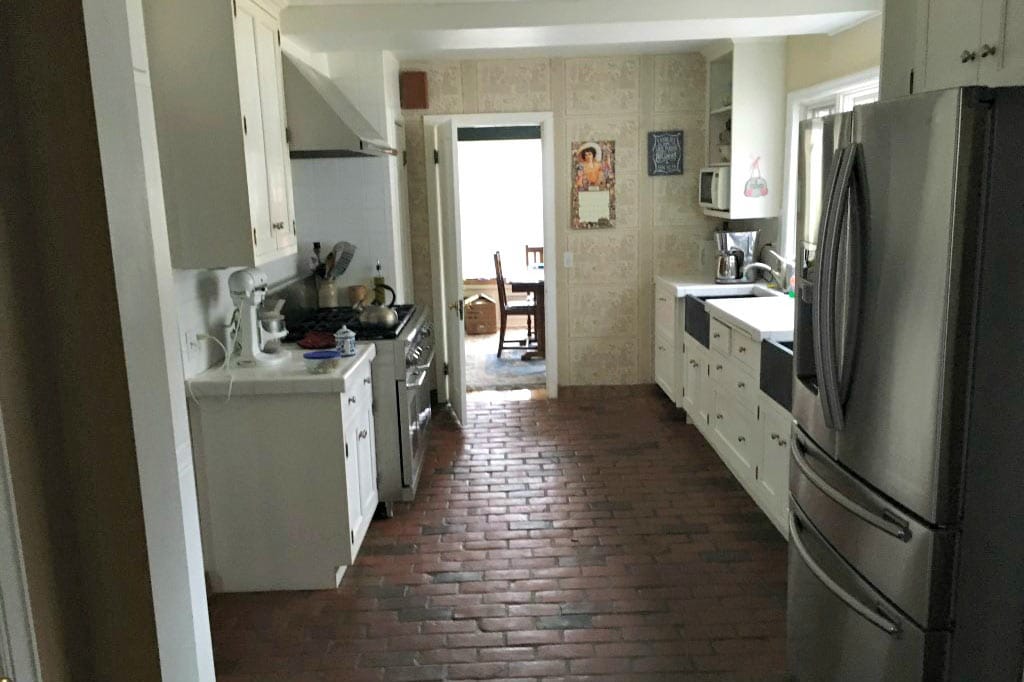
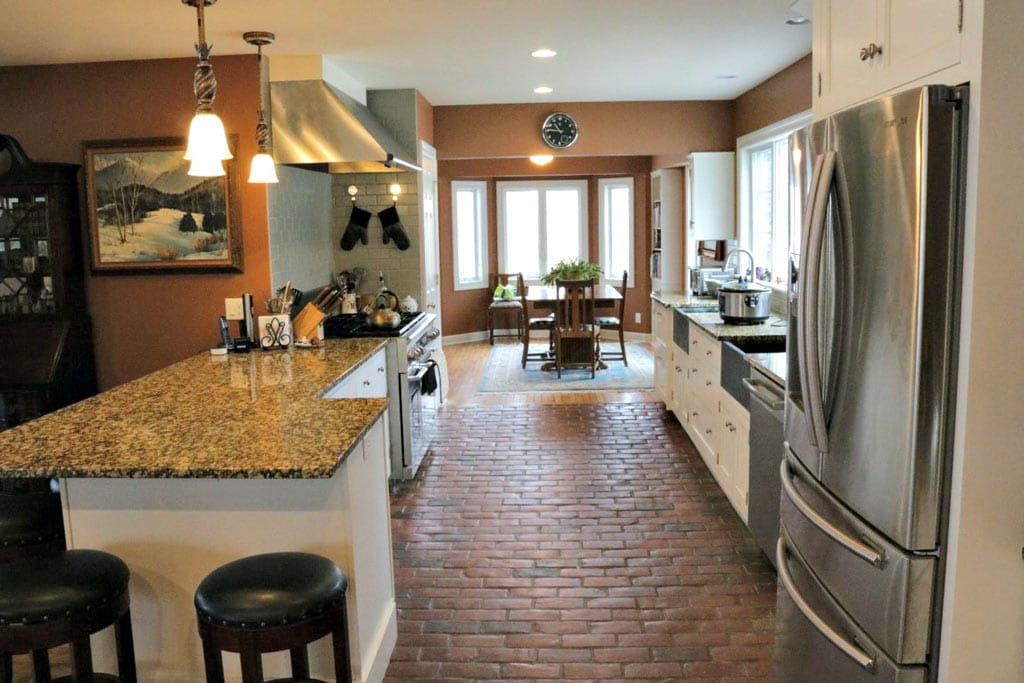
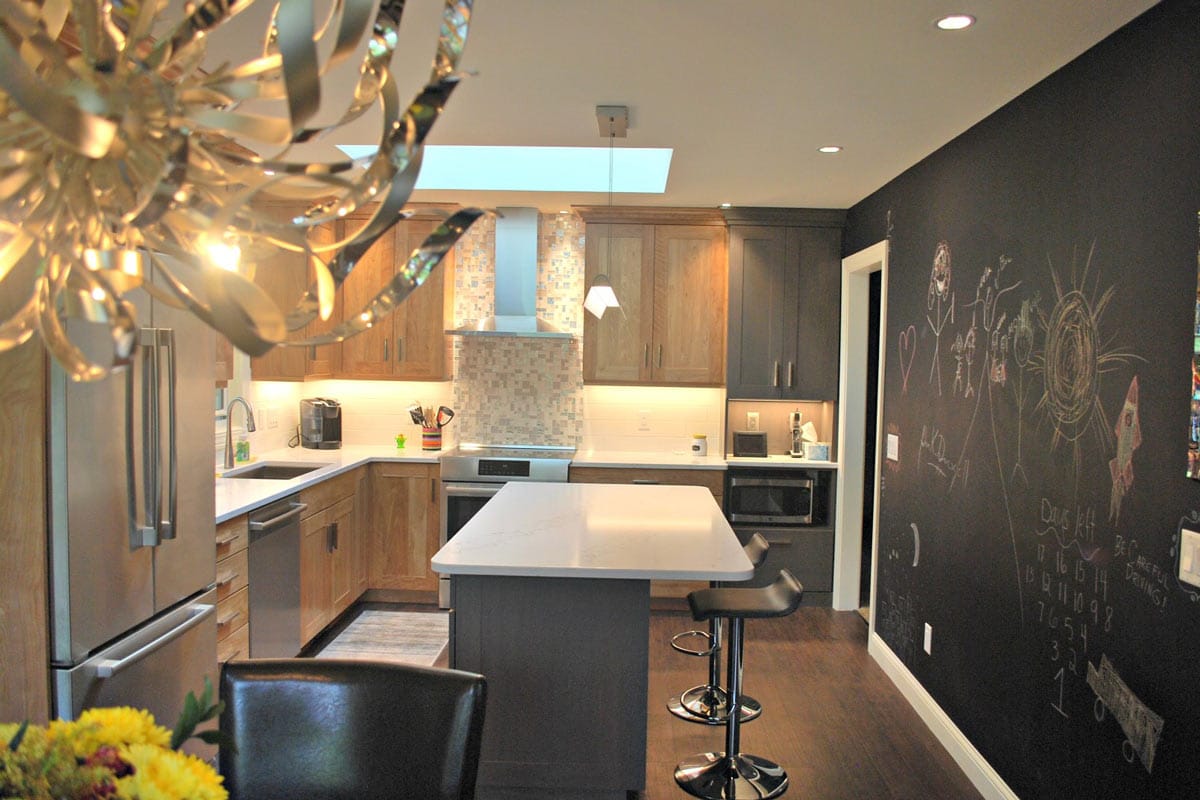
Possibly the most significant transformation in the house, the kitchen now stands where the existing formal dining room and solarium once stood. In addition to now having an open floor plan to the living room, relocating the kitchen to this area allowed for a much larger kitchen and the addition of a walk-in pantry. Having a new space meant having a blank canvass for the new design. The homeowners chose to incorporate an “L-shaped” peninsula with a raised bar top for a breakfast bar. This “L” provided multiple extra square feet of useable counter space to the left and right of the sink, making it a great space for preparing a meal or cleaning dishes. Custom cabinets with paneled appliances, a paneled breakfast bar with textured wallpaper panels, quartz tops, and tile splashes all complement each other with the dark, medium, and light contrasts. Redesigned lighting illuminates the space as a whole, focuses on work areas with the undermount task lighting, and the pendant lights were carefully centered on the breakfast bar panels and sink faucet. High-end appliances top off the space and transform it into a highly functional kitchen where any professional chef would be proud to make a meal.
Before
After
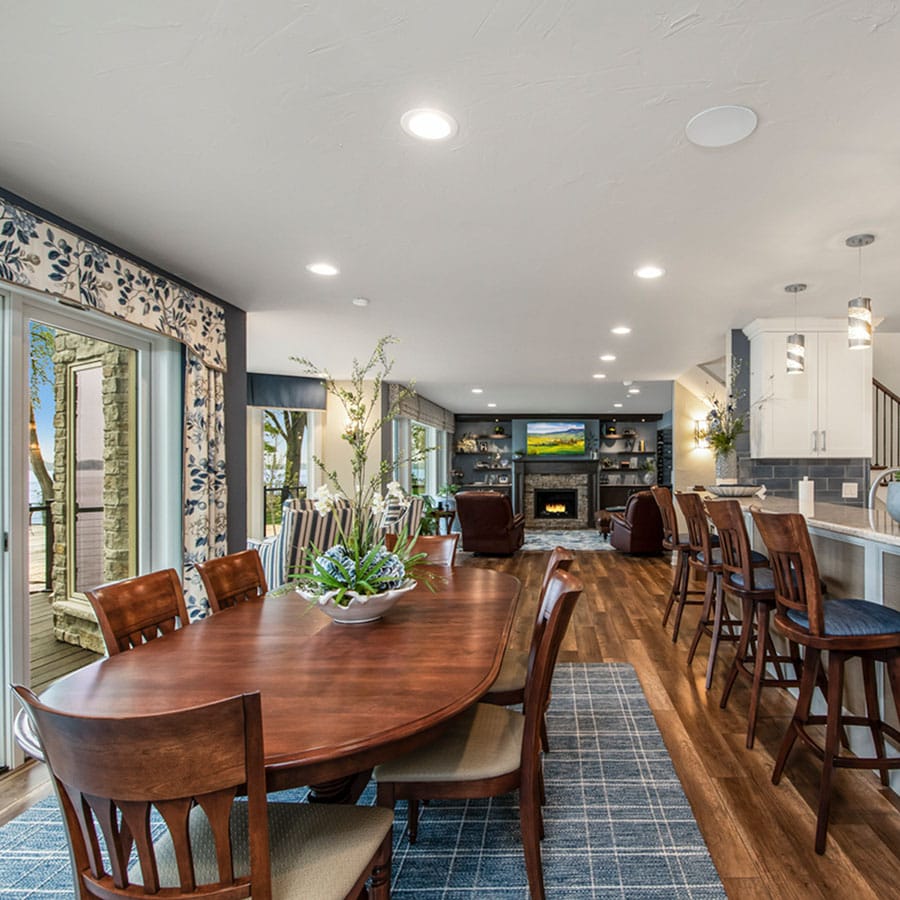
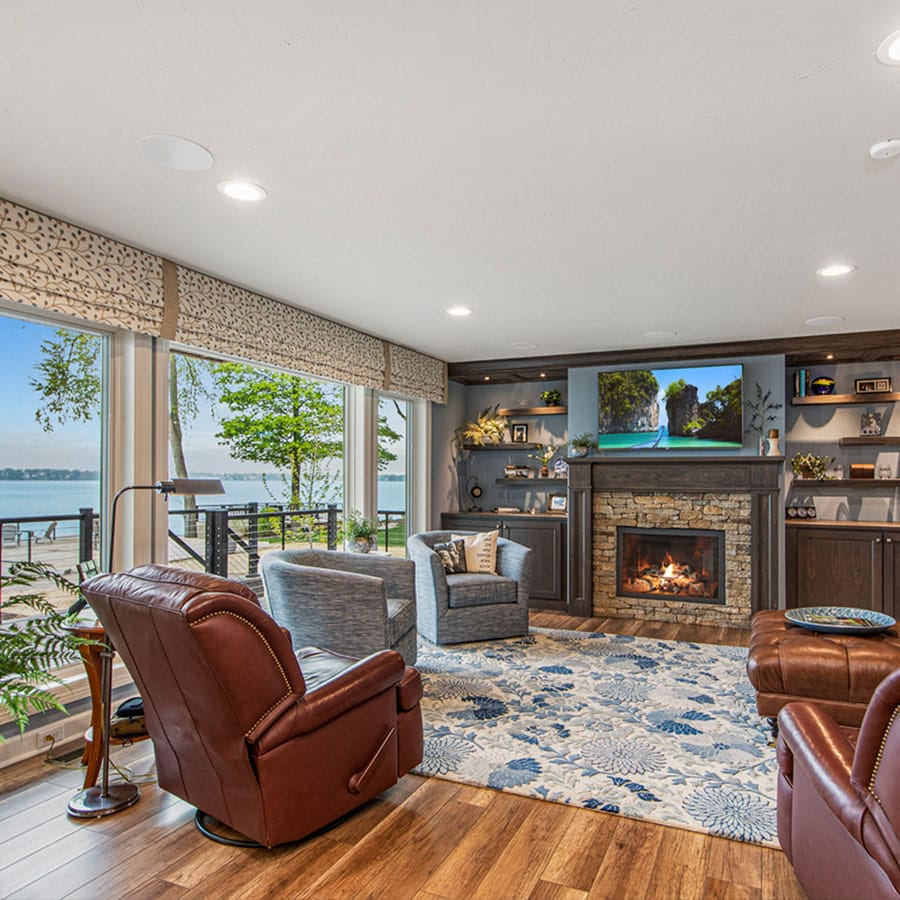
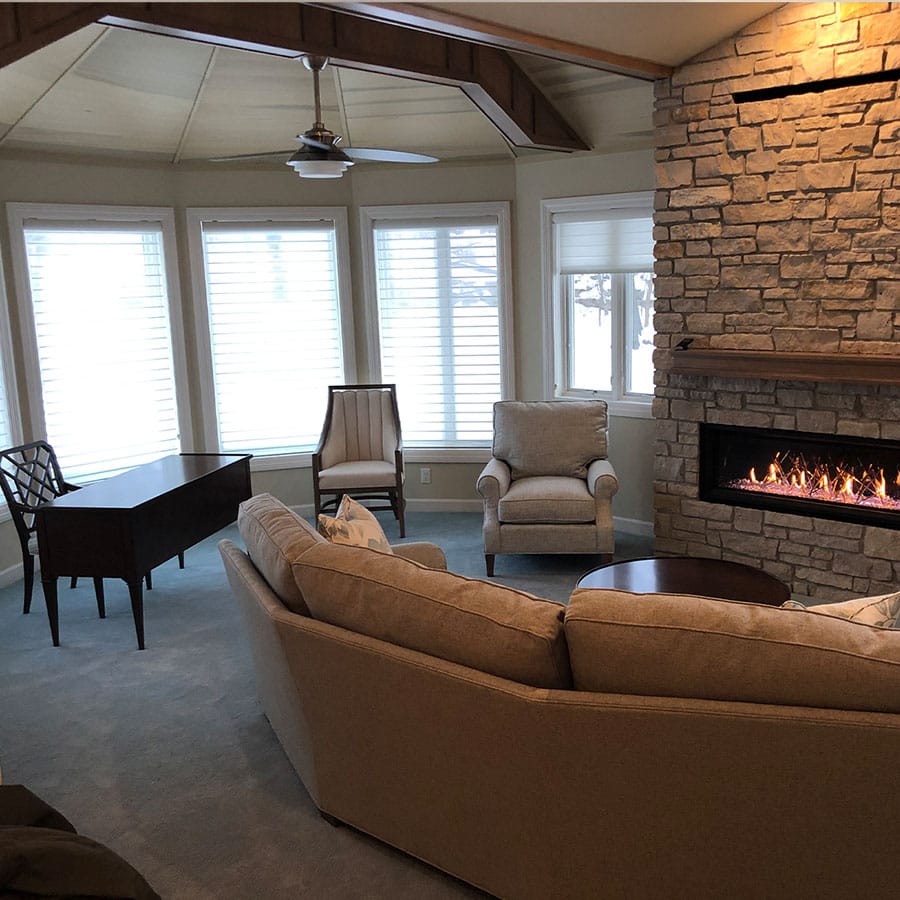
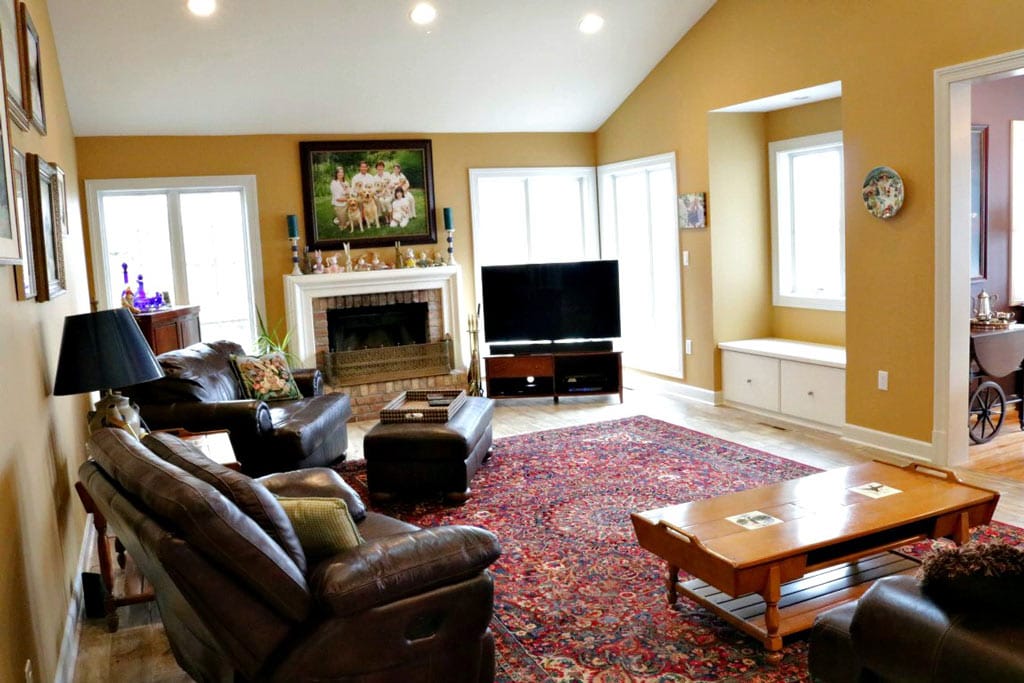
The Living Room
The Living Room was enlarged by removing the partition wall between it and the kitchen. This provides a clear unobstructed view from the dining room to the living room. With the removal of the mudroom and powder room doors as well as the wet bar, an additional three feet was gained in the width of the room as well as additional seating options including room for a couch. The built-in area was elegantly refreshed with a paneled ceiling, floating wood shelves with glass inserts, built-in cabinets, and a new mantle showcasing the new gas insert and stonework. With the additional added room, the natural symmetry of the original layout was now disrupted. A custom wine rack, additional floating shelves, and a wine cooler created a separating line, which helped to balance this new space as well as protect the original symmetry of the room. Repositioned dimmable LED recessed lighting helps to properly light the room while accent lighting in the paneled ceiling above the built-ins trickles down through the glass inserts of the shelving pleasantly illuminating the shelf knick-knacks and decorations.
Before
After
Front Living Room
The homeowners were looking for a private study area that was separated from the rest of the house. The existing front living room was a perfect candidate for such a space. With relocating the kitchen to the old formal dining room location, that meant closing off the opening to the front living room. This created a natural and private separation from the rest of the house. The homeowners chose to eliminate the tray ceiling in the turret and add a vaulted tongue and groove ceiling as well as add the stone fireplace surround to the new gas insert. Adding carpet to this location added to the coziness and quietness of the area. Although this room is separated from the rest of the house, the stained mantle and stained accent beam match the rest of the stained woodwork in the house to help tie this room together as you go from room to room.
Before
After
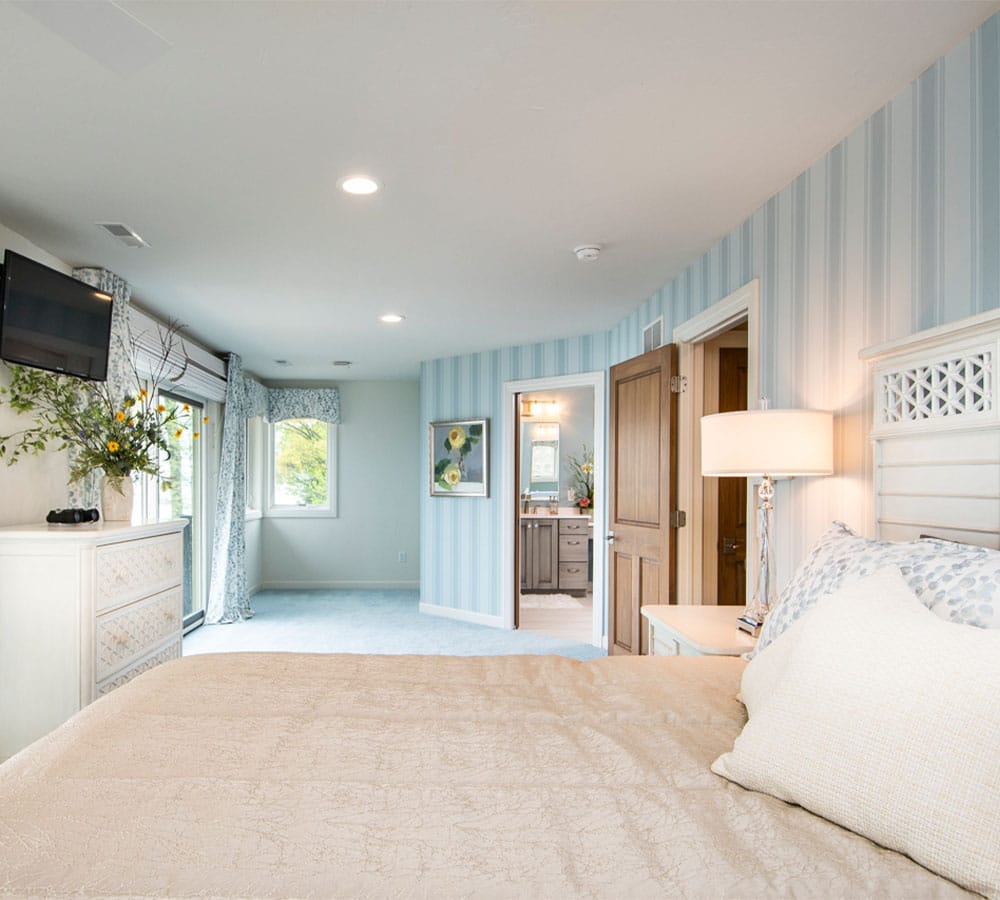
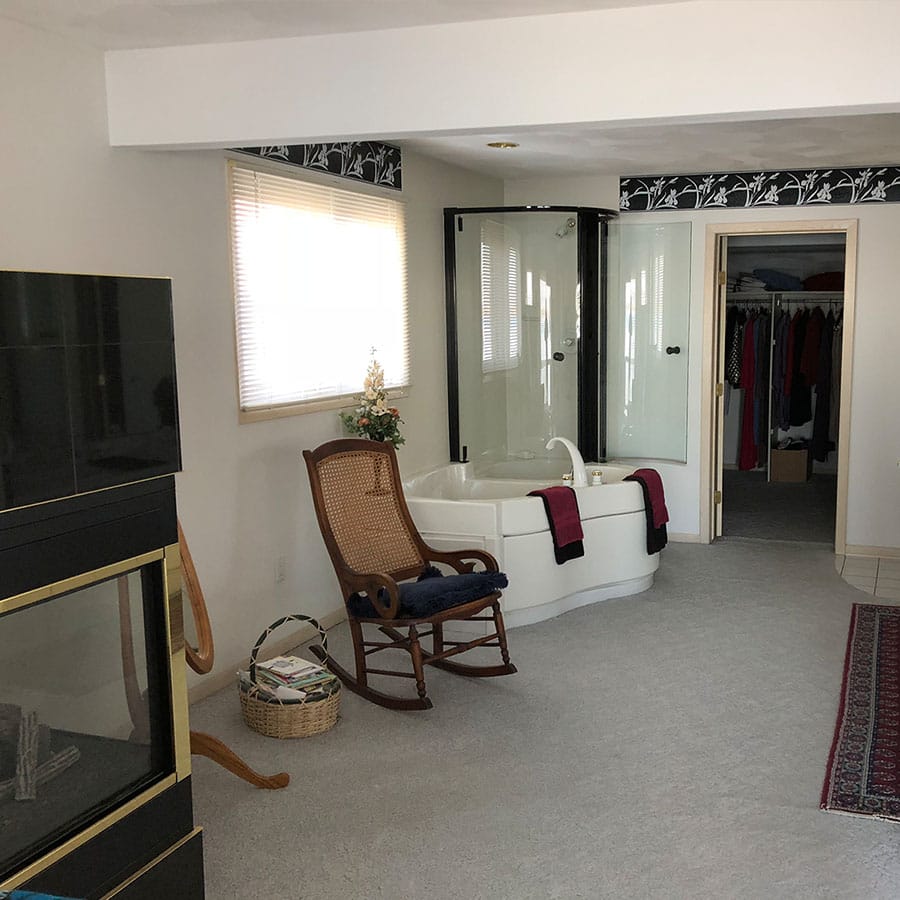
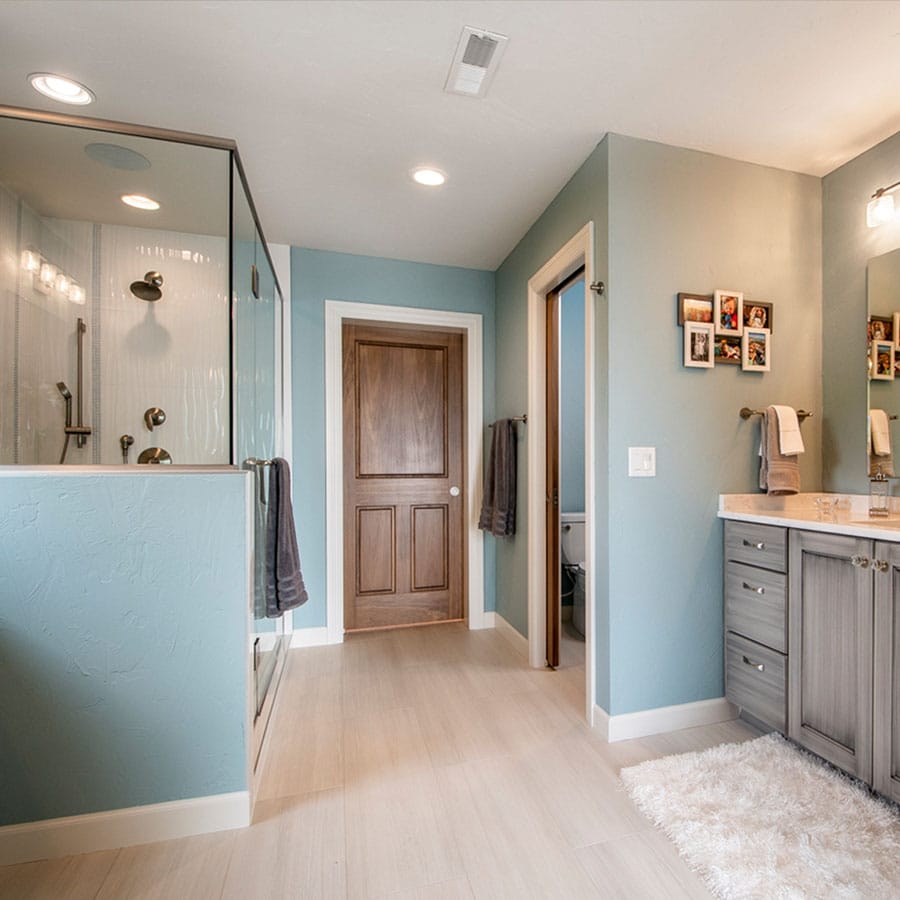
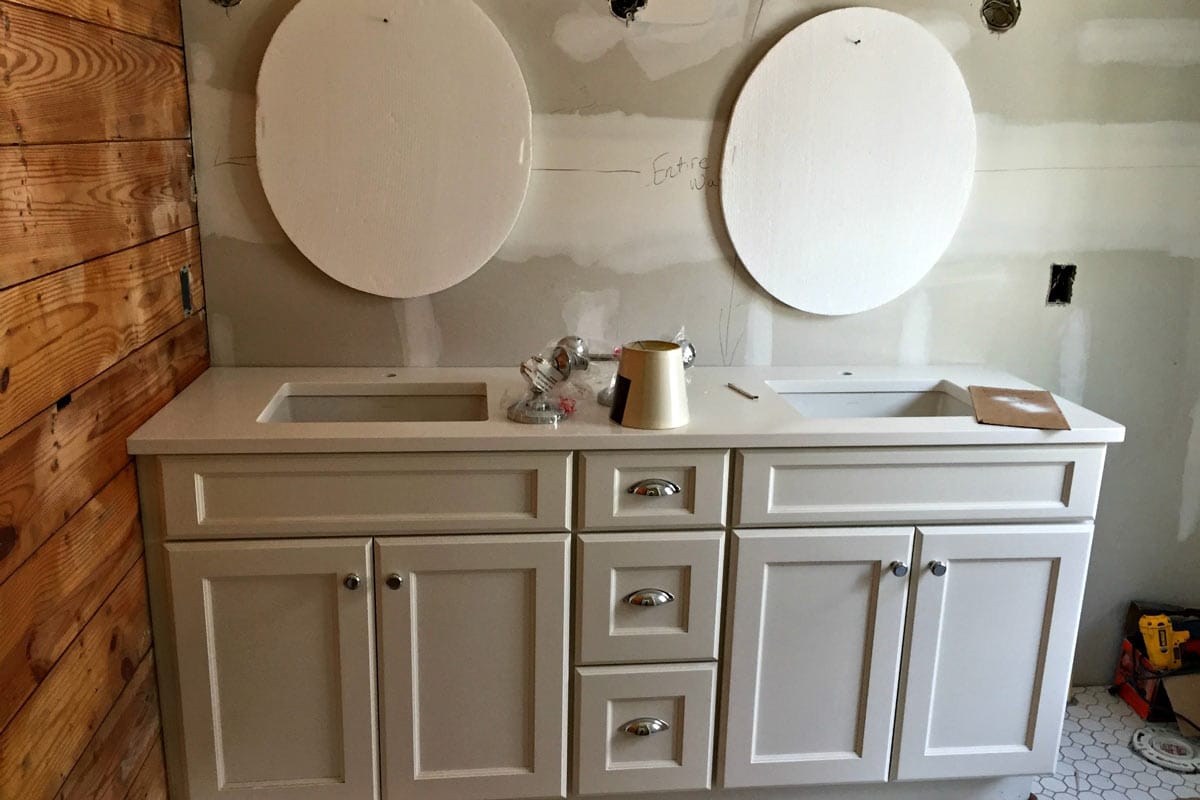
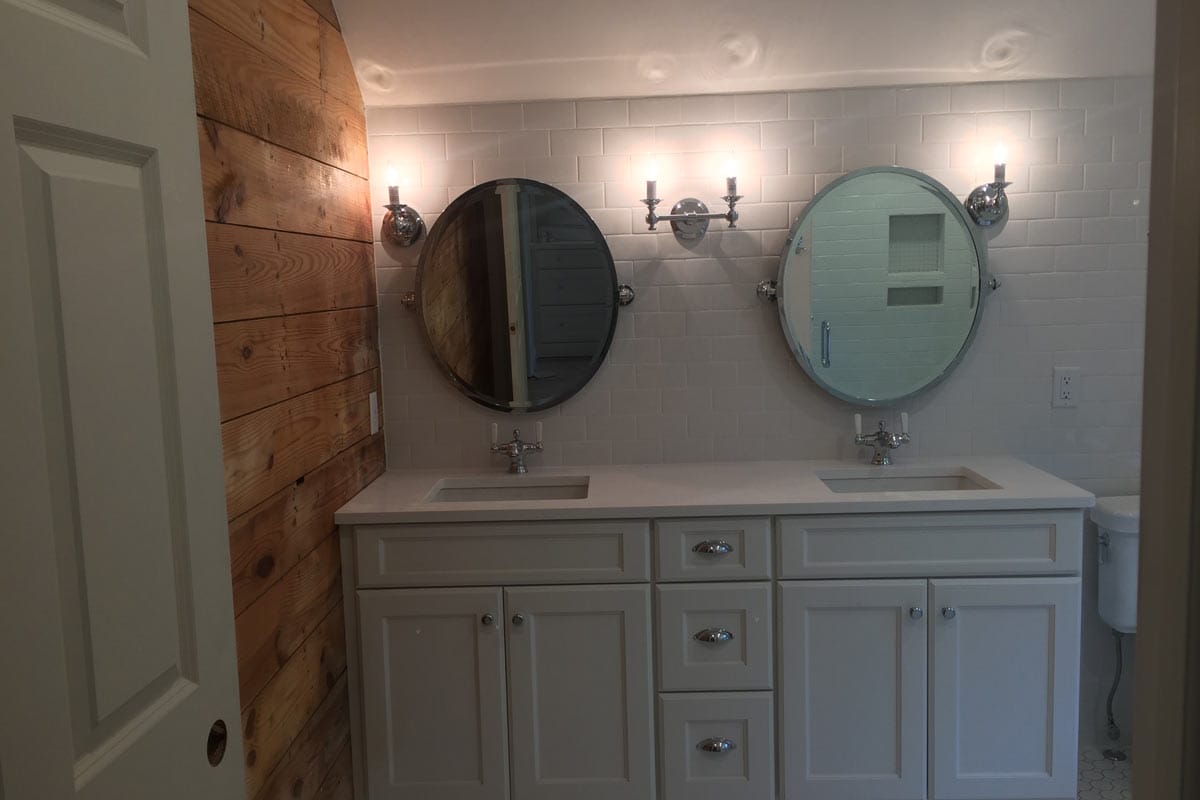
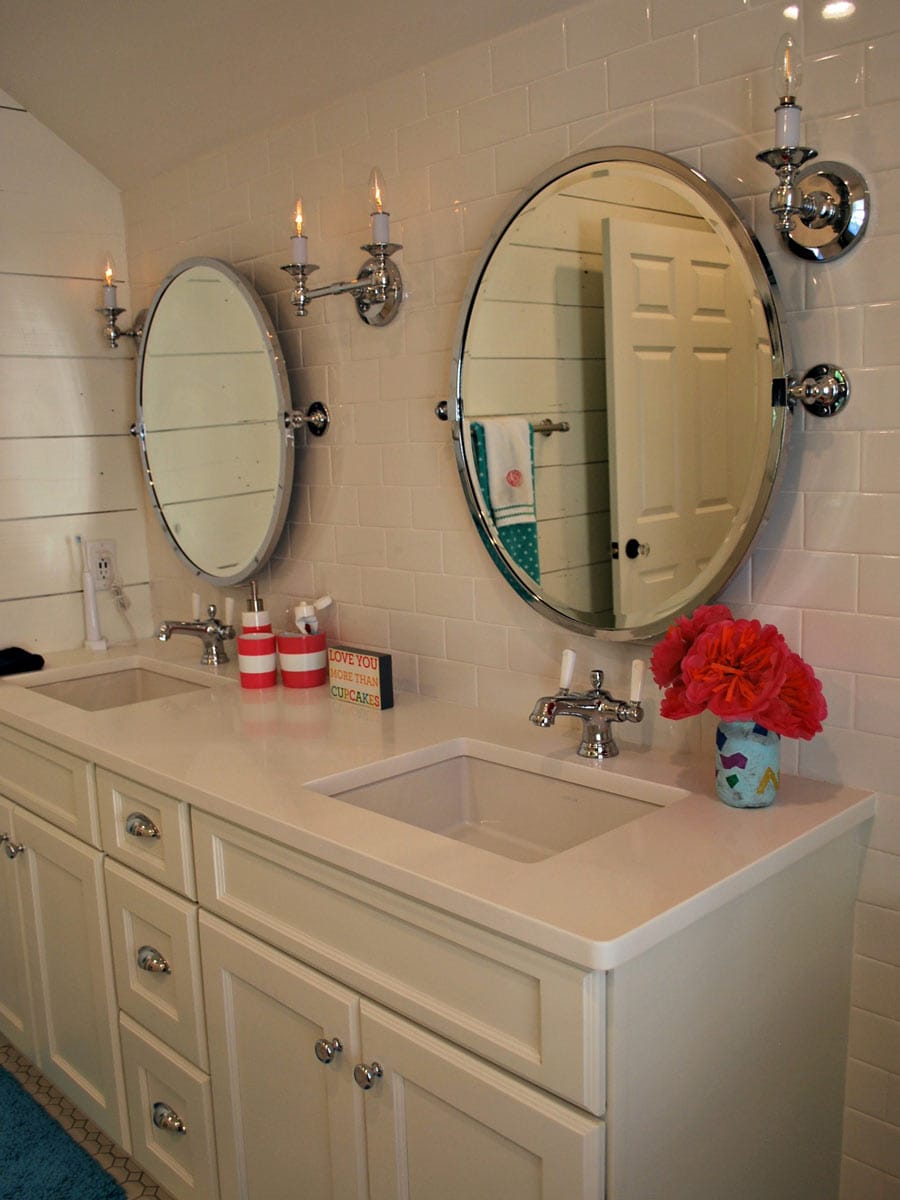
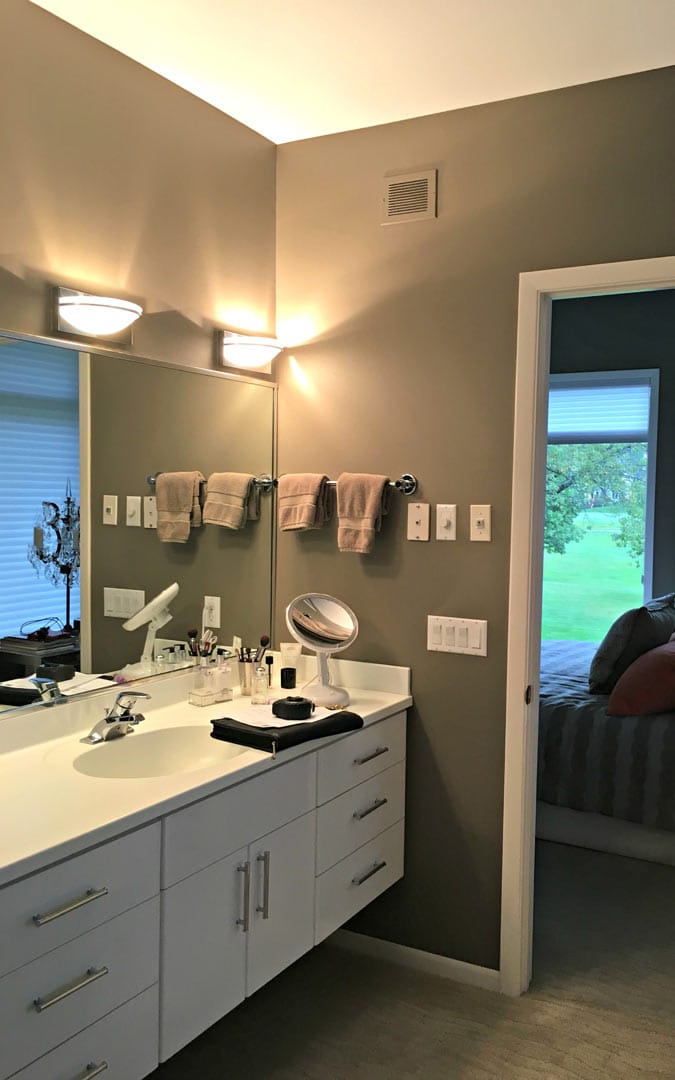
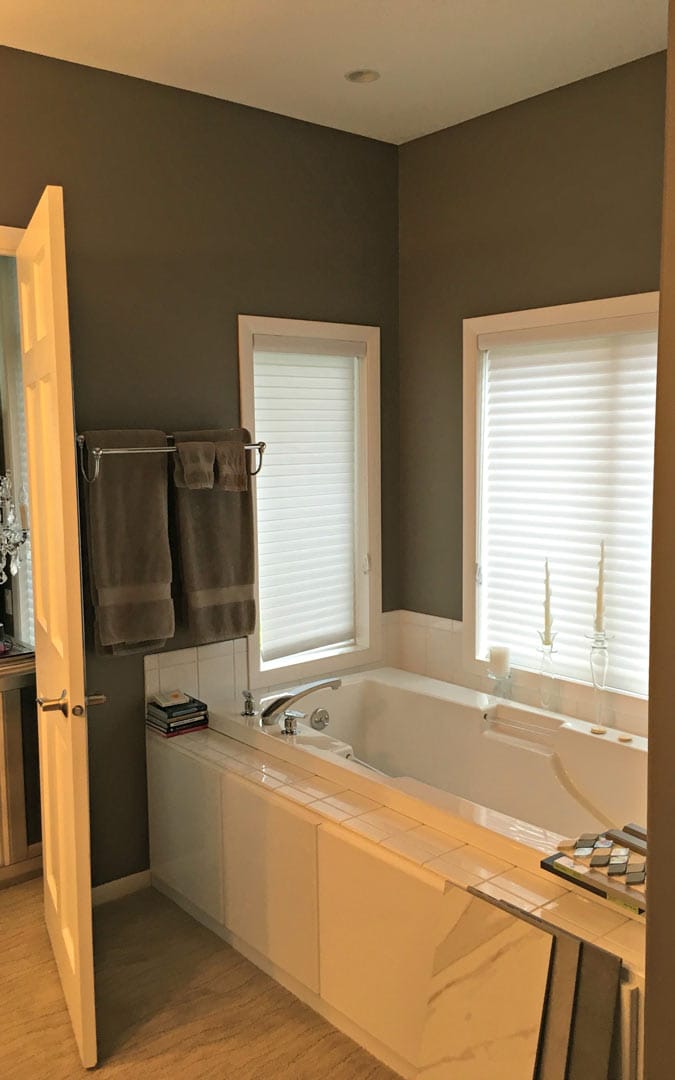
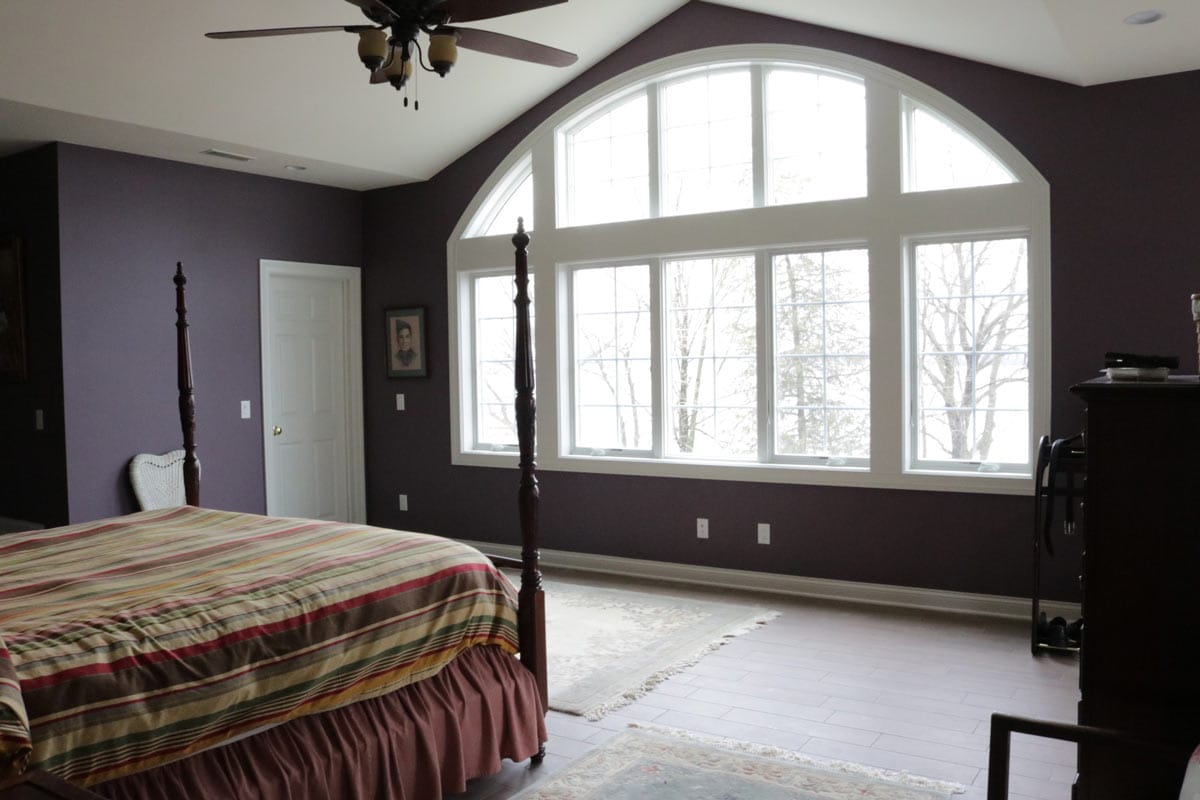
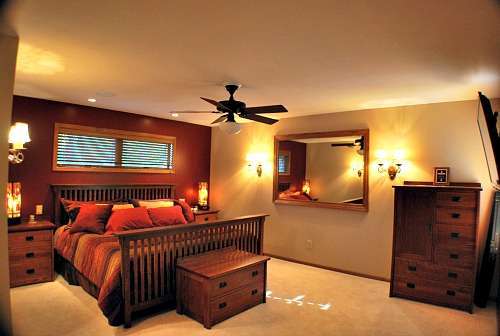
Master Bedroom
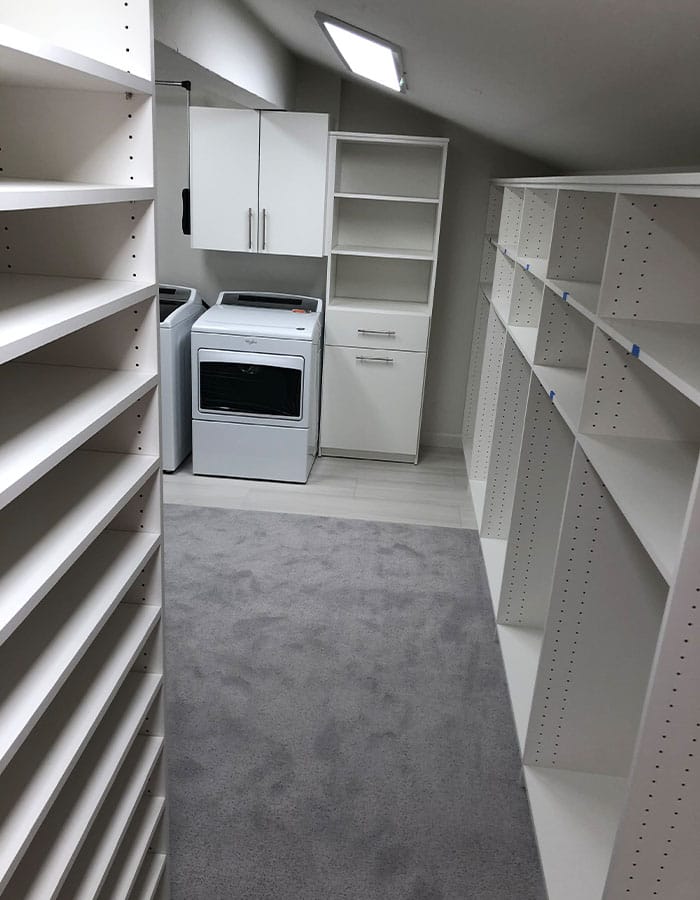
Although the location of the master bath and master bedroom stayed the same, the original floor plan did not have a separating wall between the bedroom and bathroom. This posed an issue for our homeowners and asked if we could partition it off. The dated fireplace was completely removed, and a new wall was constructed in its place with a pocket door, as not to take up any additional useable space from the bathroom, delivering a much more private space. With the removal of the laundry on the main level, our homeowners chose to move the laundry to the second level. The space that allowed for this move was the master closet located in the bathroom. They had more than enough space in the closet, but noise was a concern, mainly if they chose to throw that last load of laundry in the dryer before going to bed. The entire bathroom was insulated to remedy this noise. In addition, the bathroom separates the two rooms making this noise virtually disappear.
Before
After
Understanding that many people wouldn’t choose to have a laundry on the second level of their home, much less in their master suite, the homeowners decided to install a secondary hookup in their mechanical room in the lower level. This also gave them the flexibility of adding a second washer and dryer in their lower-level guest suit if they ever were to have guests for a long extended stay, or it gives future homeowners the choice to move the laundry.
Before
After
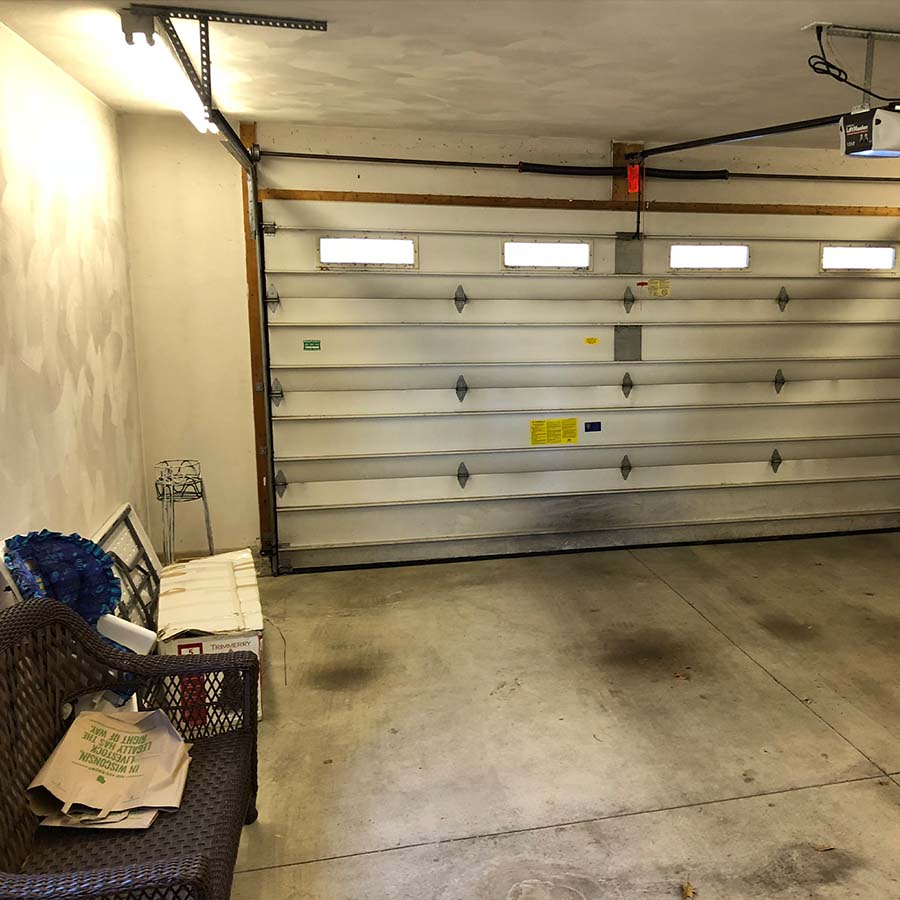
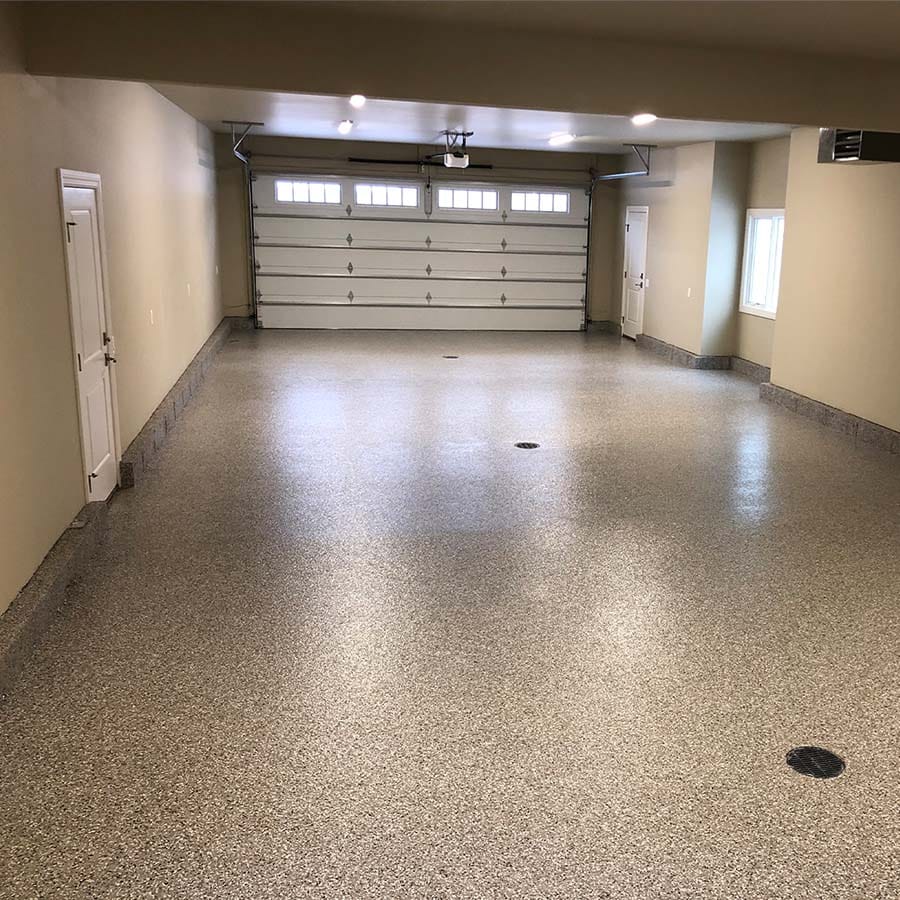
Garage
The last area of the home with a major transformation to its floor plan was the garage. The original two-car garage was cramped, dingy, and cold. It worked well for parking vehicles, but that was about it. Our homeowners were looking for much more space, as well as a heated space that could still be utilized in the winter. The addition created enough space to park four cars as well as have a shop area towards the front of the garage. An added benefit to this homeowner with the elongated design was the fact he could fully back his boat into the garage without unhooking it. The new floor drains ensured that the water that would melt off the vehicles with having a gas heater in the garage would quickly and cleanly drain away. The epoxy flooring would ensure easy cleaning and help to eliminate the grease stains that persisted in the original garage.
Before
After
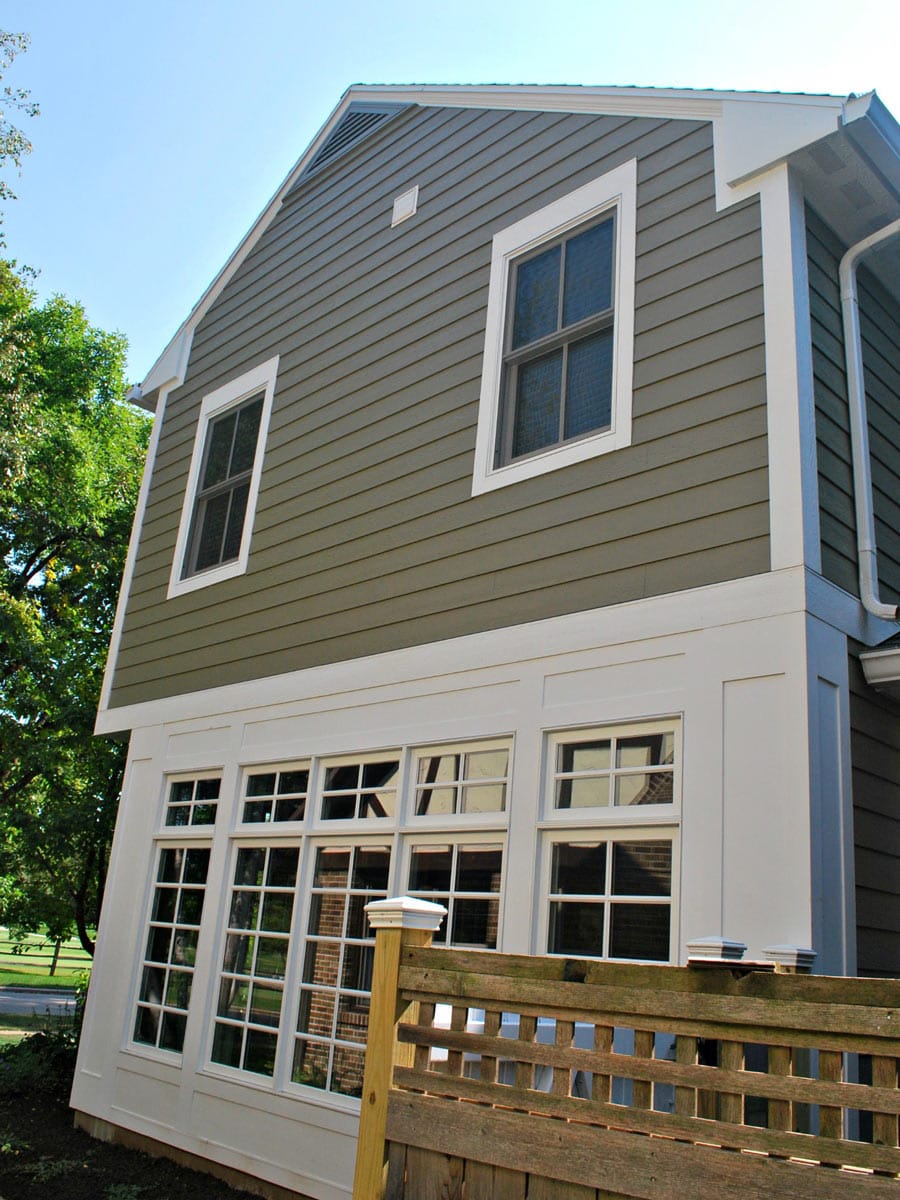
Exterior
Like mentioned last month, the exterior was a huge challenge to overcome. The windows and doors were installed improperly when the house was initially built, and there was a large amount of water damage and rot that needed to be replaced. The largest concentration of the damage was the rear turret, where the majority of the turret was reframed. The remaining exterior was received new windows and doors, new siding and stone, new decking and railing, and a roof with the insulation being sprayed in the majority of the house from the inside.
Before
After
Completed Project
This remodel was one for the books. It had more than its fair share of obstacles to overcome; however, they weren’t too much to handle. Our team can take on the toughest challenges and create the smartest solutions for any project.
Before
After
Before
After
Before
After
Considering a Renovation? Simon Builders can help!
Here are some questions to ask yourself before you begin thinking about the redesign process.
What is my budget? Can I achieve the design I want? What are my goals for this redesign? Who do I call for help?
The last question is easy enough- our design and sales team will help you find the right look and quality products to transform your home. We have the years of experience to guide you through the process from start to finish! Contact us today to get started.
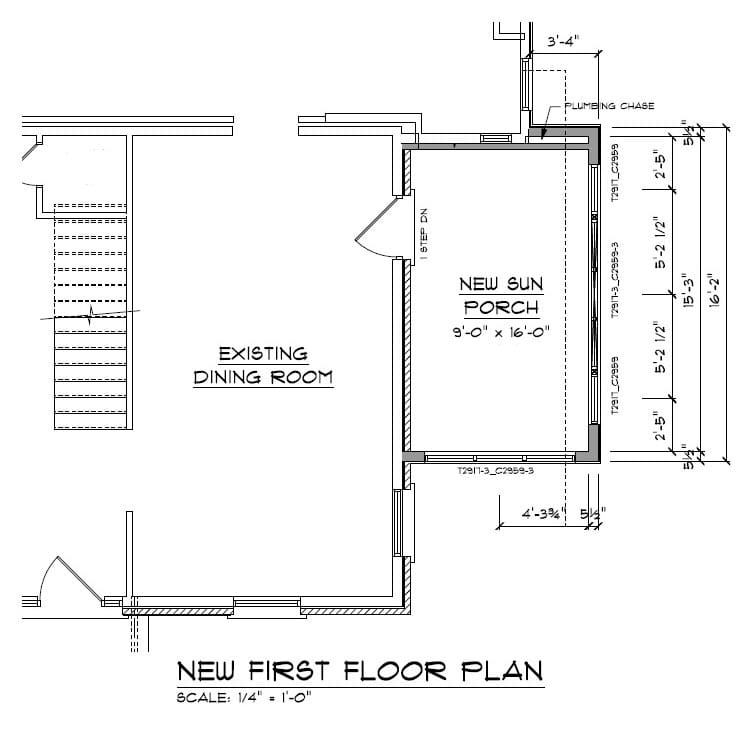
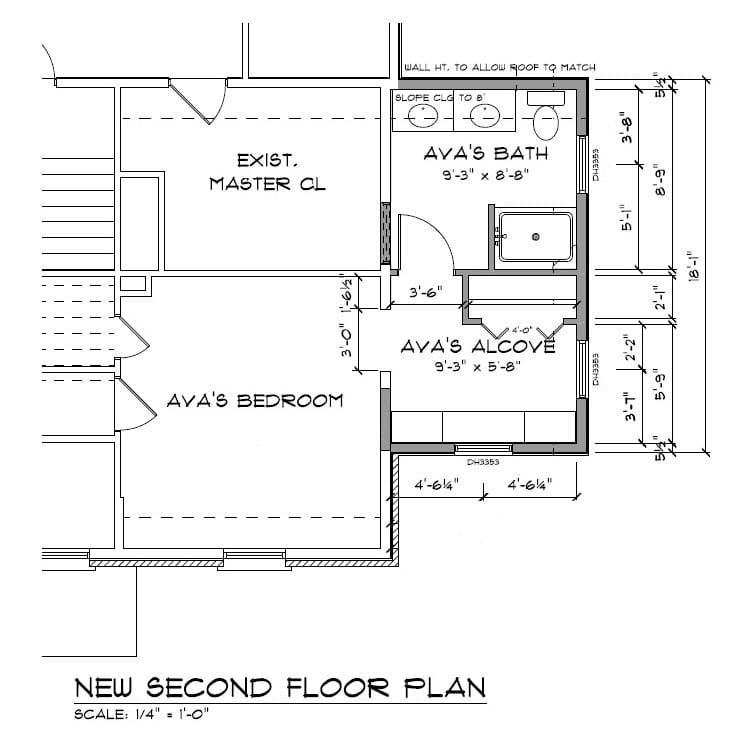
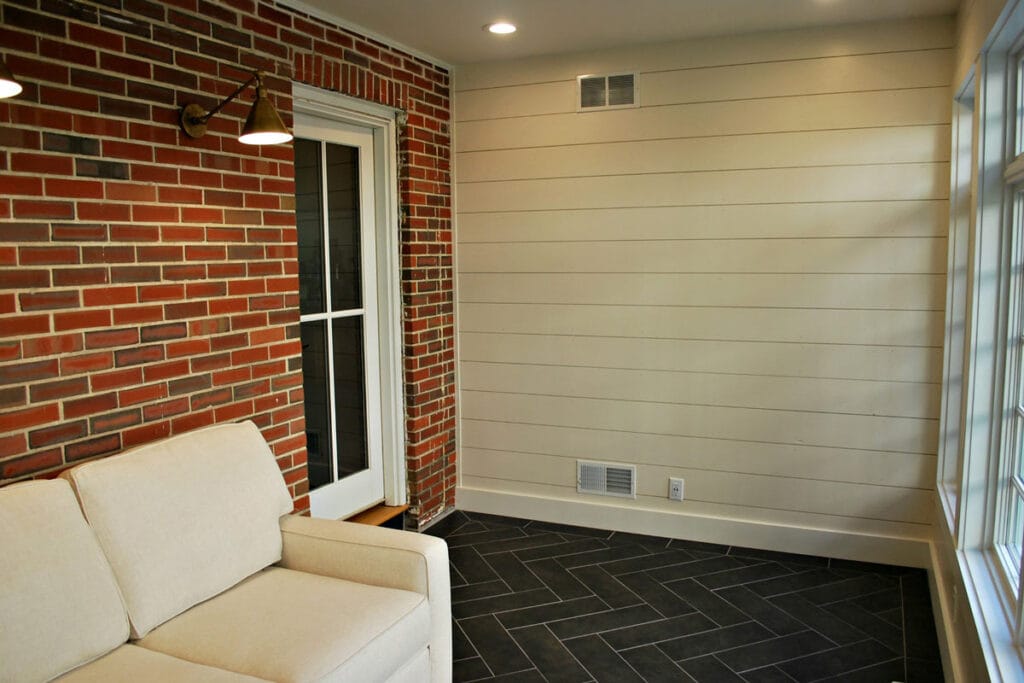
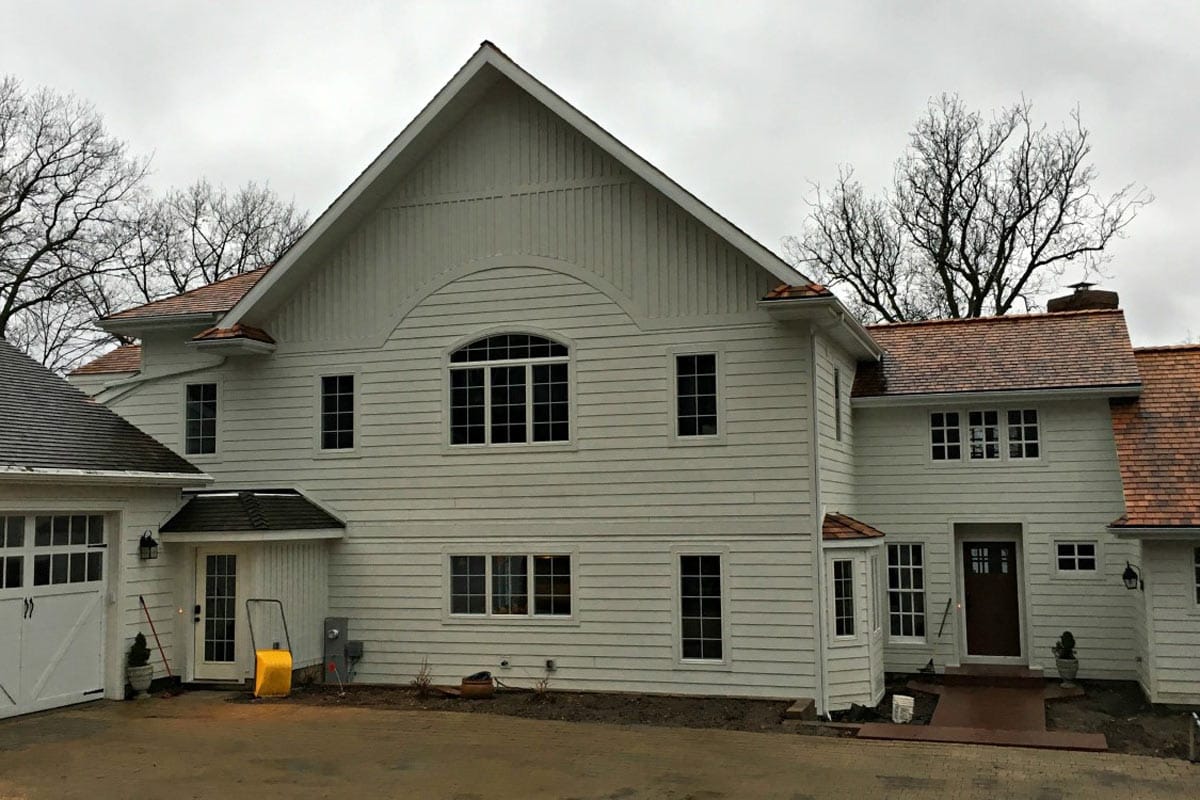
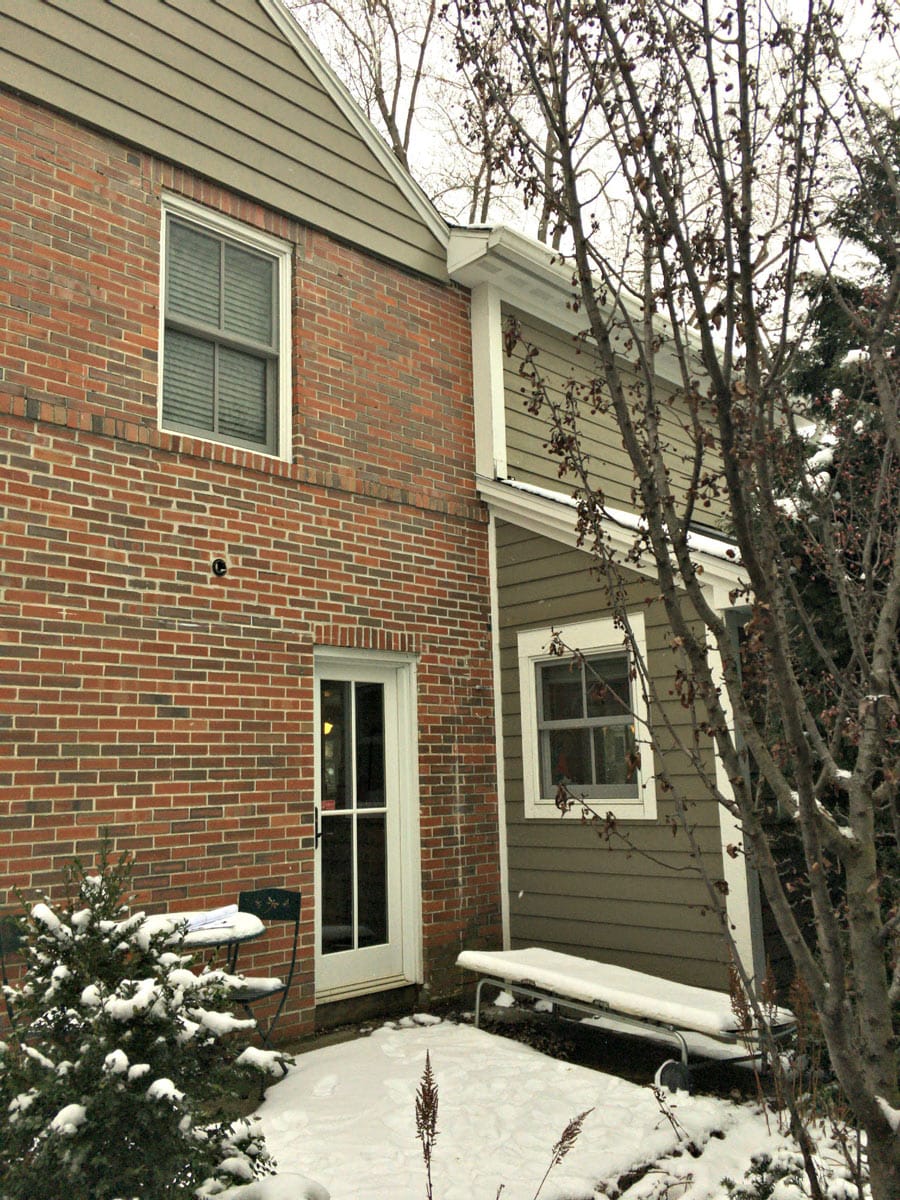
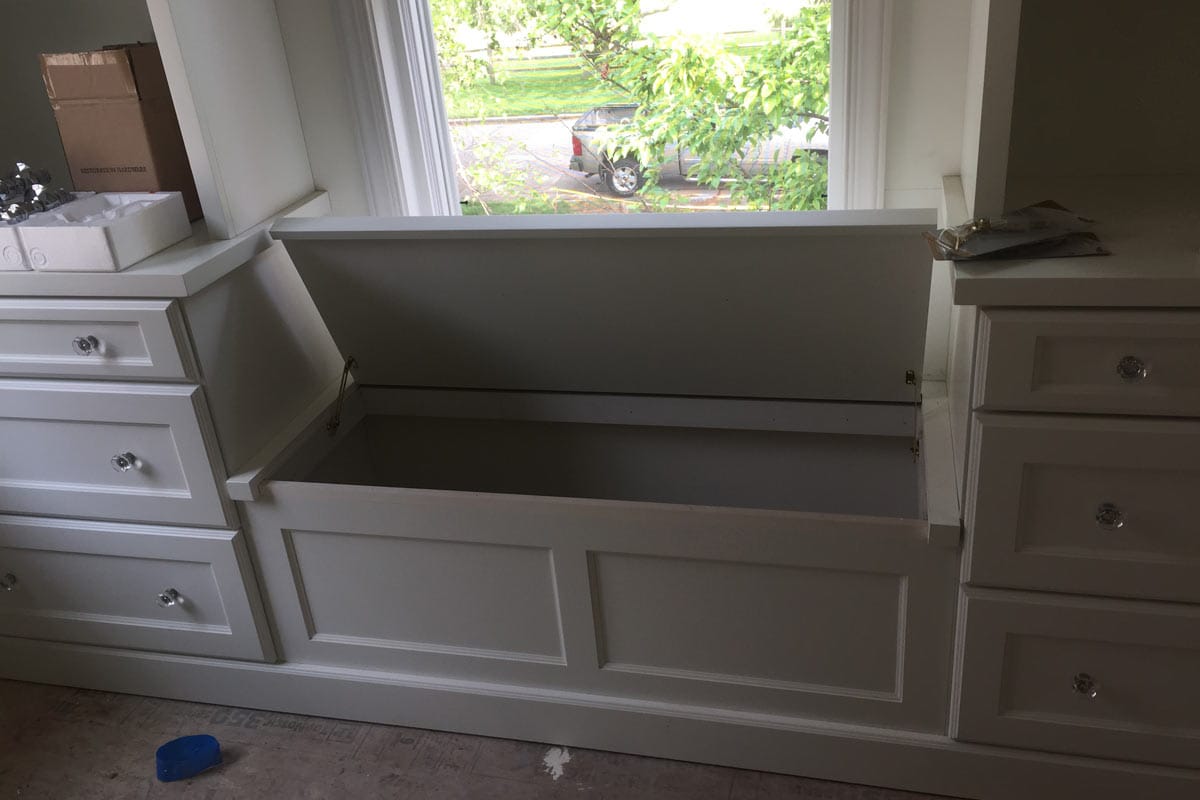
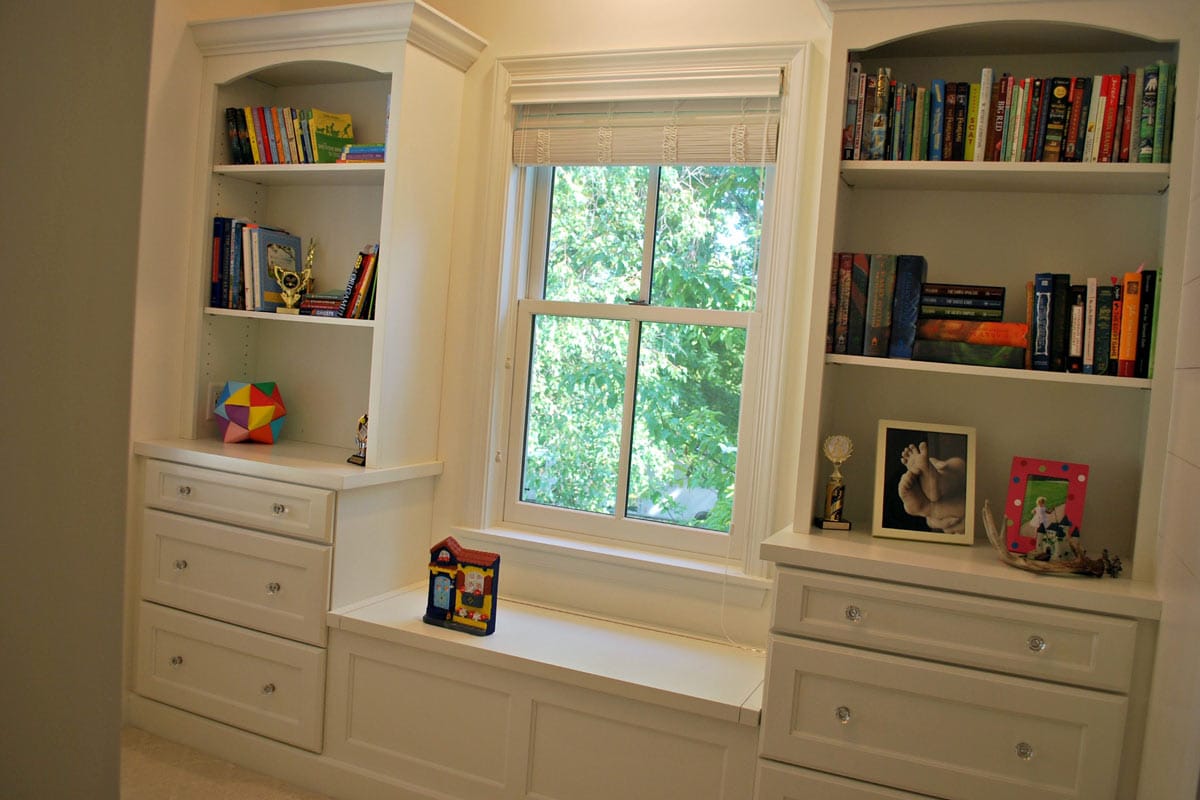
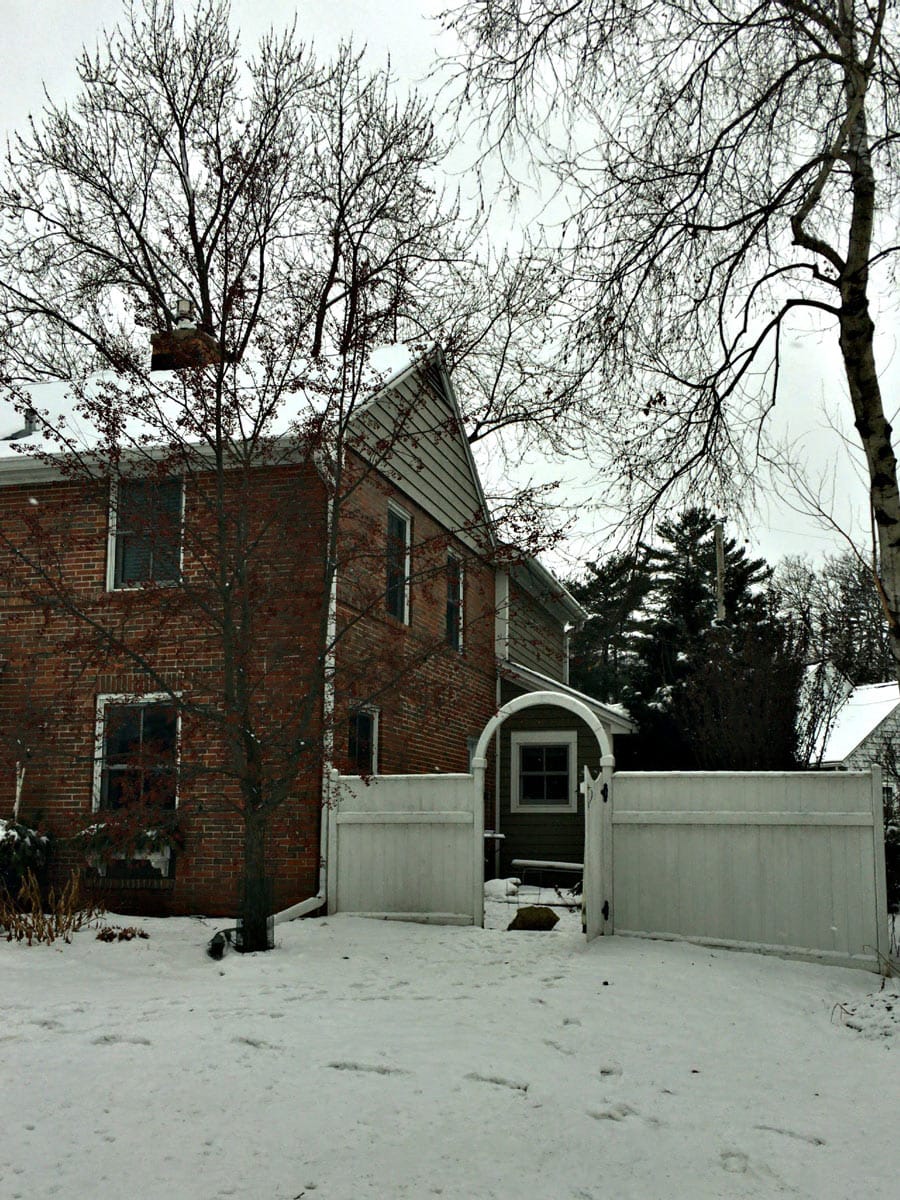
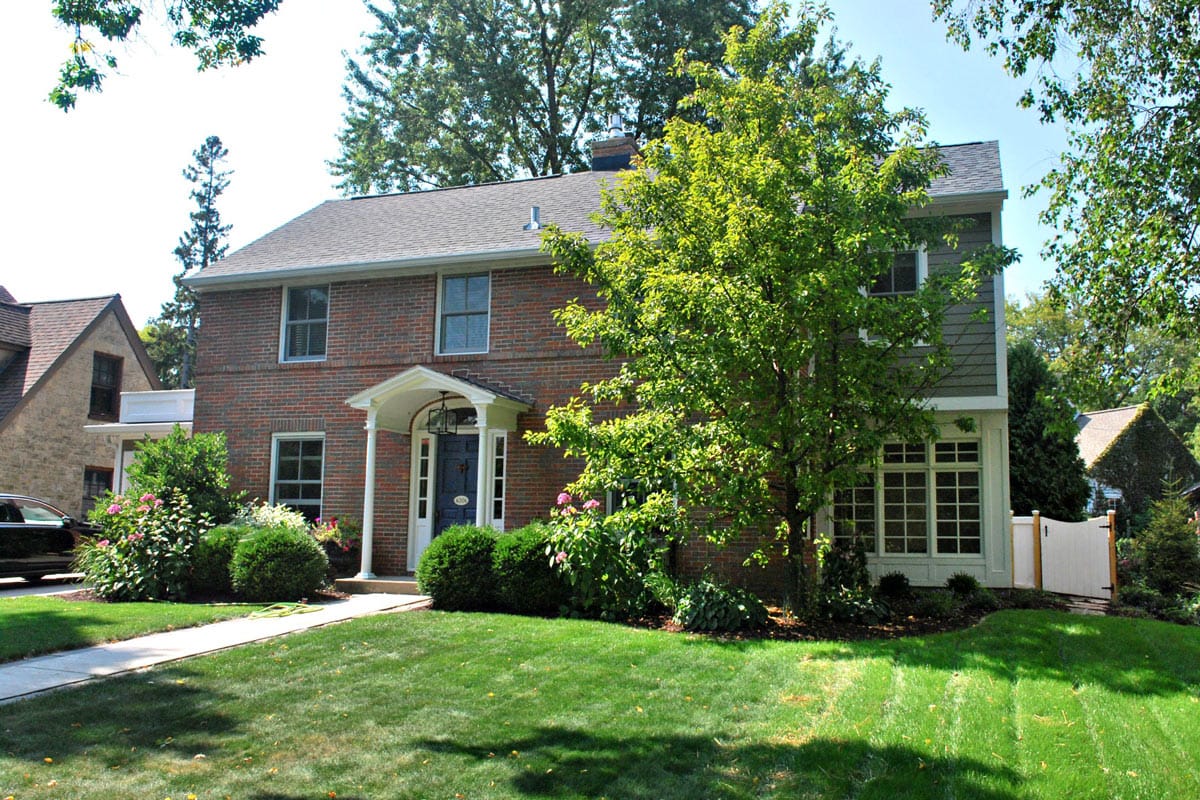
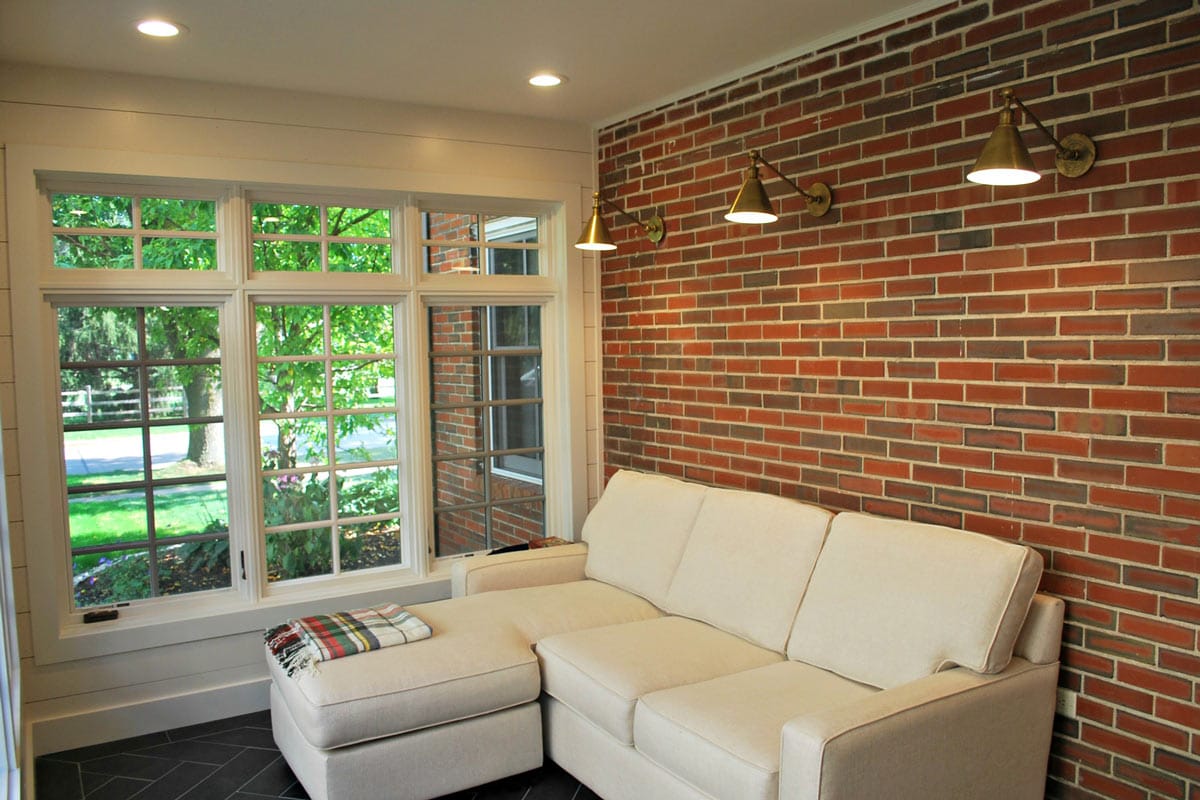
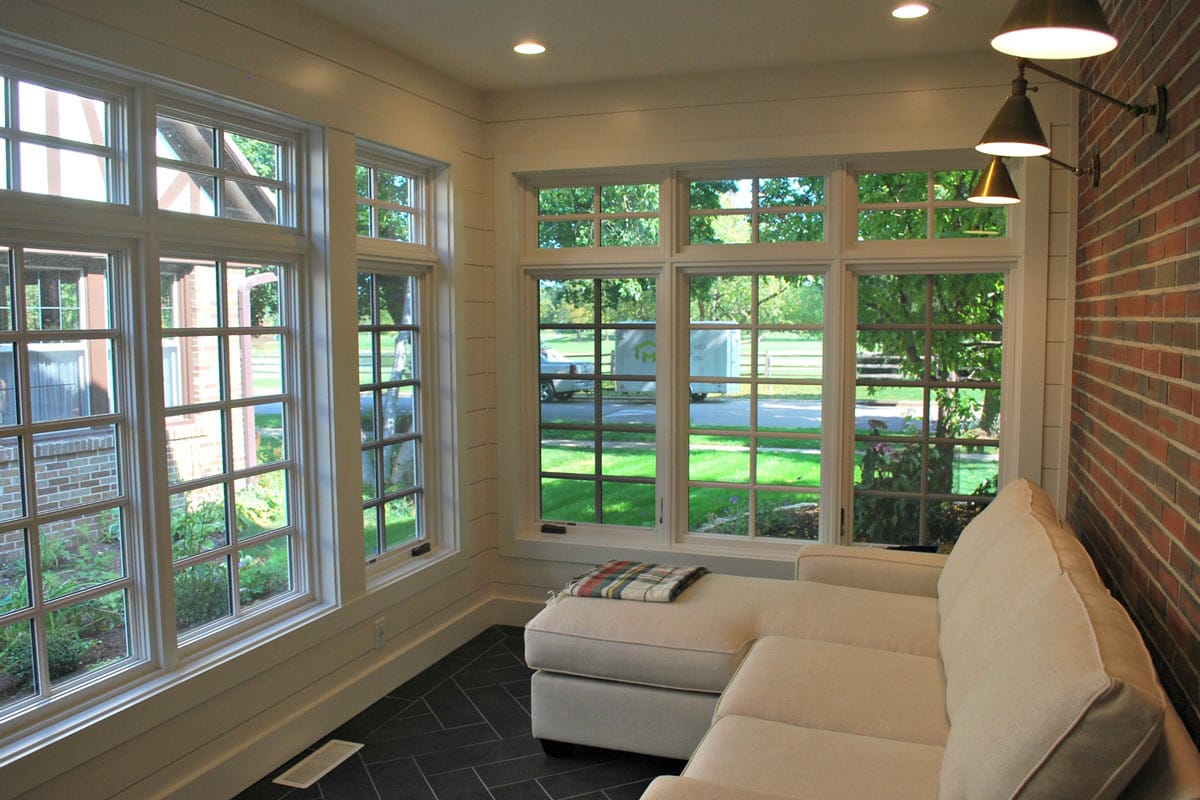
Our featured project this month started with a 90-year-old home and a family that wanted some additional space. We had talked with them about a few different projects like a screened porch on the first floor, a Sun Room addition on the first floor, a second-floor addition or some combination of all of these ideas. They ended up wanting to add a heated and cooled Sun Room on the first floor with a bathroom and alcove above it connecting to their daughter’s bedroom.
Sun Room Addition
By adding the new Sun Porch to the first floor, we were able to add valuable space to the first floor that the entire family could use and enjoy. This allowed us to add a bathroom and a closet to connect to their daughter’s bedroom right above it. The alcove provided additional storage space and a great transition into the new bathroom.
Drainage Re-Routing
Early on in our discussions about remodeling and adding onto the existing home, we were informed that there were existing drainage problems in the backyard where the existing slope of the yard was pitched back towards the house. The water coming from the downspouts and even the sump pump was contributing to the drainage problems. After looking at the neighboring yards and discussions with the city, we came up with a plan to add an underground pipe out to the street that would tie into the city sewer system. We were able to incorporate the existing downspouts as well as the sump pump into this pipe. Now that the project is finished, it’s hard to believe we had made such mess in the front yard and had re-poured two sections of the sidewalk. What a great feeling it will be to have a dry backyard without any more water issues.
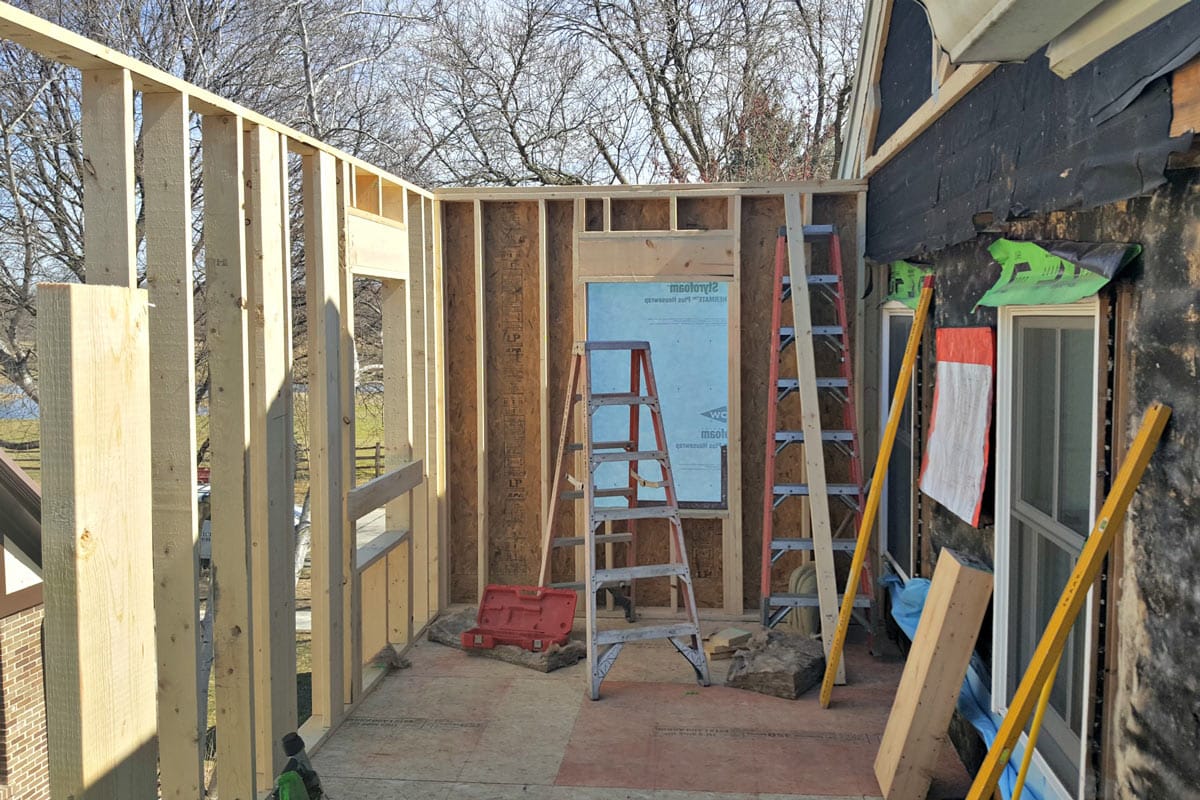
While designing the new Sun Porch, we were able to keep the charm of the old home by leaving the existing brick exterior wall in place. By carefully cutting the brick vertically, only where the new walls tied into the existing exterior wall, we were able to flash and seal the new addition properly while retaining the beautiful brick wall.
Aesthetics
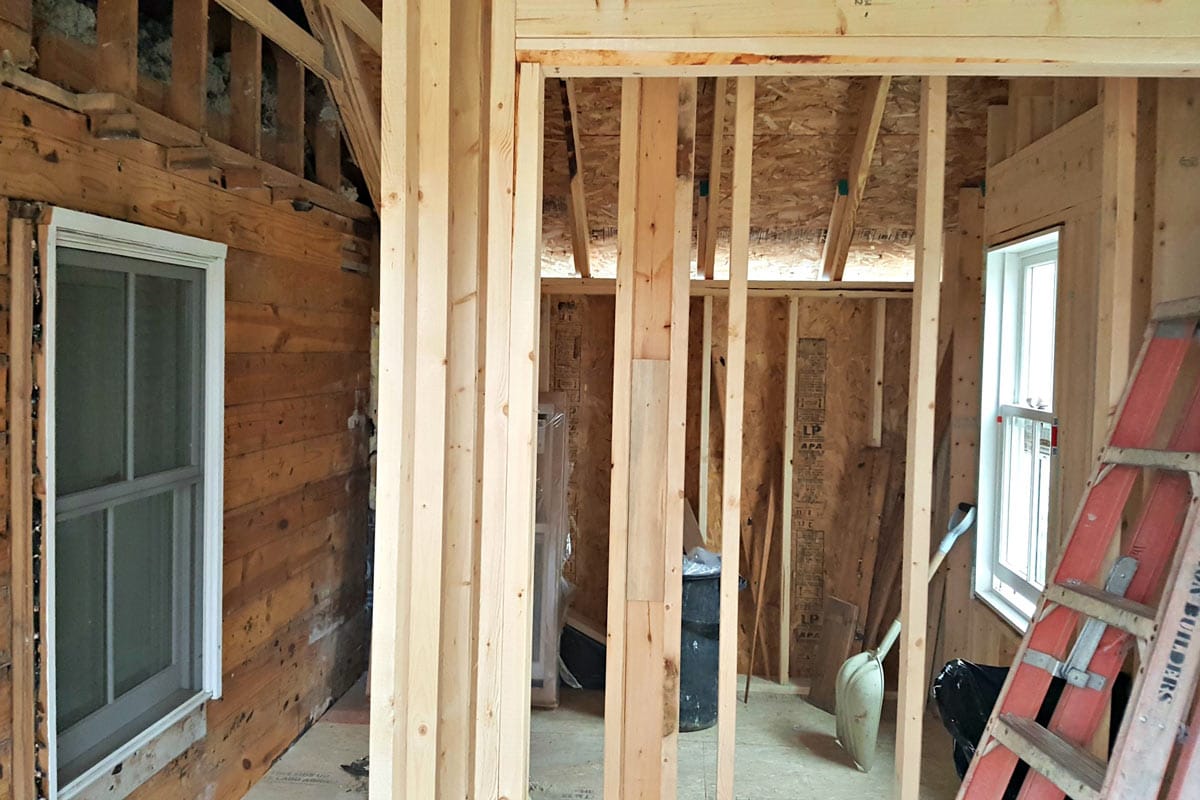
It was important to us to minimize our disruption to the family while we were working in and on their home. We were able to frame the entire new addition and get it weather-tight before opening up the second-floor wall and connecting it to the existing bedroom.
Attention to Detail
There were a lot of discussions early on about what mirrors and lighting would look appropriate in the new bathroom. These scenarios were drawn onto the wall in marker during the drywall stage to help the homeowners visualize how it would look. Beautiful tilting mirrors with candle style lighting fixtures to the sides of them were chosen. Here you can see the templates that were made to show the size and locations of the mirrors before they were permanently installed.
Most people will probably not notice the repetition of the style from the white wood panels on the existing garage and the new addition and how it was carried inside. The new bench in the Alcove was built using the same two-panel style as the exterior details. The drawer fronts even have that same look and feel while maximizing the usable storage space.
This addition was a breath of fresh air for our clients and this home. By adding these new rooms, they were able to make their home fit their family better. We were able to not only add usable space to the first floor, but also add a bathroom and storage space to their existing bedroom and fix the drainage problems around the home, all while retaining the charm of this old home.
We are just as excited about how the finished project looks as the homeowners. While the existing tree in the front yard hides most of the new addition, it stays true to the existing look and feel of the existing home by using the same materials and detailed panels as the other areas of the home.
Considering a home renovation? Simon Builders can help!
First, for any large renovation give us a call!
Next, whether you have a new property to fix up or want a big change in your current home, we are here to help! When thinking of a large-scale remodel you want to be sure your new space is cohesive and will be a space you will enjoy for years to come. The Michael F. Simon team has seen a great variety in style and design – and we love them all! We are happy to help you find the right look for your home. Every remodel starts with a conversation about what you need in your home and what you want in your home before we begin the pricing and design for your project.
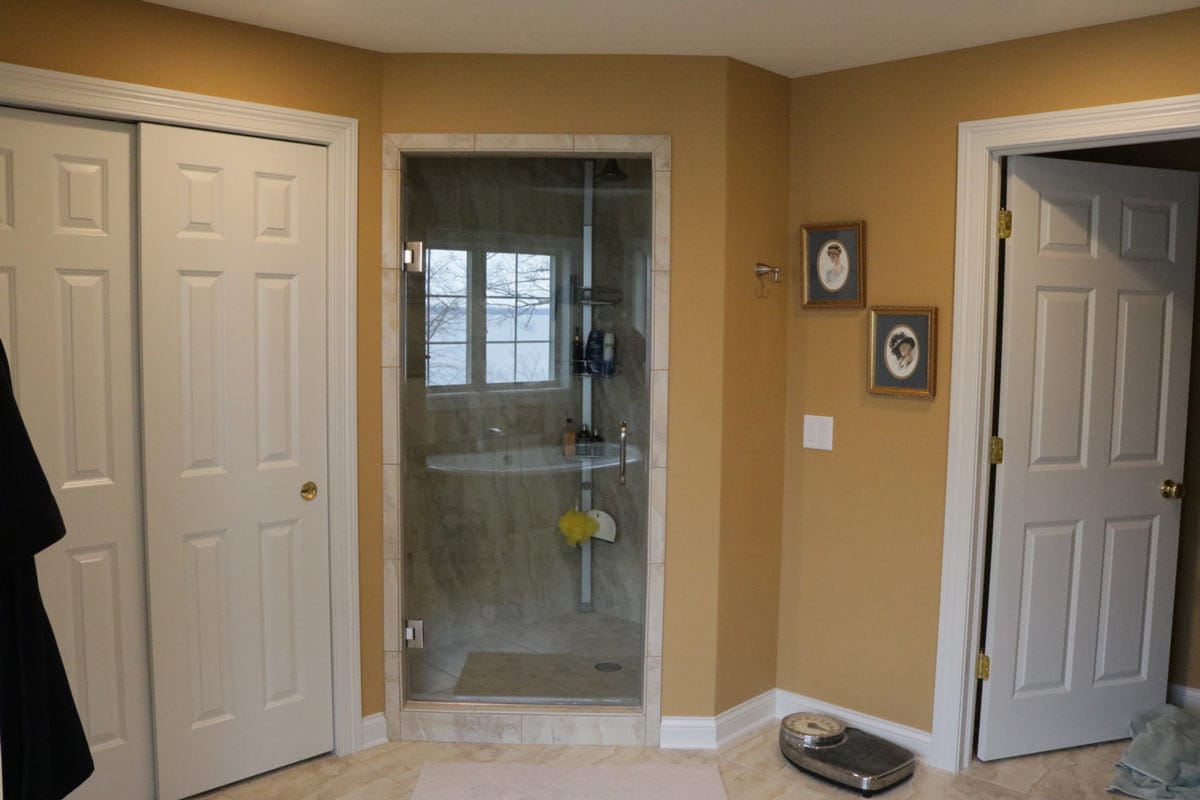
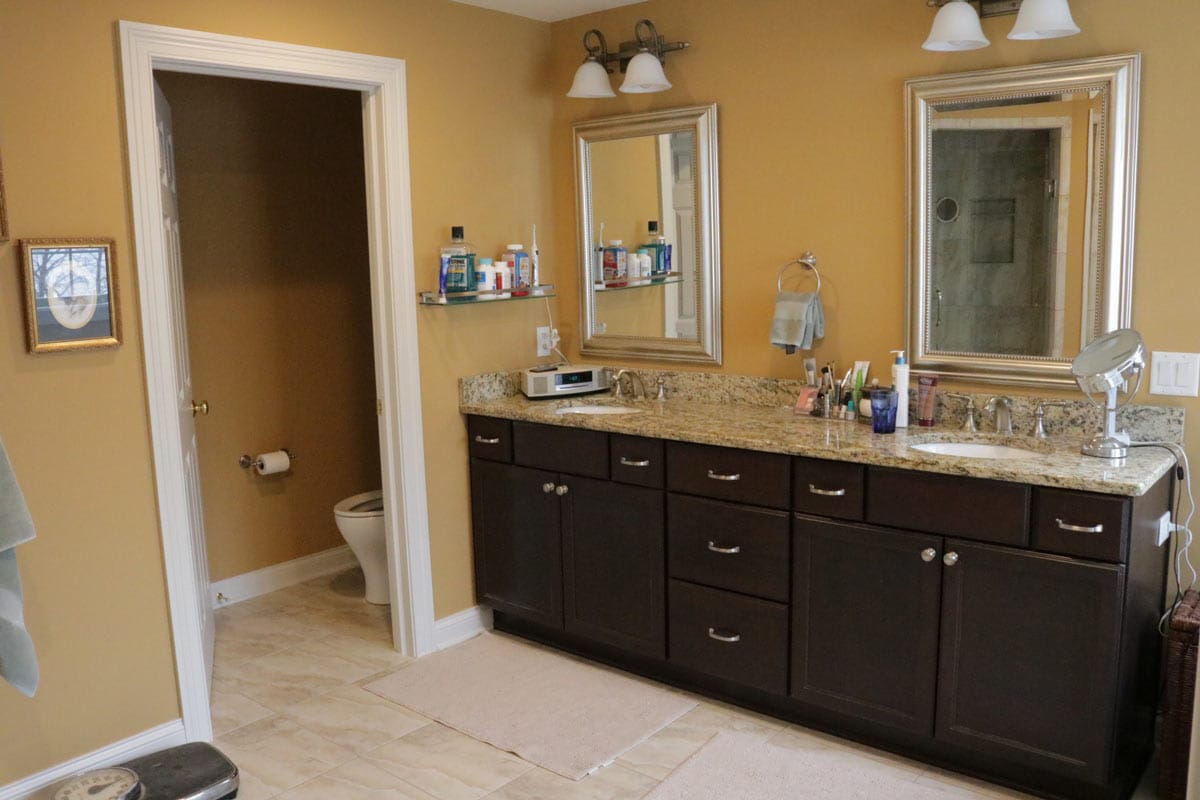
This month’s featured project was anything but typical. Michael F. Simon Builders were brought in to help transform the traditional-style 106-year-old home into an updated luxury lake home. The existing home was separated into numerous smaller-sized rooms, typical of a 100-year-old home.
Second Story Removal & Additions
The existing second floor was removed and disposed of and additions were put on the back and side of the home before a new second floor was built over the entire structure.
The new floor plan required extensive planning and engineering to ensure the open floor plan had adequate support for the new second floor and roof system. The homeowners wanted to add an open concept and luxury finishes.
Before
After
This open concept allows for a much more pleasing and unobstructed view throughout the house. With the addition of energy efficient doors and window throughout most of the house, there is a relaxing view of Lake Mendota from just about every vantage point within.
As beautiful as the view is looking out, the view looking in is just as spectacular. With this viewpoint, you can begin to understand the homeowner’s vision of opening things up. Before the remodel, you can see the small portioned off rooms typical of building 100+ years ago. With a little engineering and problem solving, you can see how the space was really opened up during construction. This forethought and planning allowed for and set the stage for the beautiful high-quality finishes that were selected. In the end, a space that is more practical for entertaining and conversation as well as is more aesthetically pleasing has been achieved.
Before
After
With completely reconfiguring the second story floor plan, the homeowners decided to completely do away with the second stairwell that leads down to their family room. This decision allowed for extra square footage in the family room as well as space for another bedroom upstairs.
Before
After
Chances are if you were familiar with the house before the remodel, you would not recognize much of the house with the updates that were performed. However, a few spots such as the kitchen and breakfast nook simply received a refresh. Much of the layout remained the same, however, a few new simple finishes really update the space.
Finished Pictures
When you make your way up to the completely new second story, you begin to realize that the special engineering that was hidden so well right below your feet doesn’t go to waste. The homeowners had a dream master suit in mind that overlooks the lake and this dream was made possible due in part to that engineering. Vaulted ceilings provide extra room for additional round-top windows giving you every possible opportunity to enjoy the beautiful view of the lake. Also included were his and her closets, walk out porch, and a luxurious master bath with walk in tiled shower and beautiful tub surrounded by more stunning views of the lake.
Considering a home renovation? Simon Builders can help!
Do you have a 100 year home that you are looking to reconfigure and are wondering if it’s possible? Give us a call to set up a walkthrough and see how we can improve the look, feel and functionality of your home!
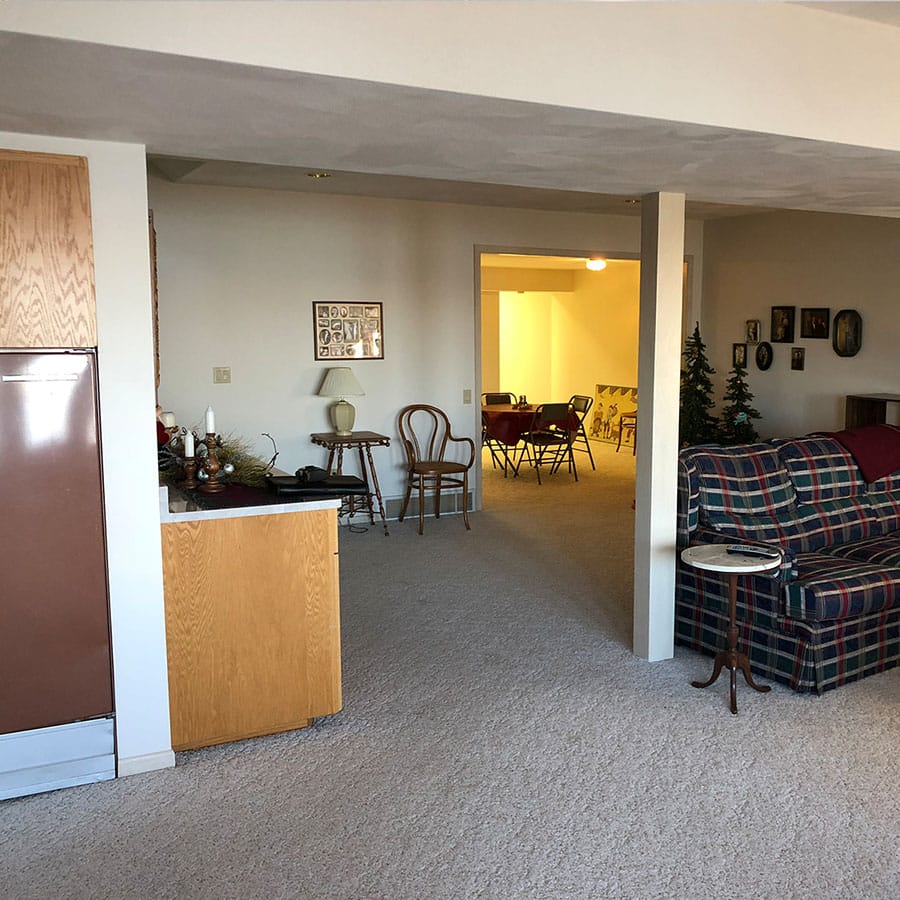
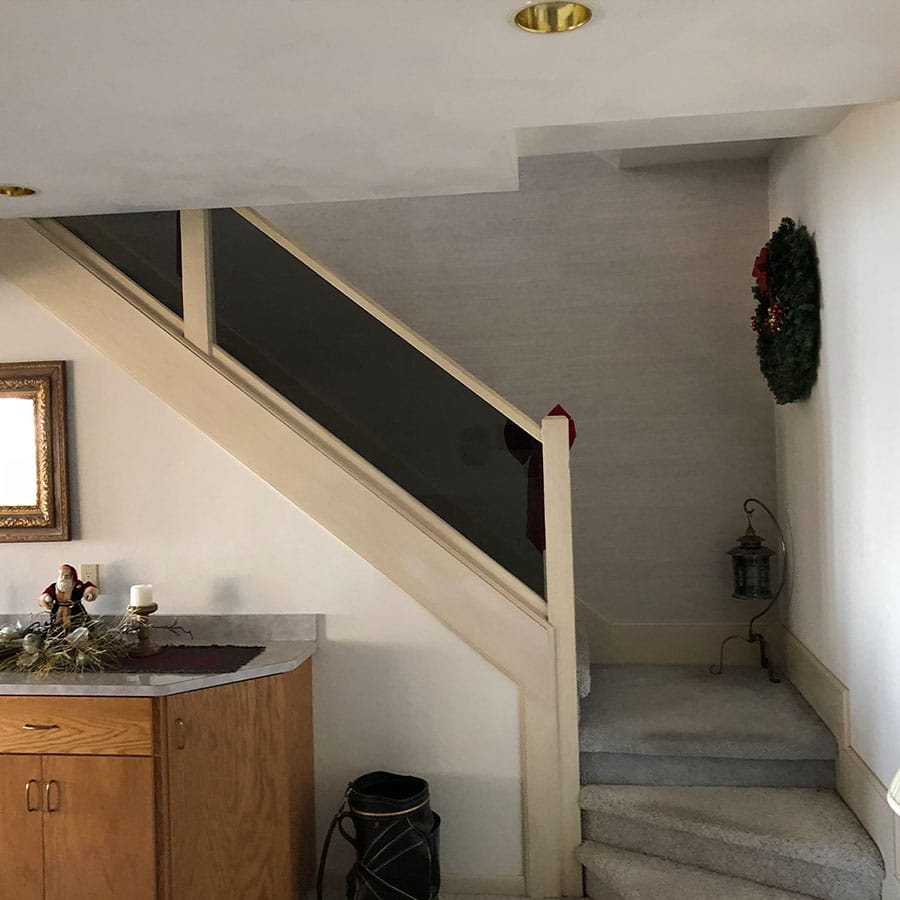
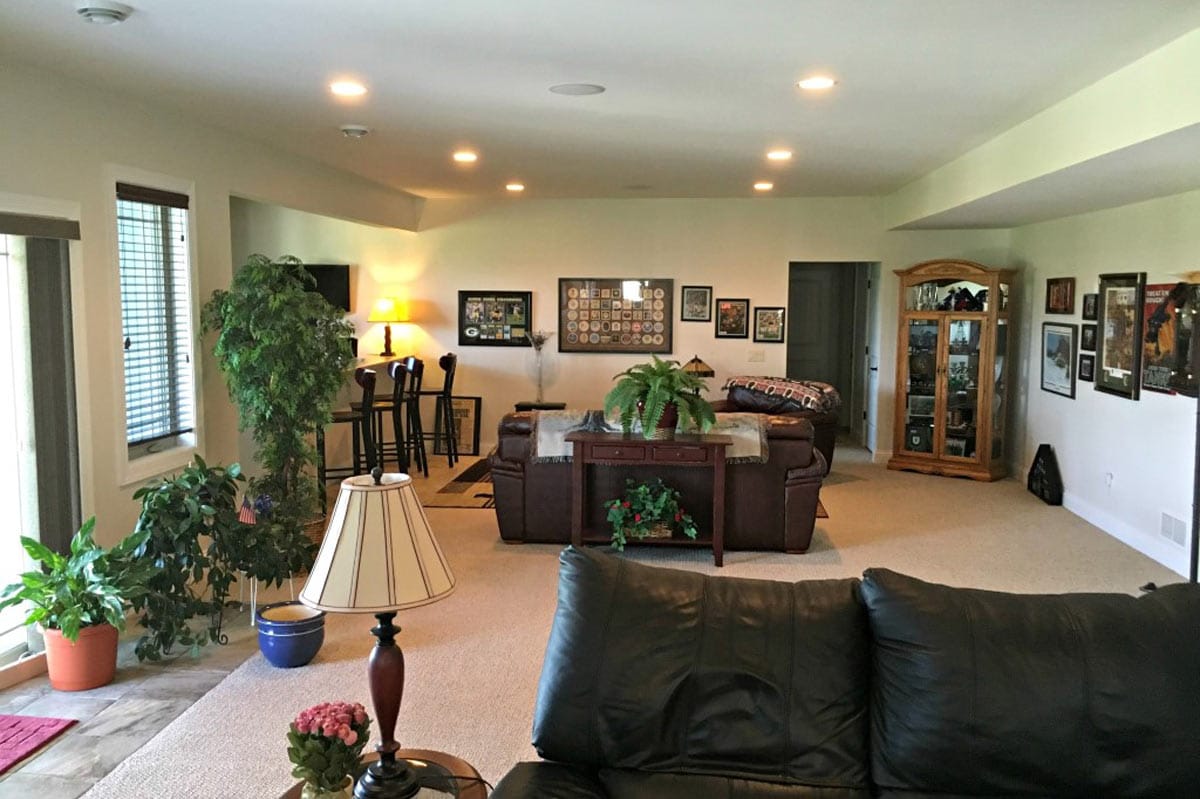
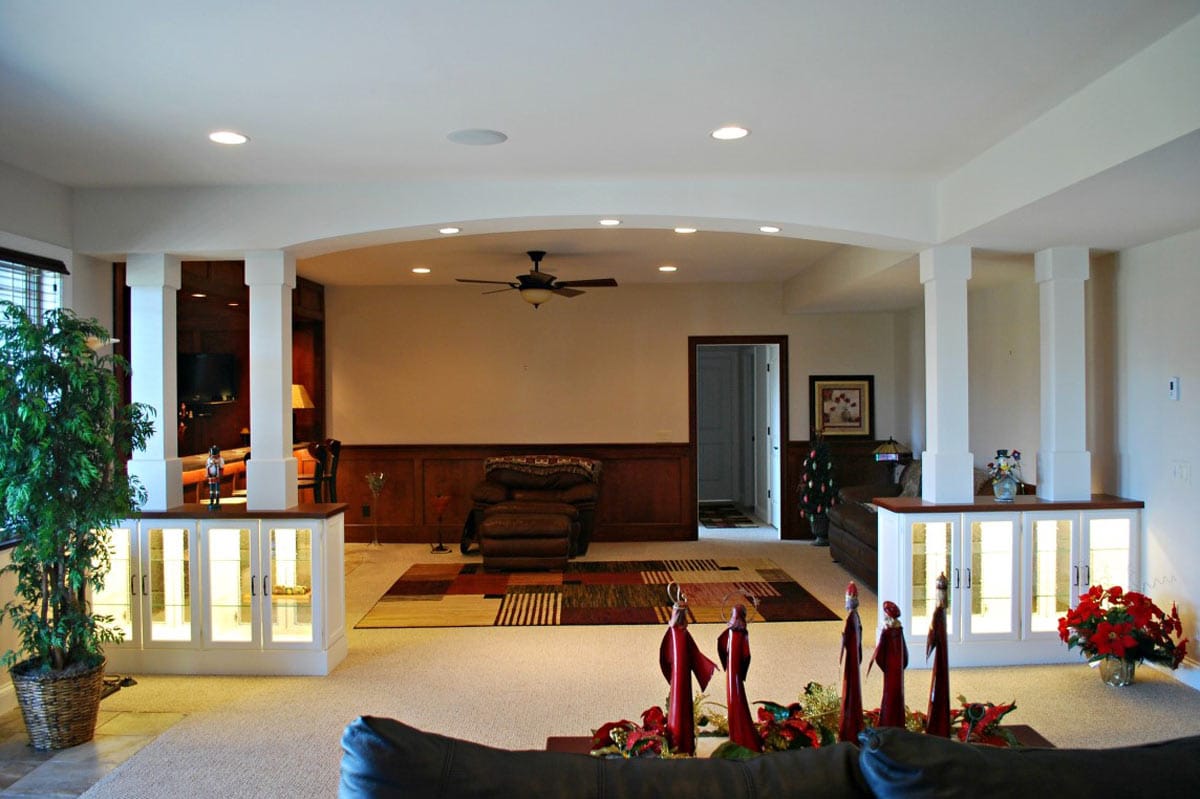
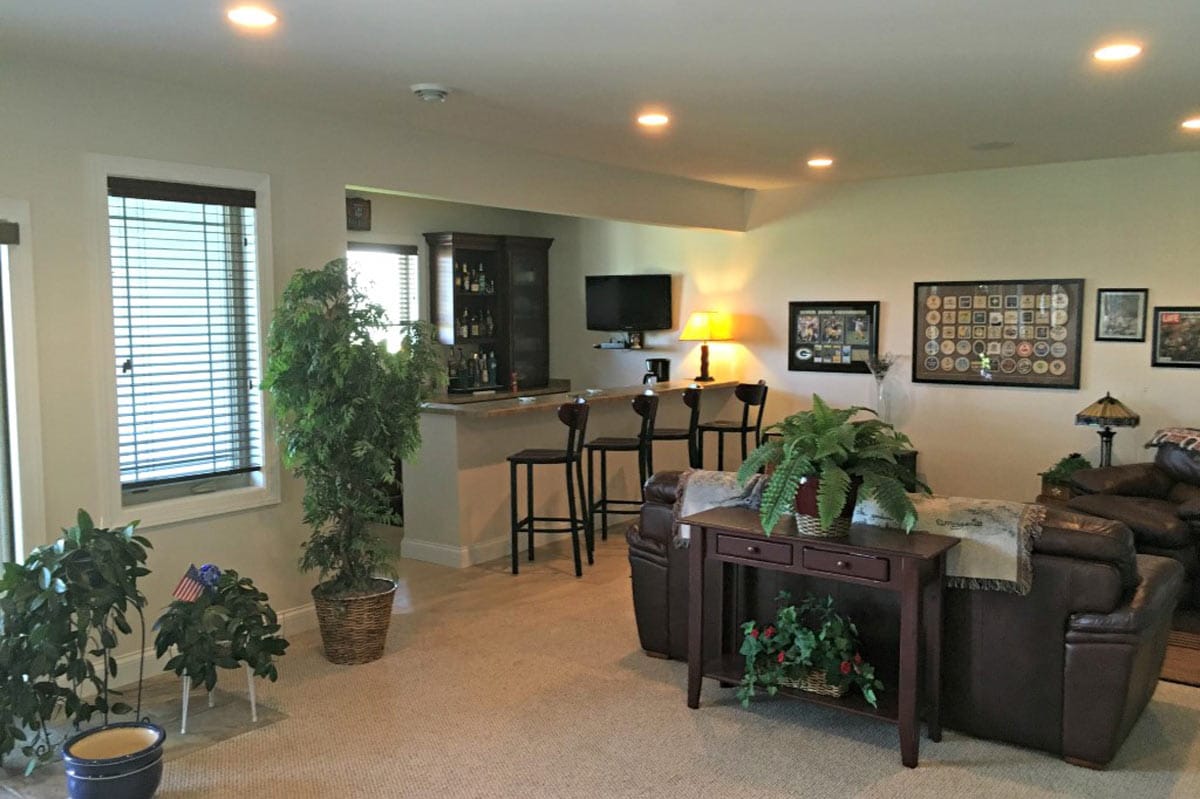
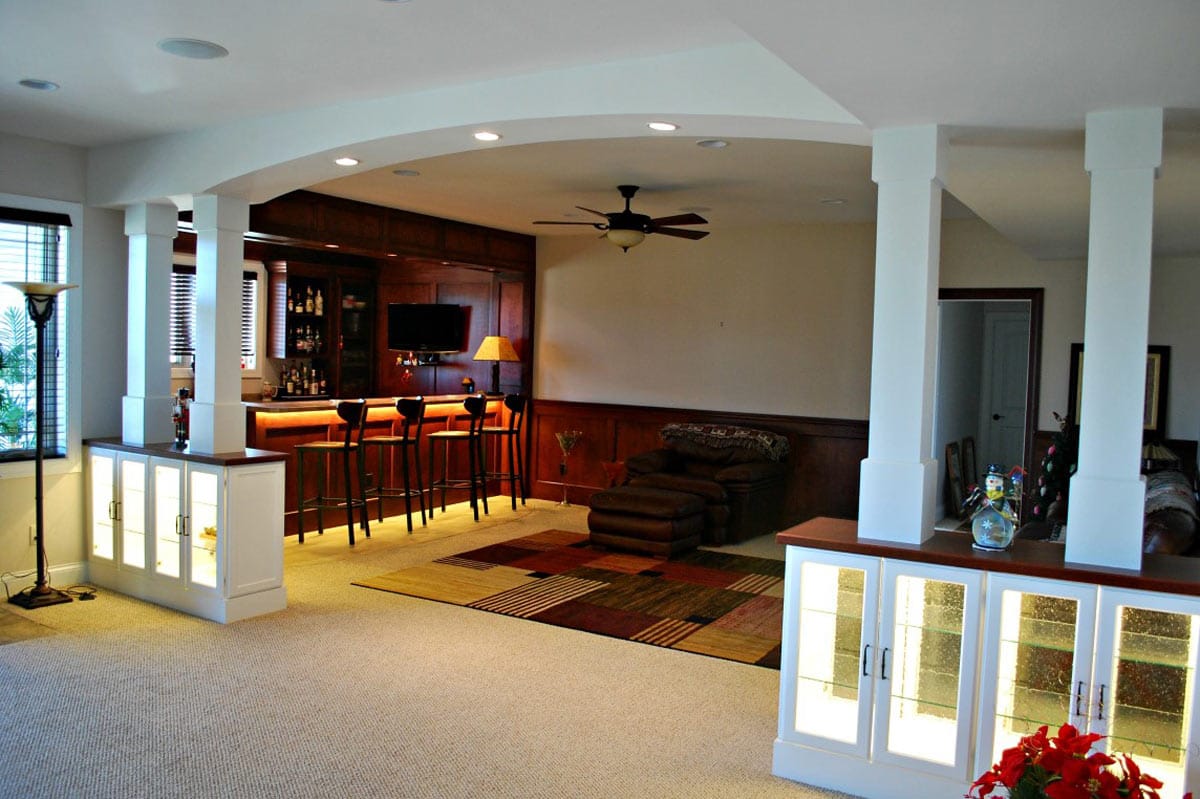
This home was newly built two years ago, and after living in the home, the owners decided that the existing lower level was lacking the look and feel that the rest of the home had. The flooring, walls, and ceilings were all a light color that all blended together. The owners contacted us to help them update the lower level, including the bar area. As they had no idea what they should budget for such a project, they were also looking for cost estimates.
Before
After
Design & Budget Planning
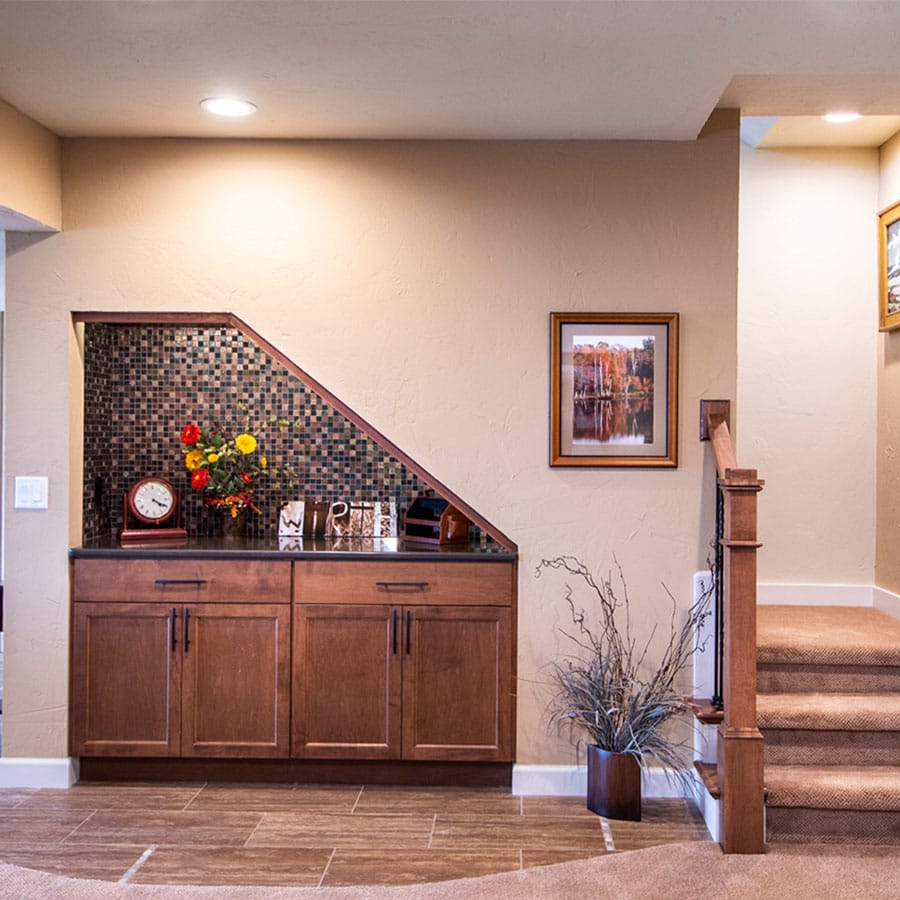
Lori, our in-house designer worked with them on some different designs, and we provided initial ballpark pricing with a list of additional ways they could add to, or reduce the overall price. We call this our “shopping list,” as it makes it easier to make an informed decision when you know what the associated costs are. This list included things like adding masonry on the front of the bar, (which would drive the cost up a bit), as compared to having the same wood panels as the bar area and adding wood paneling to other walls in the lower level.
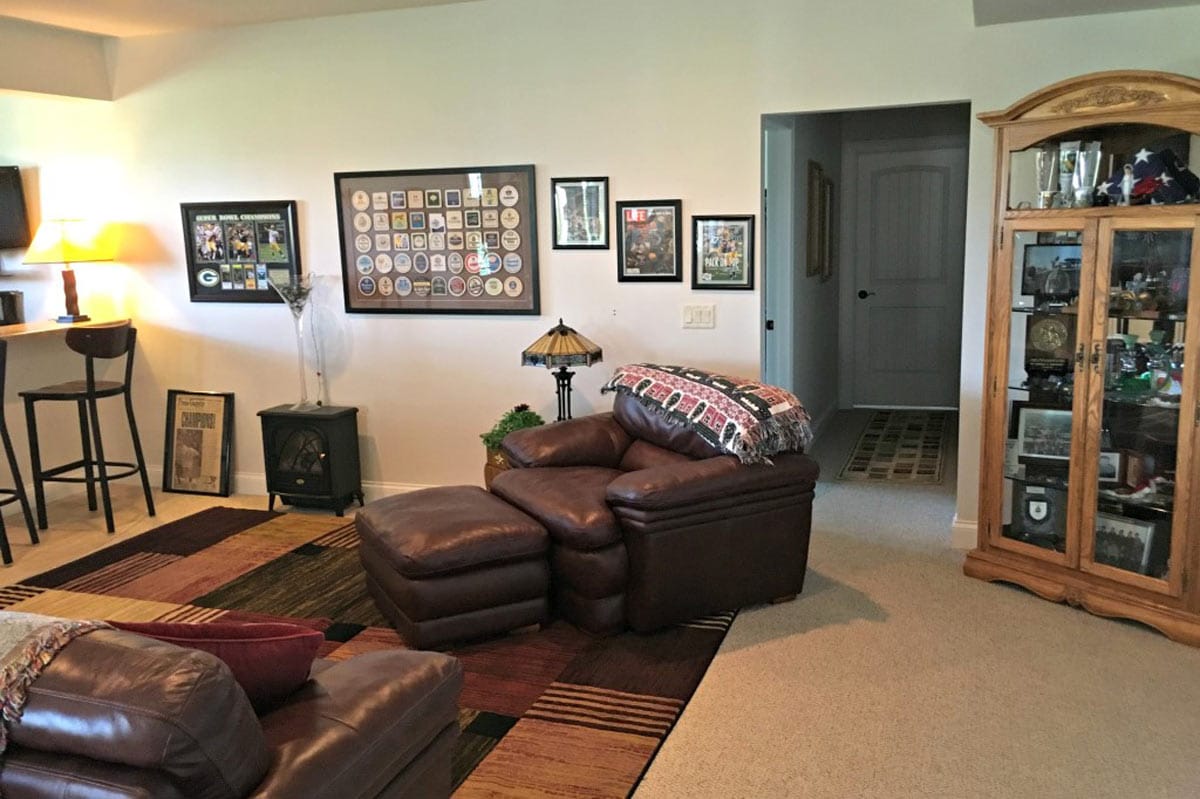
After a few meetings spent discussing various options and looking at pictures that the owners found on Houzz, the plans were set. We would help them dress up the entire lower level by creating an archway with built-in cabinets and columns to help separate and define the family room, with the TV and fireplace, from the bar area. The side of the room with the fireplace would remain as it was, while the bar side of the archway divider would have stained wood wainscoting installed on the walls, as would the entire bar area.
Before
After
The archway helps transition the two spaces by combining the look of the new white cabinets, similar to the fireplace surround and mantel, with stained wood countertops to match the new wainscoting. A seedy-texture glass was used in the new base cabinets to match the existing glass inserts in the bar cabinets.
Before
After
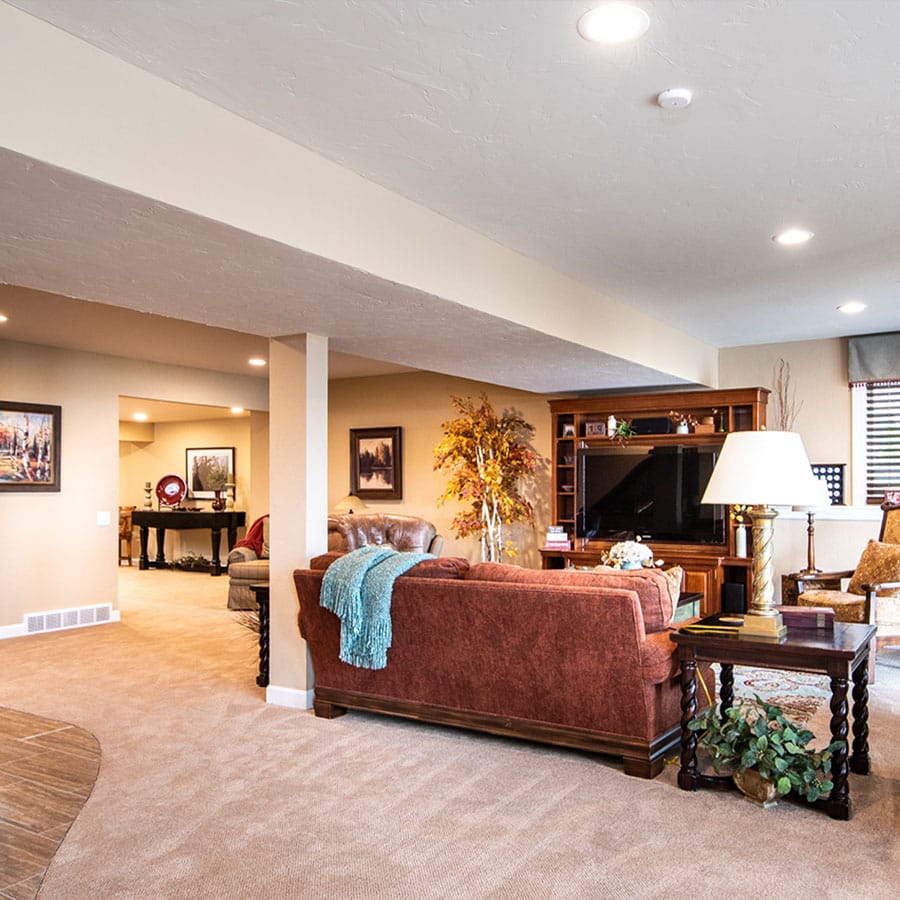
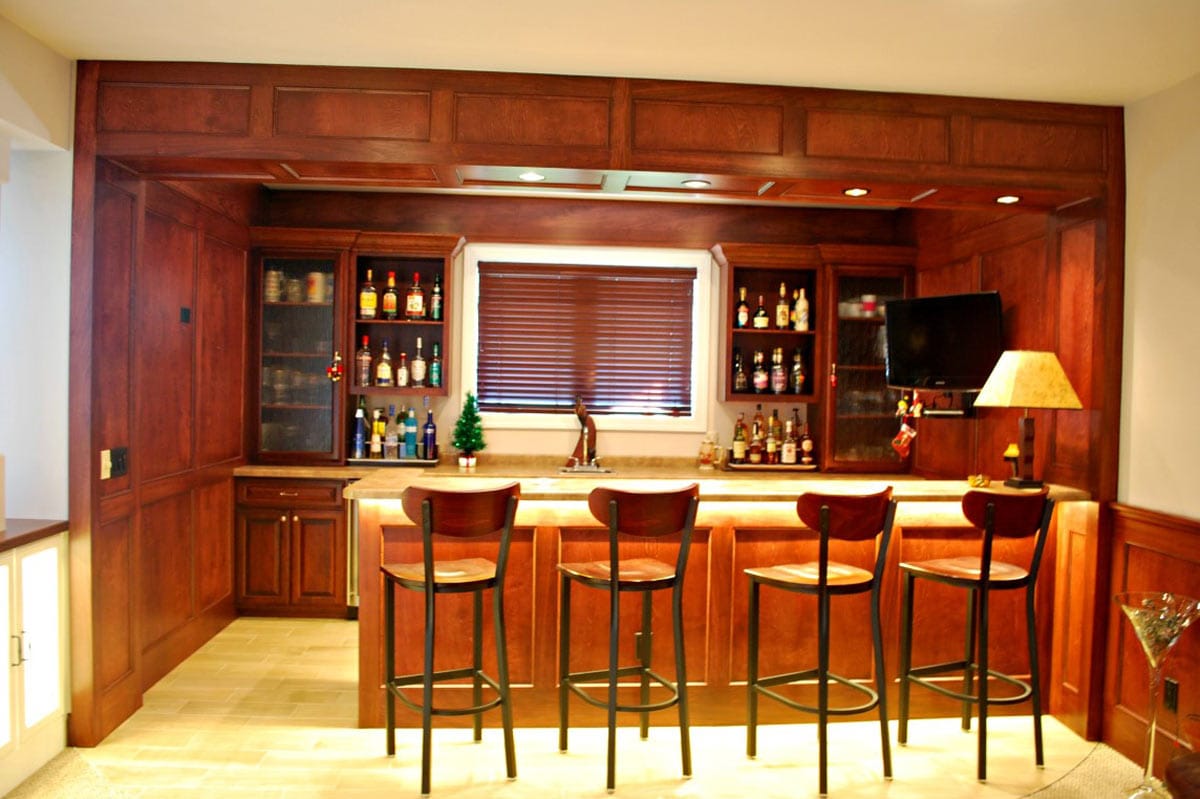
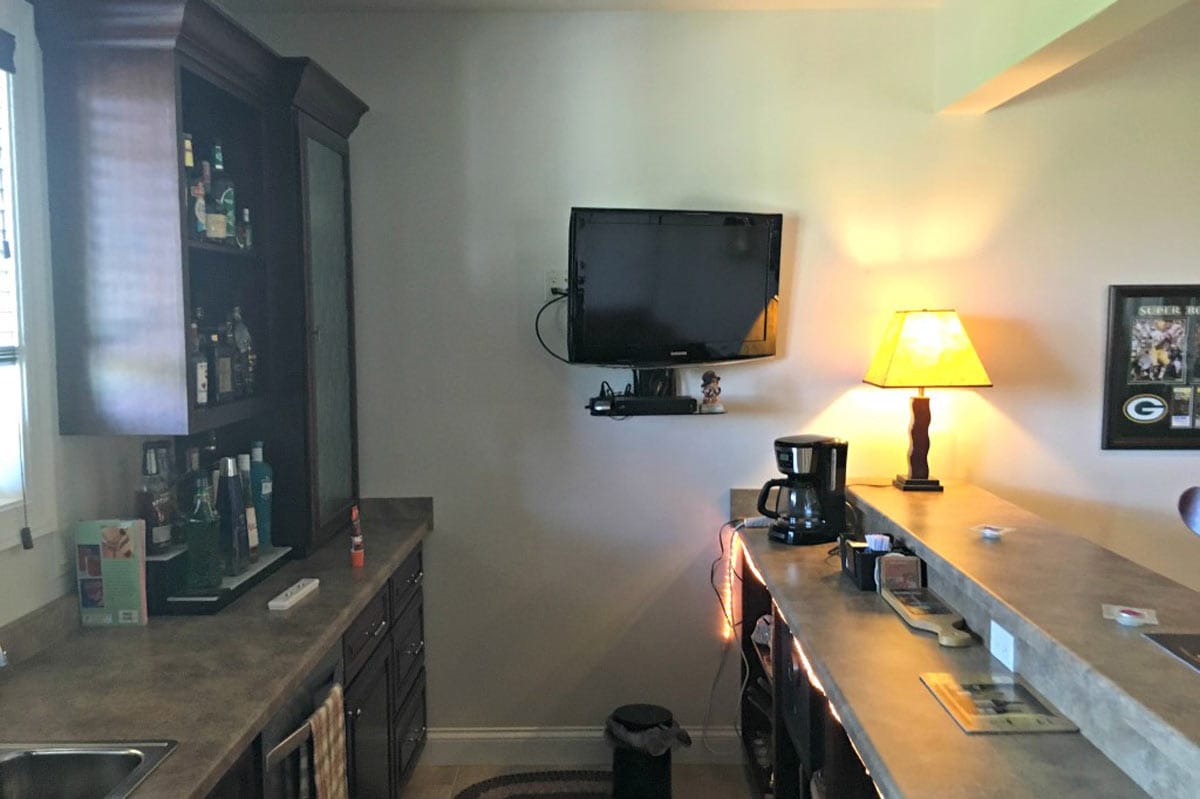
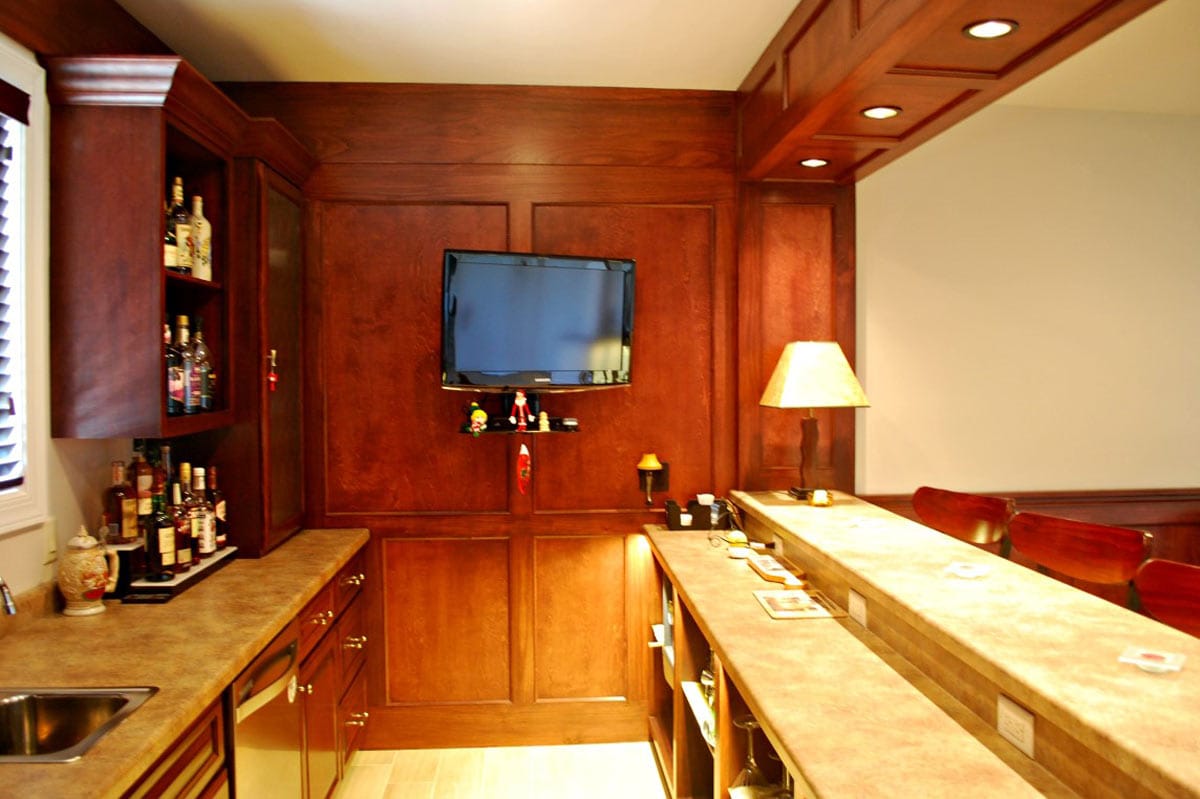
Lower Level Bar Transformation
The most dramatic change in this lower level is the bar area. We bulked up the size of the header above the bar and the portions of the walls below them to make them look bigger, as well as adding can lights in the header area. The existing cabinets and countertops remained, but the ceiling in the bar area was painted a dark color to help define the space. Adding wood wainscoting, stained to match the existing cabinets, makes the entire look and feel of the bar area much warmer and inviting, and provides the perfect amount of contrast between the walls, carpet, and ceiling.
Before
After
A fresh coat of paint on the walls in the lower level completes the project. The results are an amazing, rich and inviting living space. The project finished on schedule and within budget, thanks to the planning and detailed options that were discussed before starting any of the actual work. We are thrilled to have another happy client, and cannot wait to work with them again on whatever project they want to tackle next.
Before
After
Considering a home renovation? Simon Builders can help!
First, for any renovation, give us a call! Our dedicated team will assist you at every step to ensure complete satisfaction, from start to finish. No matter the size or scope, we want to be your remodeler or builder for life.
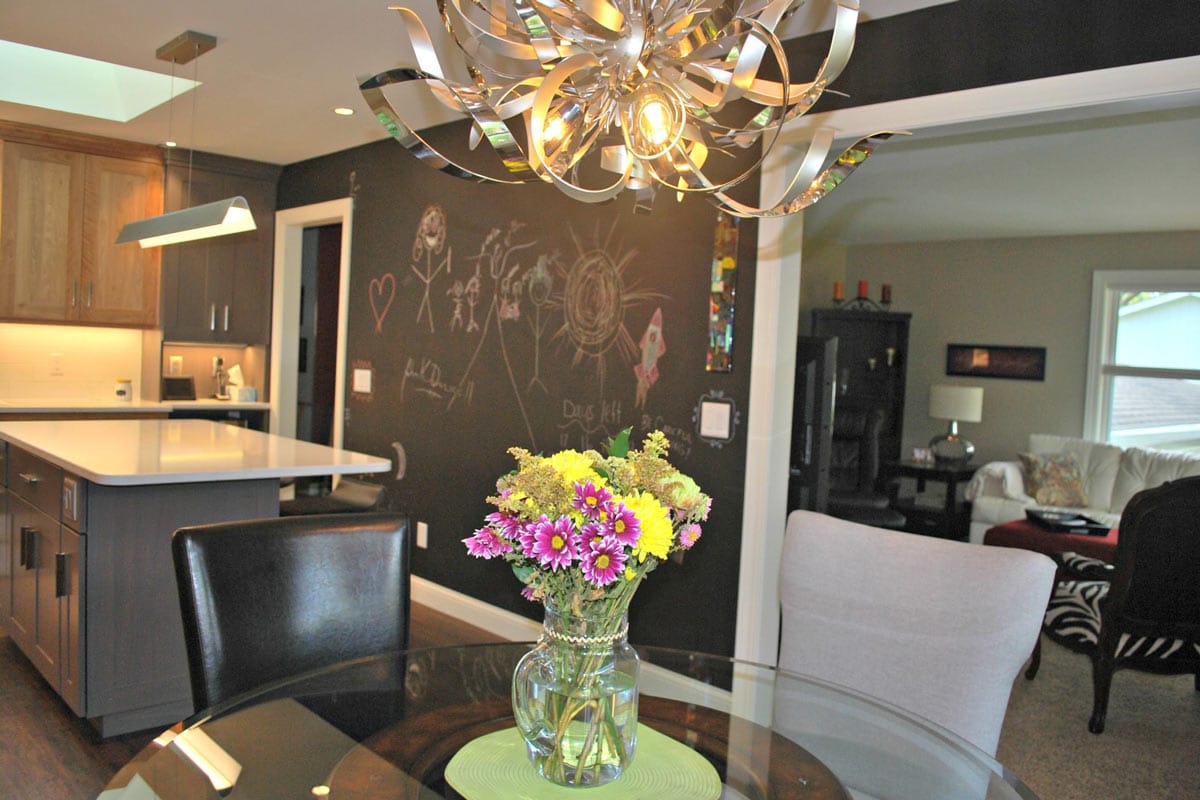
We are excited to share the story of our most recent kitchen remodeling project with you. This is an example of what we call a “Refresh” rather than a remodel. In a Refresh we keep everything in the same general location, but update the finishes to bring a new feel to the existing space.
Opening Up the Space
We started by removing the wallpaper, cabinets, flooring, countertops, sink with faucet, and appliances. Once those items were removed, we removed the soffits above the old cabinets and removed the wall that divided the kitchen and the dining room. This allows the two smaller rooms to function as one larger space and gives an open concept that is desired by many home owners today.
Before
After
Updating the Layout
Part of the new design and layout of the kitchen included the homeowners desire to move the microwave to a more convenient location below the countertop. This required changing the recirculating vent of the existing microwave over the range to a full vented hood which not only solves the problem, but also creates a focal point with sleek, modern style and a full height tile backsplash.
Before
After
The existing ceiling had several drywall cracks and a couple of areas of damage. These are non-existent now that the repairs are made. The ceiling was retextured and painted and appears to be brand new. Sergenians provided and installed the beautiful tile back splash and the high quality luxury vinyl plank (LVP) flooring which simulates the look of wood, yet is extremely durable for the owner’s dogs.
Before
After
Lighting Updates
The homeowner desired to create a fun and inviting space with this Refresh and the new lighting fixtures certainly did that. They chose an artistic piece above the dining room table that is functional but whimsical. Usually when adding can lights to light up a space, a 5” or 6” light is used. This homeowner chose very small 1” LED light fixtures which are not noticeable in the ceiling until they are turned on and then they light up the space most impressively.
Before
After
Product Selections
High-end Plato Brand Cabinets with flush doors were chosen with help from our friends over at Kitchen Ideas Center. Sitting on the beautiful cabinets are VicaStone Quartz Counter Tops by BadgerGranite Werks, which help give the room it’s crisp and clean look.
The existing appliances were replaced with new stainless steel appliances, and a fresh coat of paint was applied to the walls and ceiling. Elliott Painting did an exceptional job by adding a large chalkboard finish to one entire wall showing everyone that this kitchen is a fun space
Before
After
When this project was finished our client had the following to say:
The remodel experience was extremely positive. The MFSB crew was on time every day, cleaned up every day, and keep the project on schedule….to the day! Terry Dowell gave me a written schedule a week before demo started. He kept to that schedule, to the day. I know this is not an easy task with 11 different subcontractors and vendors. I couldn’t be happier with the finished product or with every person on the MFSB crew that helped me to get it done. Thank you!
Considering a home renovation? Simon Builders can help!
A home redesign isn’t something that you jump right into blind. You are going to want to do some research before you begin planning out your home redesign. Here are some questions to ask yourself before you begin thinking about the redesign process.
What is my budget? Can I achieve the design I want? What are my goals for this redesign? Who do I call for help?
The last question is easy enough- our design and sales team will help you find the right look and quality products to transform your home. We have the years of experience to guide you through the process from start to finish! Contact us today to get started.
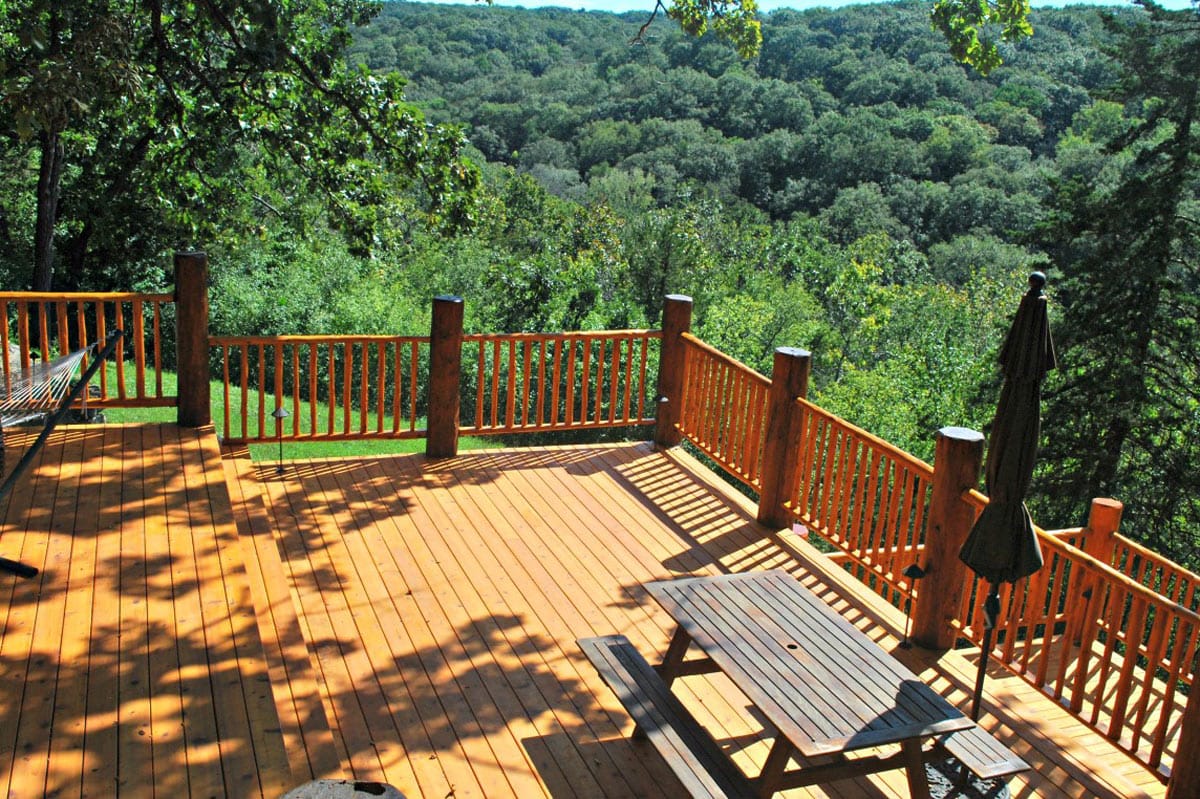
Award Winning Project, Landscape Design / Outdoor Living $60,000 and Over
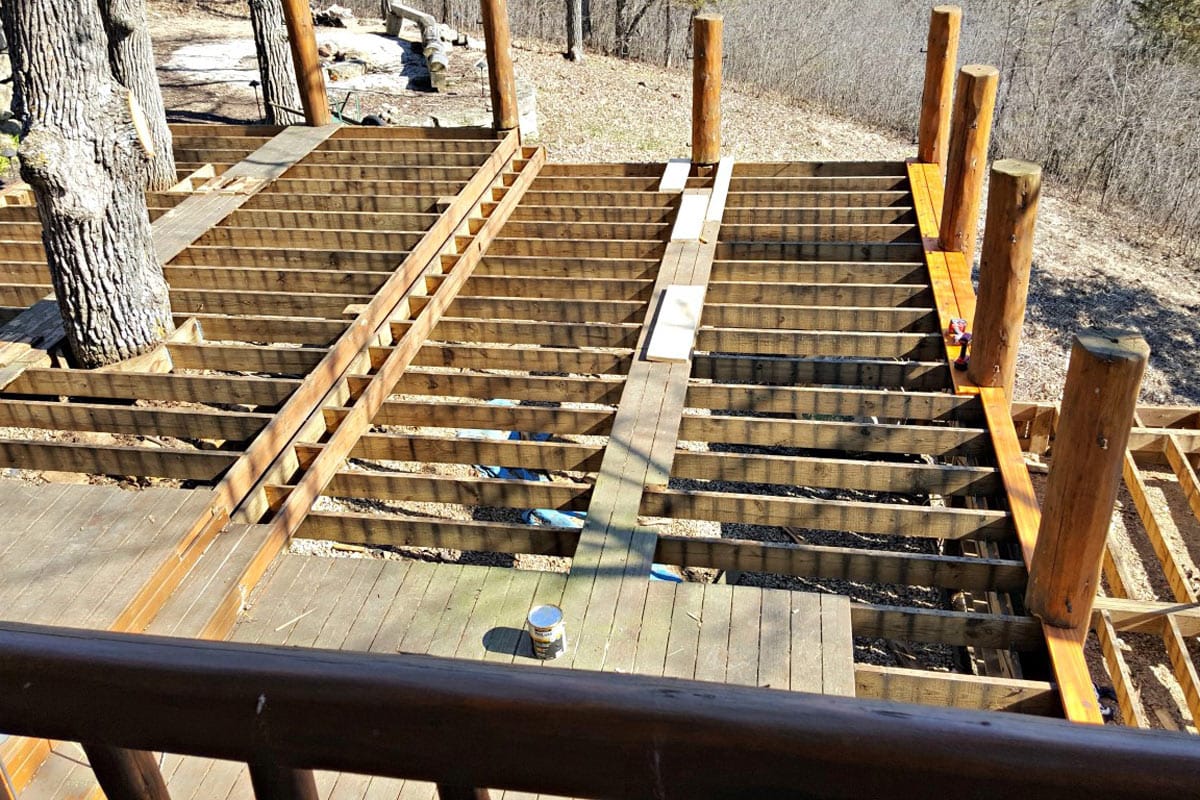
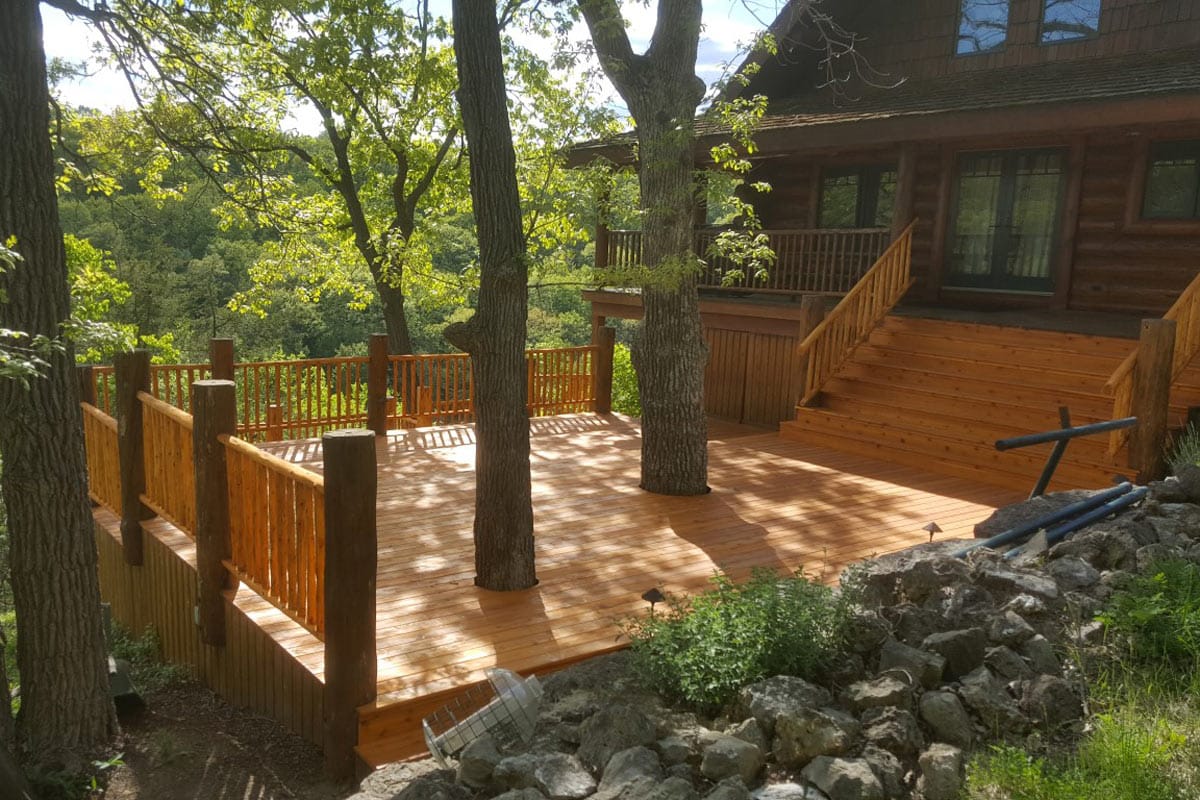
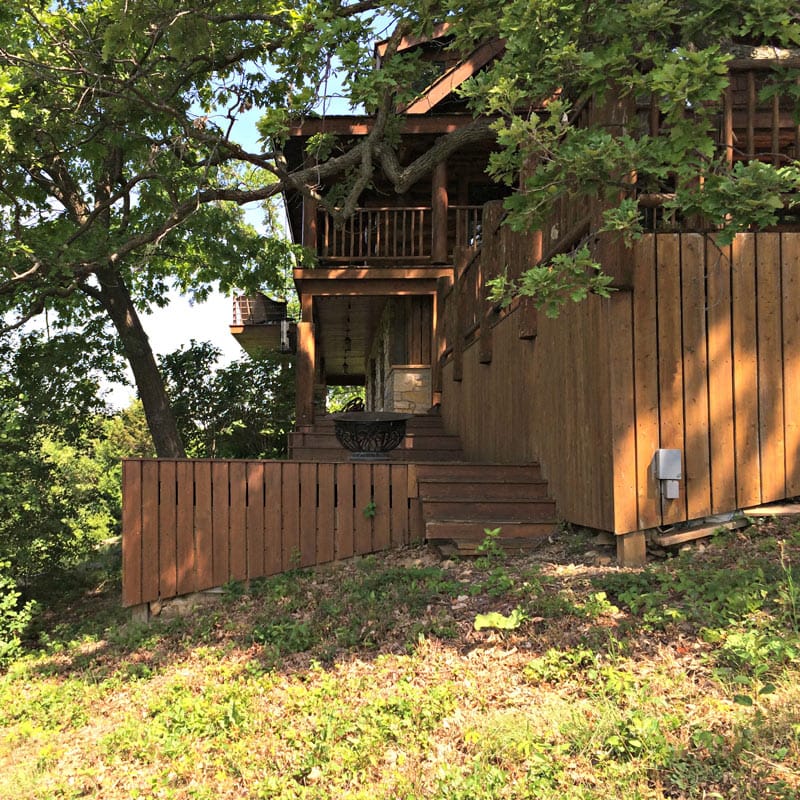
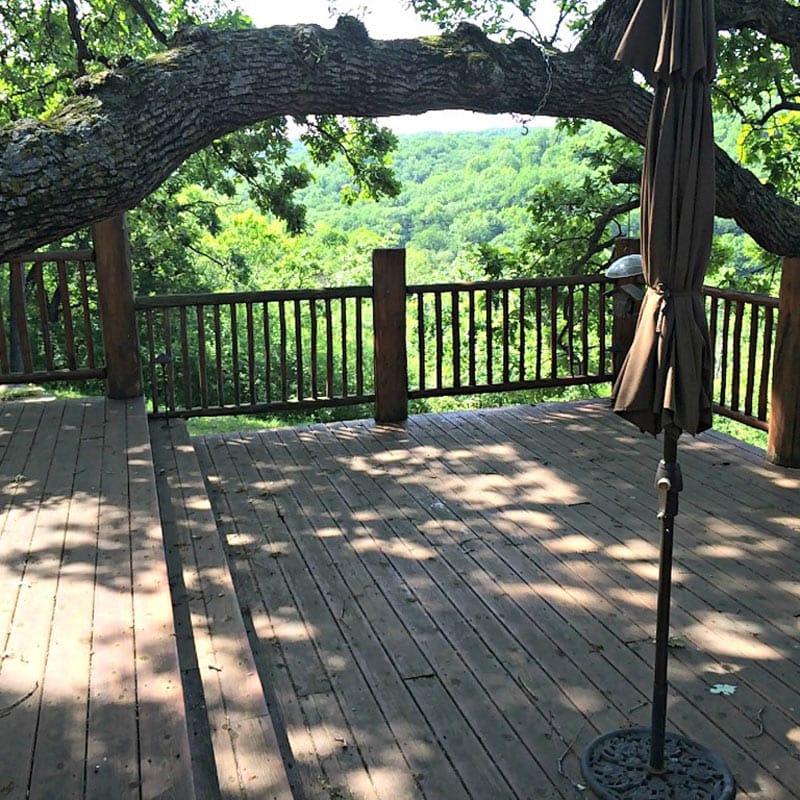
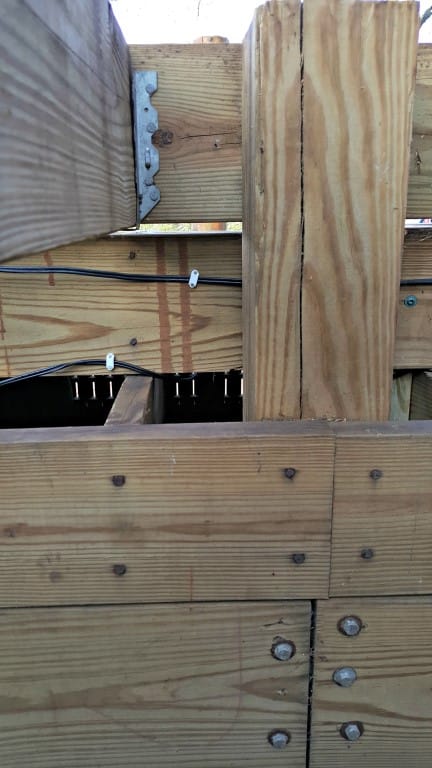
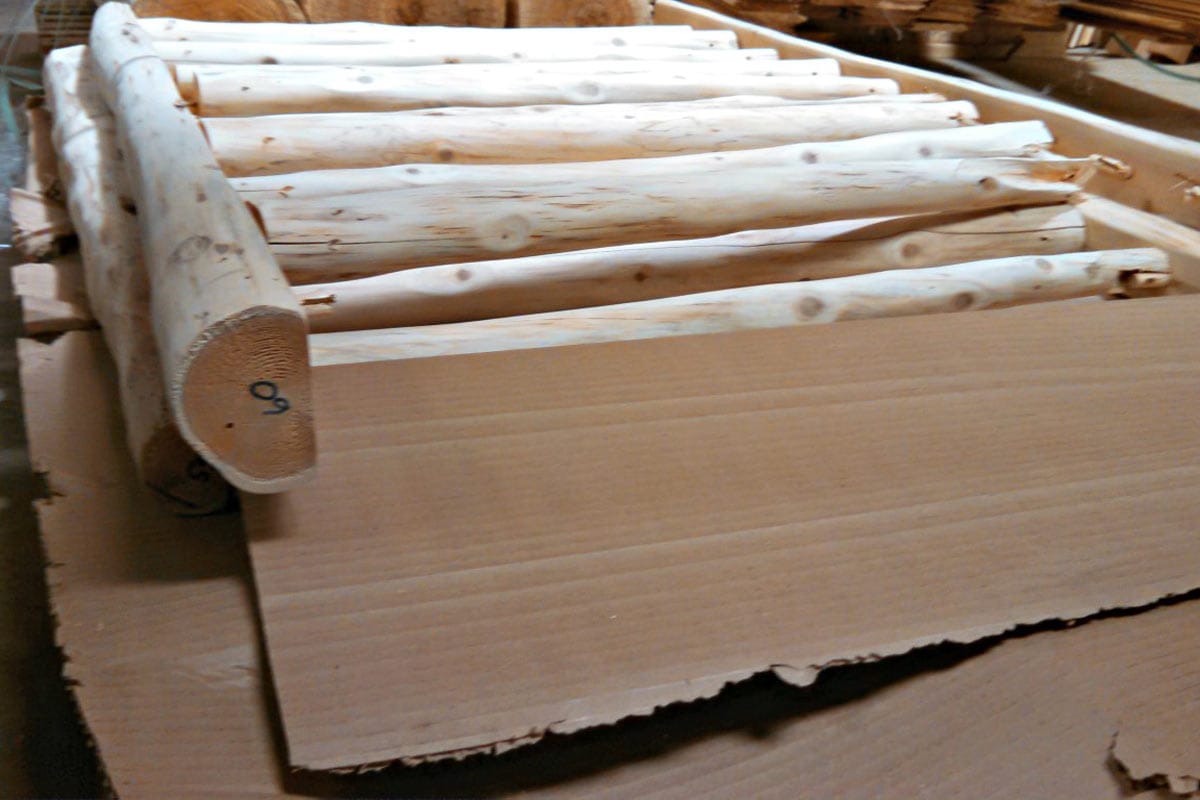
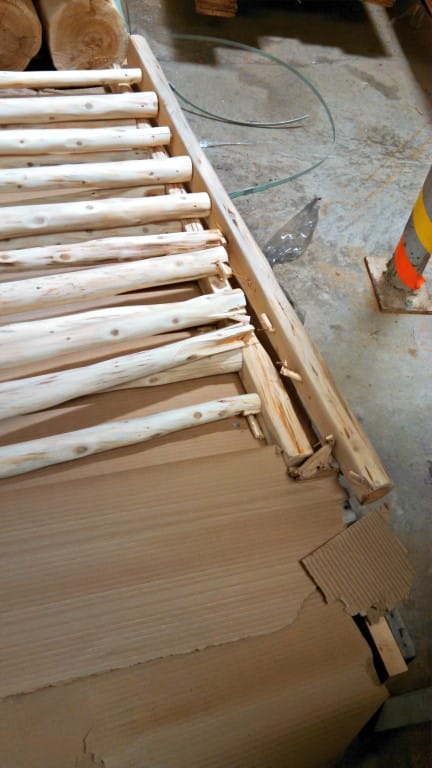
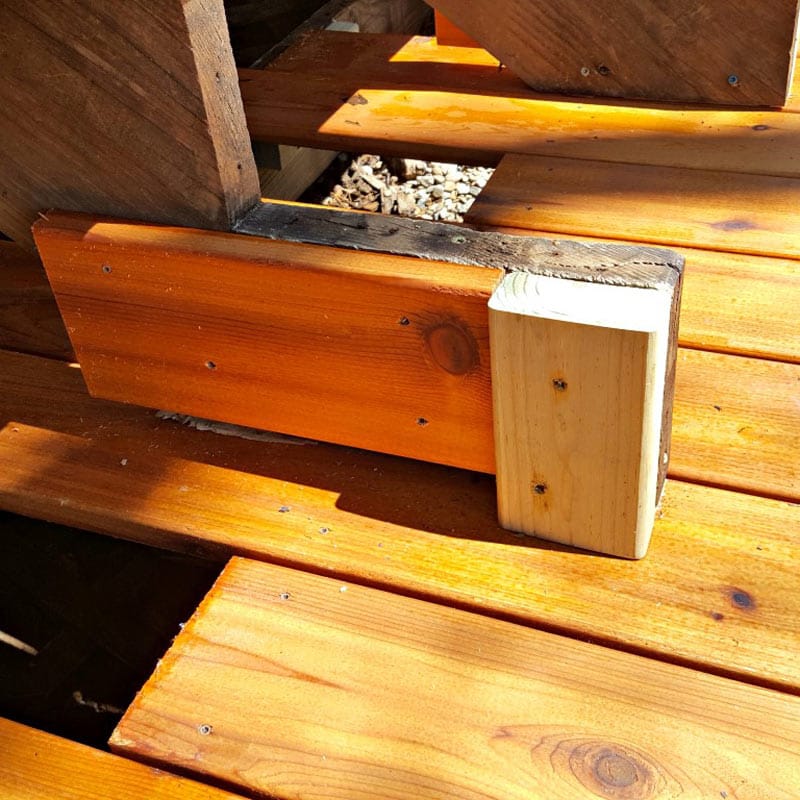
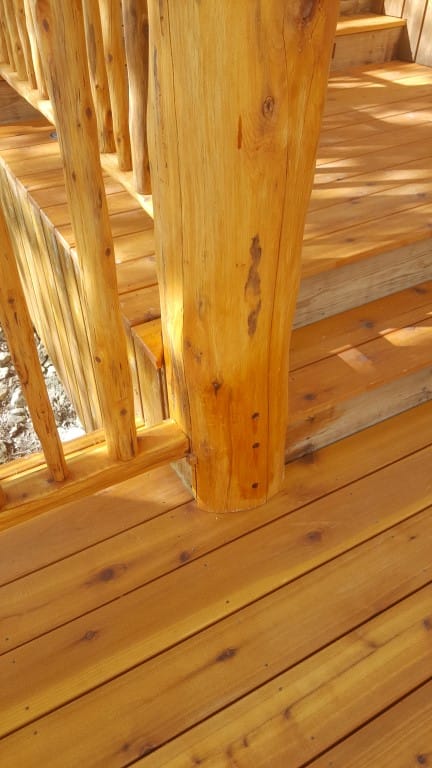
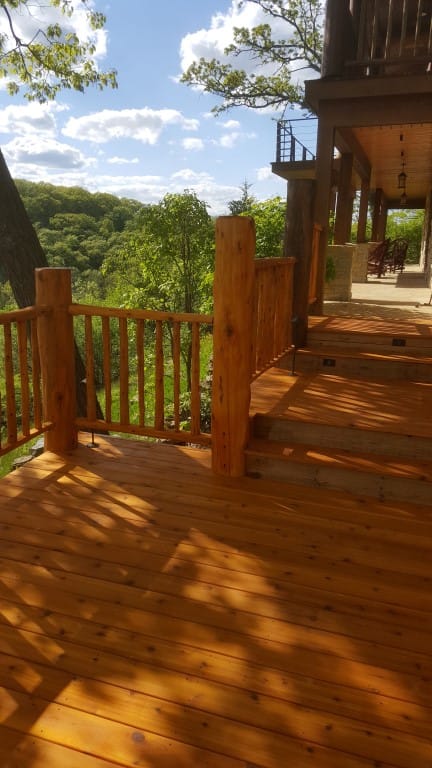
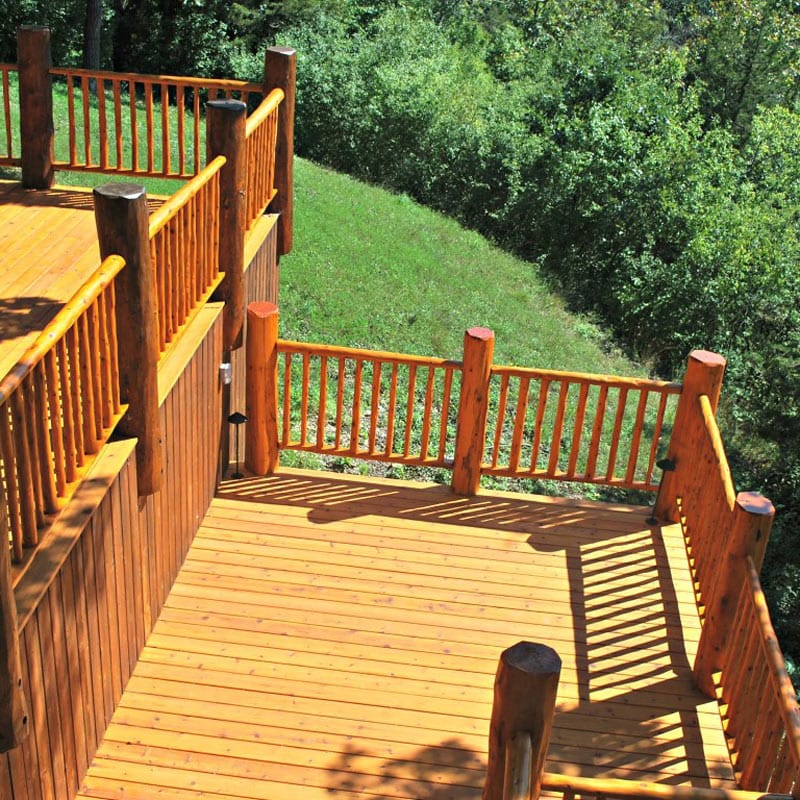
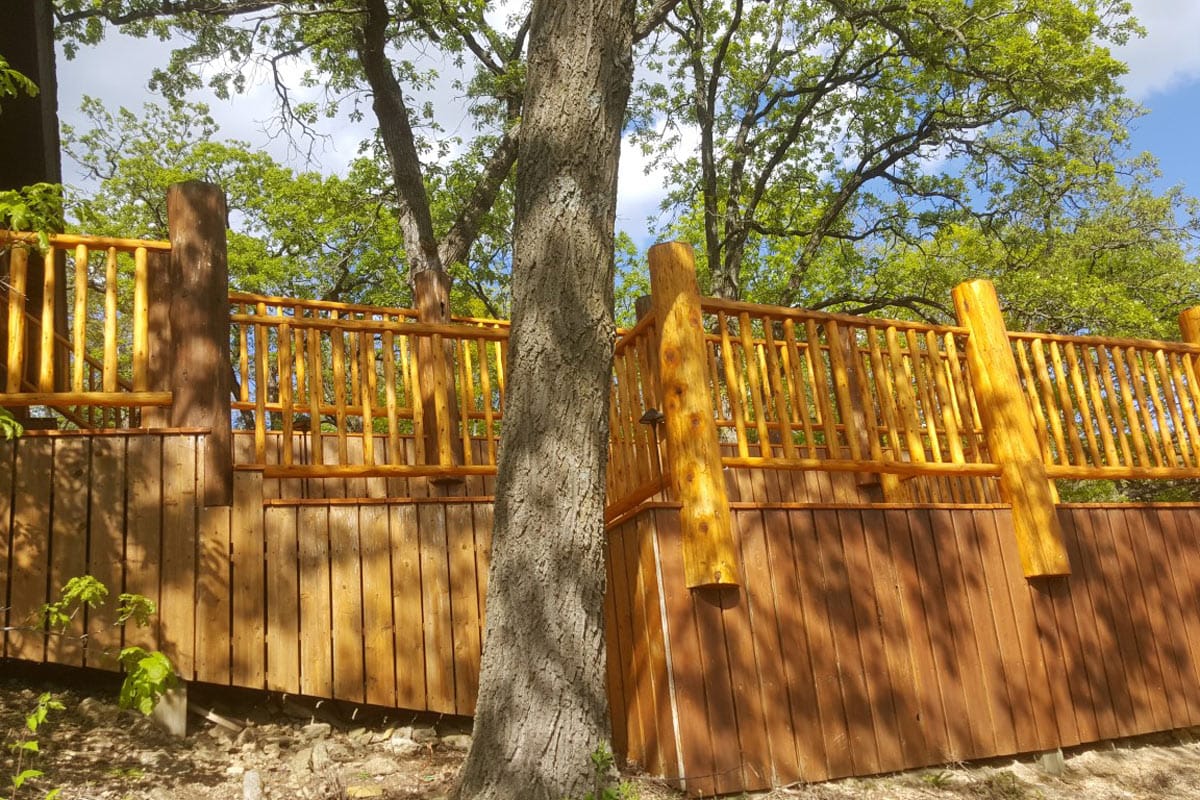
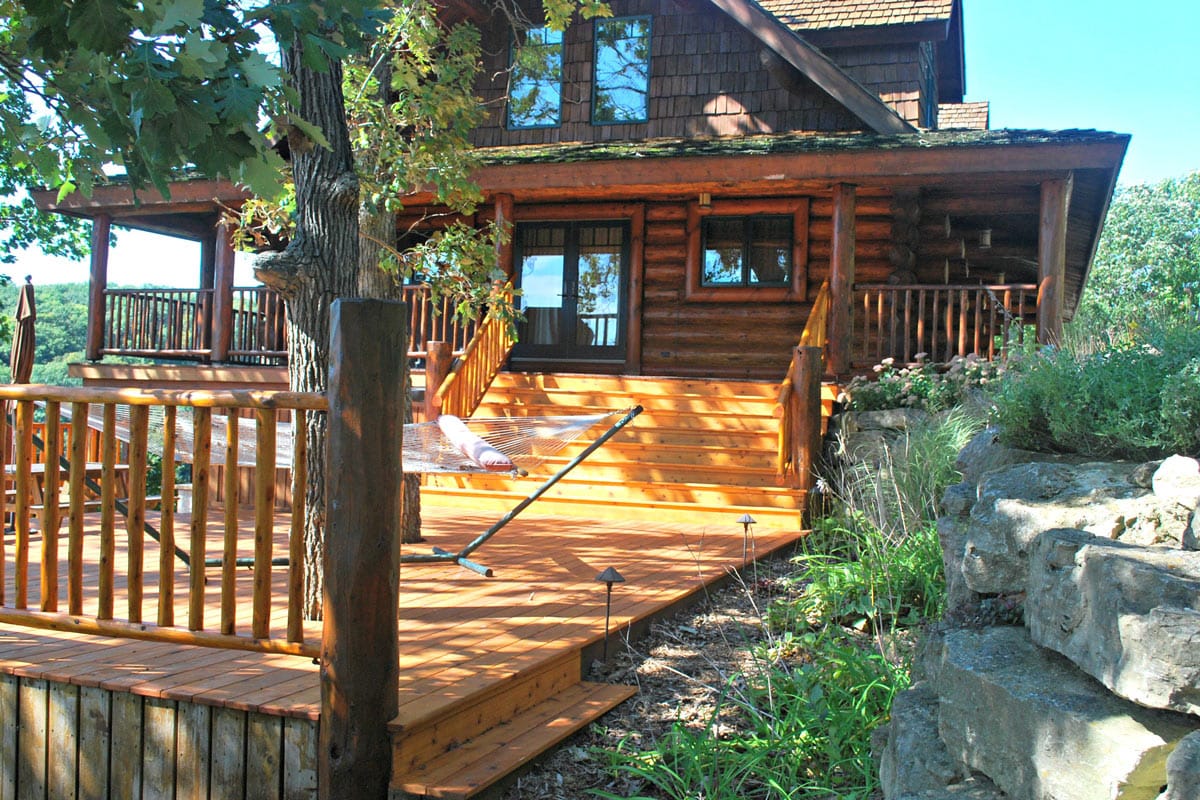
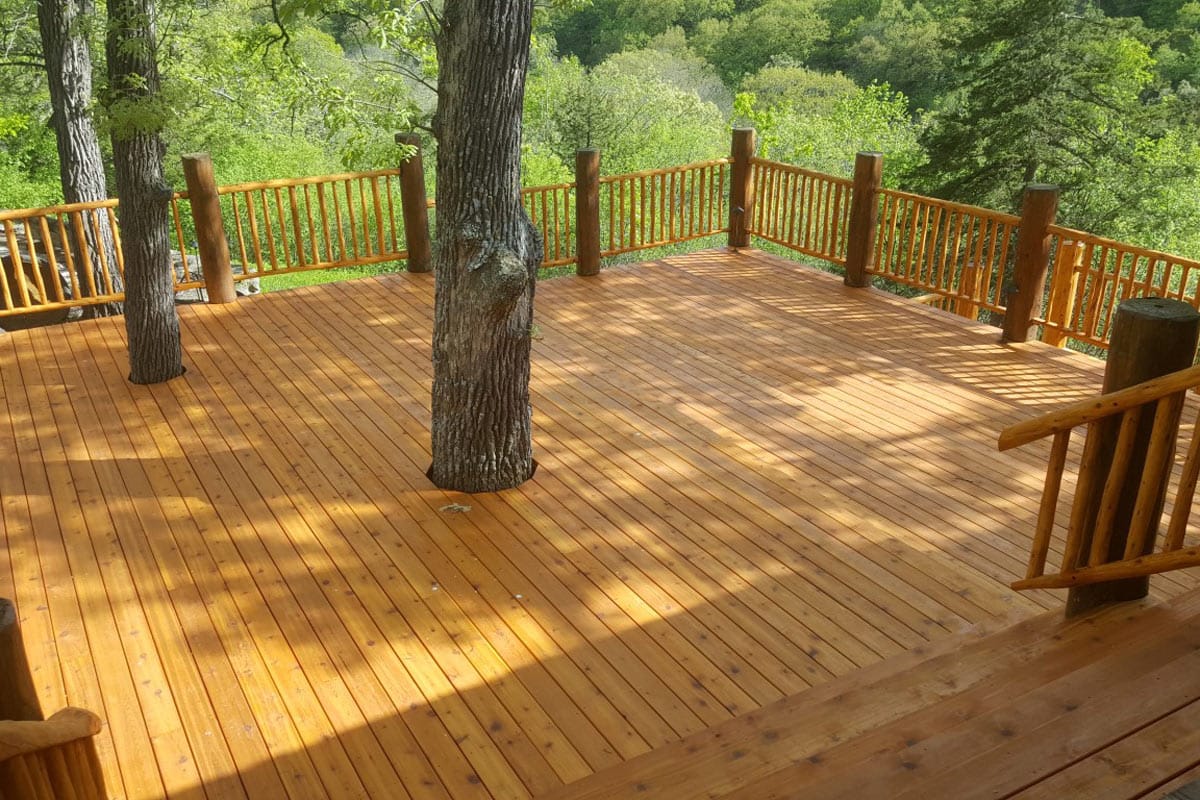
We were very fortunate to have a client ask for help in repairing the railings and decks on their existing log cabin. The cabin was set atop a hill, overlooking a beautiful valley. They loved the cabin and the surrounding property but were afraid to take their children and friends on the decks, as the rustic wood railings and cedar decking had been neglected for many years. Our project began with simply replacing the old log railings with new ones, building new railings where they were missing and replacing a few of the rotten deck boards. The railing wrapped five different tiers of decks around the cabin and was built to follow the surrounding landscape.
The owner had the following requests:
Remove the old, rotting railings and posts and replace with new ones
Add new log railings and posts to the decks where they were completely missing
Replace the deck boards where necessary
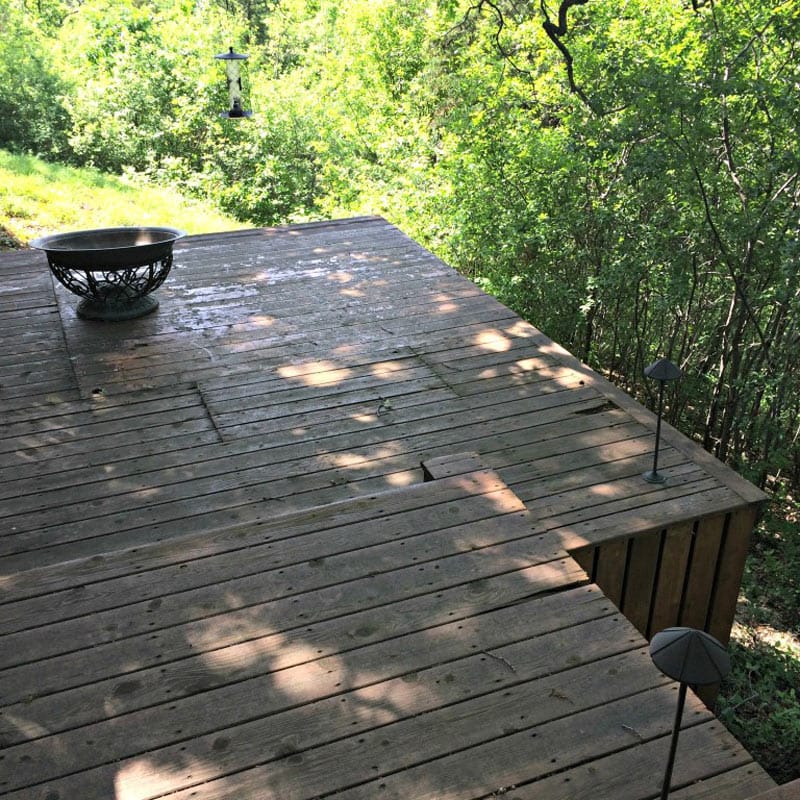
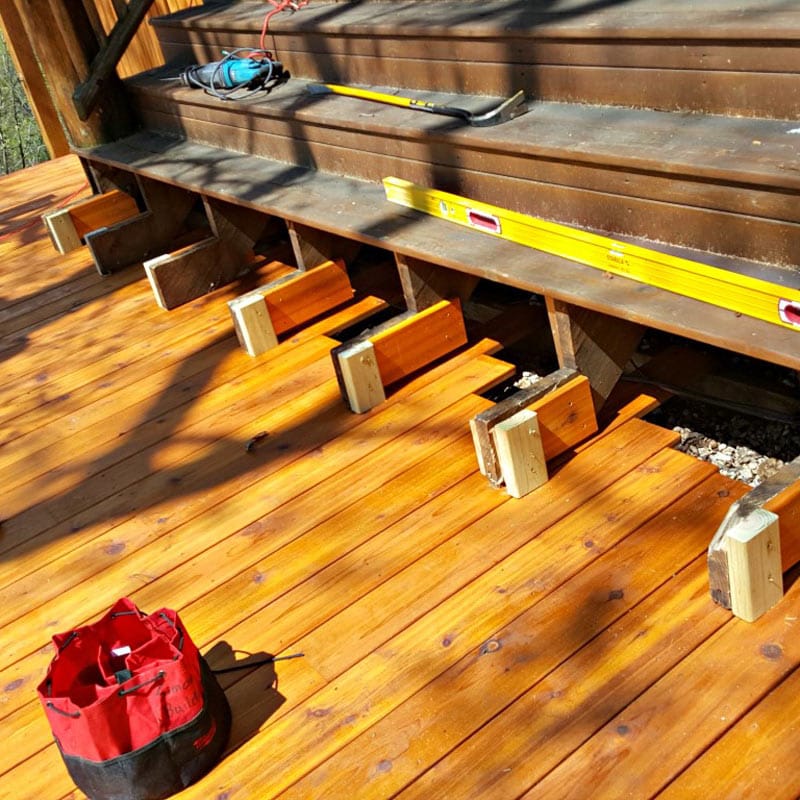
The existing railings were weathered, decaying and even completely missing on multiple deck areas. As we removed the railings and the decorative light fixtures, we quickly found that the damage was more than superficial. There were multiple areas where the decking could not be saved or salvaged. Our clients decided to have us remove and replace all of the decking while we were there instead of just replacing a few as previously planned.
Attention to Detail
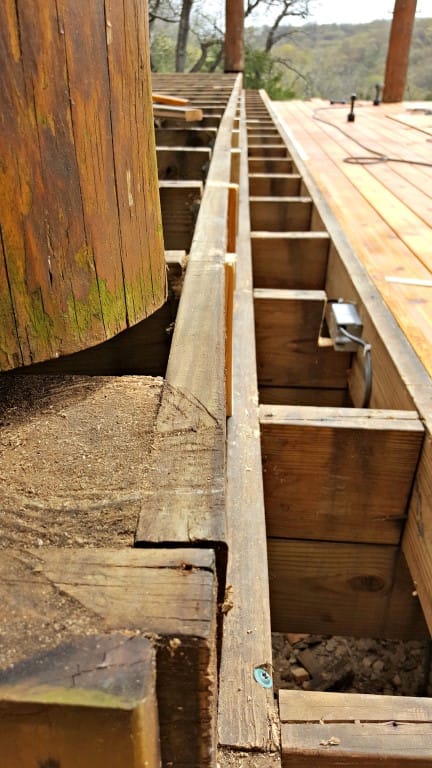
As the demolition stage changed into the installation of the new products, it was important that we maintained the stability of the deck. We left certain rows of decking in place to hold the structure’s shape while we replaced the decking boards and railings.
Obstacles to Overcome
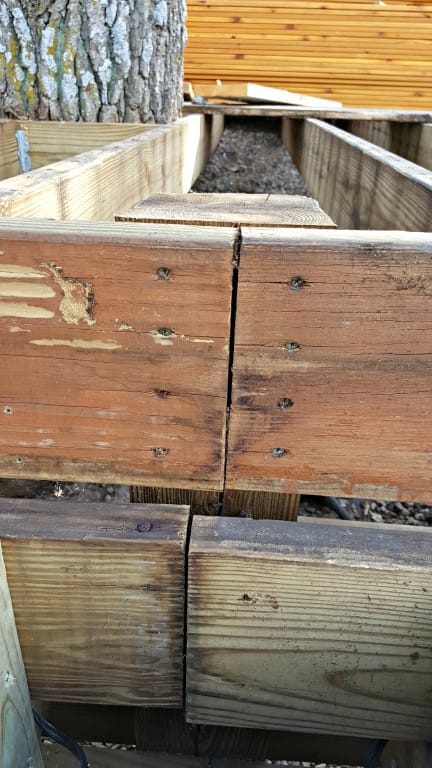
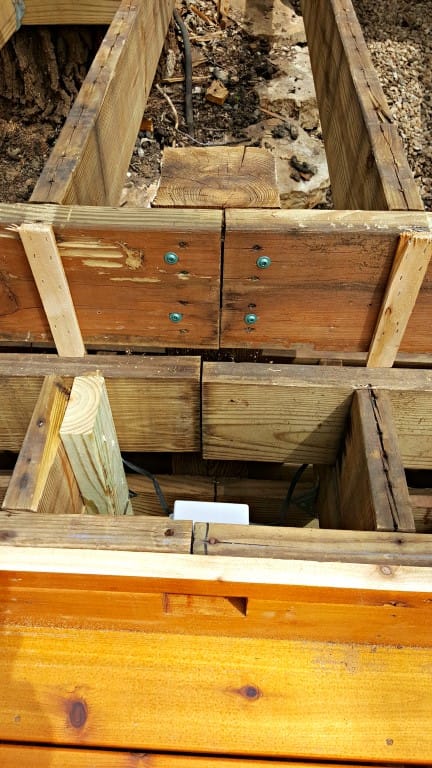
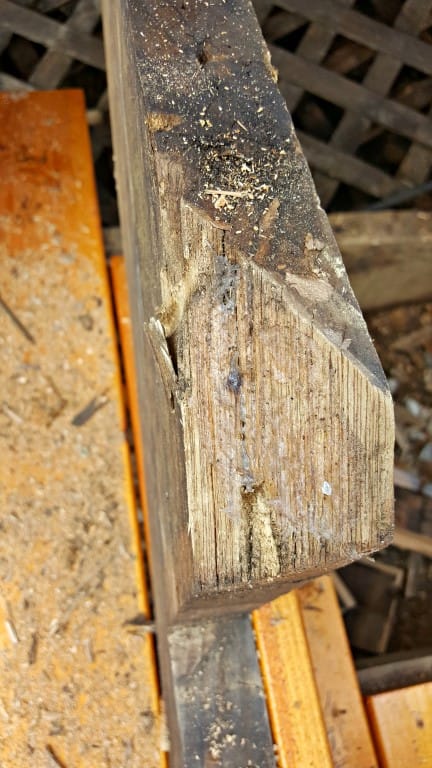
It seemed that the further into this project we went, the more problems we encountered. With the deck boards off, we noticed that multiple parts of the structure were undersized, missing screws and even spliced at the exact same locations. This weakened the entire structure of the deck. After adding a few new supports, joist hangers, screws, and bolts, we were able to fix those problems and tie together the different levels of the decks that were previously independent of each other. Together they form one stronger structure.
Our client had the original railings made by a handyman years ago, and they were not very consistent in size and spacing. Our clients were shocked to learn that the spacing of many of the balusters would not pass today’s building codes. To keep the same style, but meet code, we were able to custom order the exact sizes we needed for each railing section. We were even able to keep the irregular balusters design. Since the new railings were made in a controlled environment, they could be assembled correctly and would be stronger than a site-built product. As seen above, the company that delivered the railings accidently gave railing #09 a strength test with their forklift. It didn’t quite pass. This could have been a major delay, but the manufacturer had sent one extra rail and a handful of extra balusters, so our carpenters were able to repair railing #09 on-site and install it without any delay to the schedule.
The staircase stringers also needed some repair work as shown above. Our simple railing replacement job continued to grow into a larger repair job.
Attention to Details
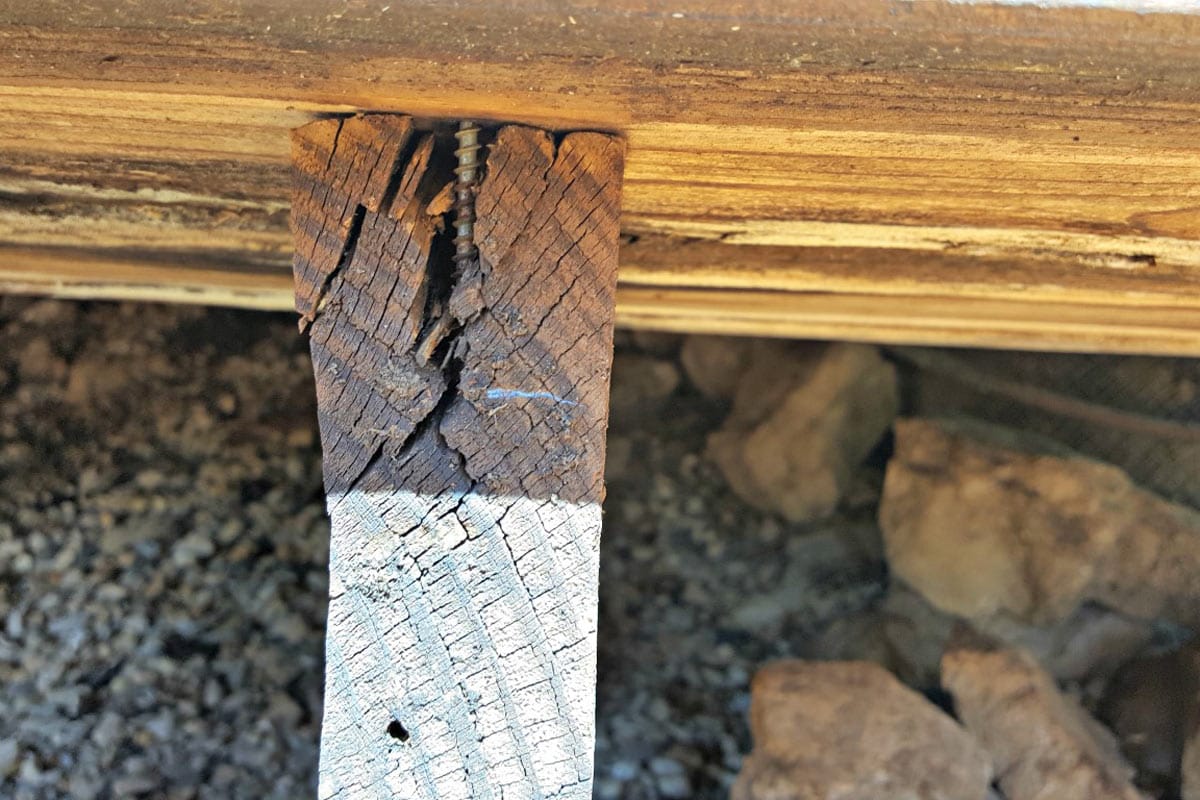
We were able to reinforce the existing stringers with available materials, so we did not need to remove and replace even more of the decking areas.
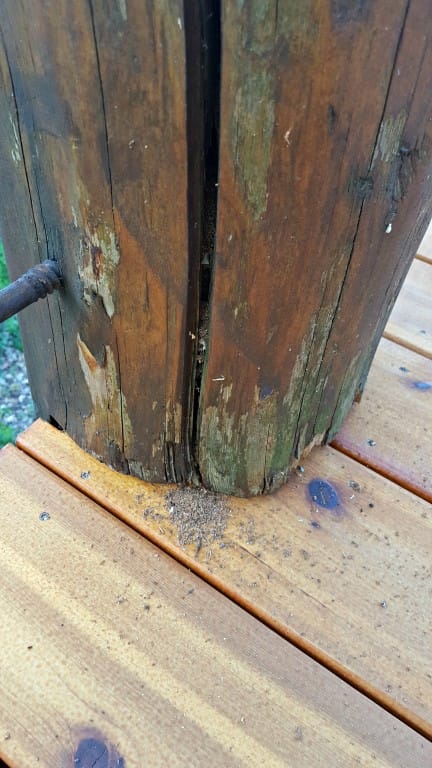
Because the old wooden posts and railings had not been properly sealed and maintained, they were rotting from the inside out. They also had become home to carpenter ants that were eating the wood. The old posts were removed, and new posts were treated with a brand new Sikkins product that will not only protect against rot and decay but will also help deter carpenter ants from moving in.
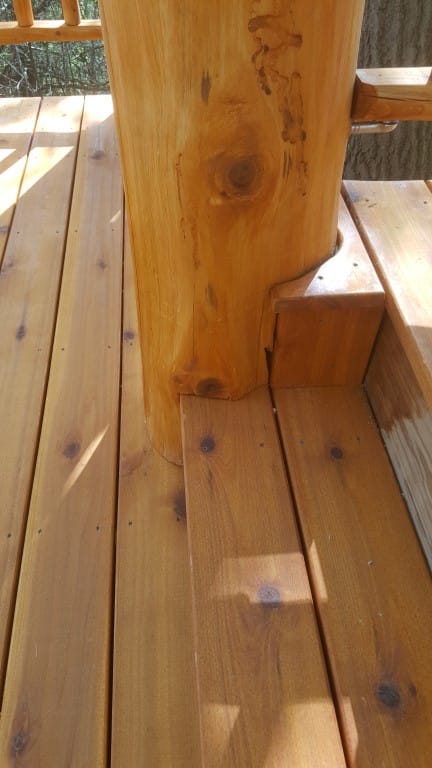
As we installed the new posts and railings that were missing from the lower decks, we took extra time fitting the posts to make it look like they were growing out of the deck. This mimics the actual tree growing out of the middle of the main deck and adds a level of detail that previously was missing.
With the scope of this project changing to be much more work than previously planned, our client decided that next year the entire cabin would be looked at and repaired as necessary. Knowing this, they chose to use a lighter color stain on all the new materials that we had installed and repaired. As part of next year’s project, the old posts, and other logs will be power washed, repaired, sanded and refinished in this same lighter color. It may look a little out of place this year, but it is the right call knowing their long term plan.
After the new railings were installed, we reinstalled the original lighting on the steps, and the decorative lighting along the outside edges of the deck.
Before & After
The existing deck was missing railings in multiple areas. We added new railings and posts to match the existing railings and posts, making it safe and aesthetically pleasing.
Finished Project
After removing and replacing the old, rotting railings and installing railings where they were previously missing, this deck is once again safe for our client’s family and friends to enjoy. We are happy to have been able to fix the issues that arose. Now our clients can stop worrying, and start enjoying their log cabin and the beautiful views. The end result is a gorgeous, safe and updated outdoor living area.
Looking to refresh your outdoor space? We'd love the opportunity!
A deck renovation can seem overwhelming at best. You need a knowledgeable contractor to complete the job safely and beautifully. The team at Michael F. Simon has years of experience in specialized outdoor renovations, so you know you’re getting the best value and quality.
Our design and sales team will help you find the right look and quality products to transform your deck or patio. We have the know-how to guide you through the process from start to finish! Contact us today to get started.
Award Winning Project, Residential Kitchen, $20,000-40,000
This remodeling project has won first place in the local and first place in the regional Contractor of the Year (COTY) competition held by the National Association of The Remodeling Industry (NARI).
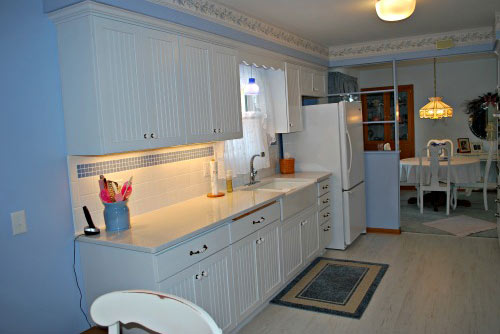
We are excited to show you this kitchen Refresh that we have completed. We call it a “Refresh” rather than a remodel because we kept everything in the same location, and updated the kitchen. The existing kitchen had the original cabinets that were installed when the home was built 45 years ago. They were still in very good shape but were starting to show signs of wear and tear. We removed the existing cabinets and replaced them with new Countryside Cabinets that incorporate a bead board center panel. We removed the existing tall pantry cabinet that acted as a separation from the kitchen to the dining room, and we replaced it with a base and upper cabinet to add valuable new countertop space. The cabinets were chosen to match the surrounding rooms that had lighter colored furniture with light blue accents. The countertops were removed and replaced with new white quartz countertops that matched the cabinets quite nicely.
The existing vinyl flooring and sub flooring were removed from the kitchen as well. The subflooring was removed and replaced to ensure that the new floor would be a solid, squeak less, floor system that would last a very long time. The flooring that our client chose was a laminate flooring product in a White Brushed Pine Plank color.
After
Before
After
Before
As for the lighting, plumbing, and appliances in this Refresh, we installed convenient under-cabinet xenon lights that could be controlled by a dimmer to adjust them accordingly. A dimmer was also installed for the overhead lights in the kitchen to make them more versatile for the client. New white appliances were installed which fit in perfectly, including a GE cooktop, microwave hood, and a wall oven. We couldn’t replace everything except for the kitchen sink, as the saying goes, so we installed a new Farmhouse Style Kohler Sink as the icing on the cake in this beautiful kitchen Refresh project.
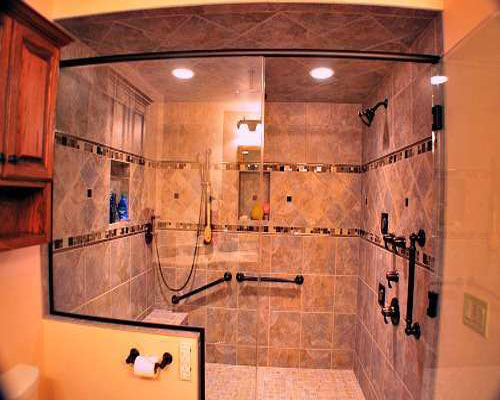
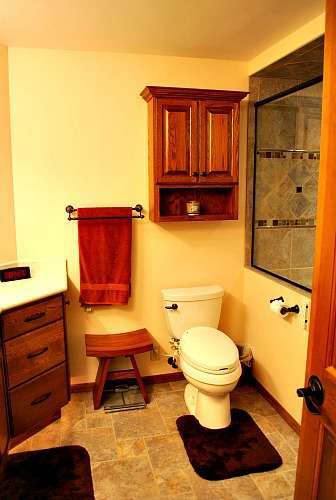
Award Winning Project, Residential Bath $30,001-60,000
This master bathroom remodel won first place in the local and first place in the regional Contractor of the Year (COTY) competition held by the National Association of The Remodeling Industry (NARI). In addition, it also received a special Universal Design Recognition for being handicap accessible.
One of our recent projects was this Master Suite remodel. The Master Bedroom and Bathroom were transformed into a relaxing Master Suite. The new suite includes a redesigned bedroom and more noticeably, a luxurious bathroom with large walk-in closet and shower. The owner loves his existing home and does not plan on moving out as he grows older. Taking that into mind, we went to work designing the new suite. Our goal: producing a superior and functional Master Suite that lives up to our company’s demand for quality. We used the bathroom’s basic outline, moved the location of the small shower, and completely removed the soaking tub.
New Layout
The new layout follows the ADA (American’s with Disabilities Act) specifications so that if a wheelchair is ever needed, mobility and accessibility will not be an issue.
The new walk-in closet has more shelving than the previous layout. But even more noticeable is the new custom walk-in shower. We went to work and gutted the entire bathroom. In the demo stage, the floor joists were modified to allow for a curb-less entrance to the shower. That means there is no step needed to get into the shower. This gives the room a cleaner look as well as allowing the functionality needed for wheelchair access. The heavy custom glass door invites your eye into the beautifully tiled shower. The shower is an oasis where the user can choose any combination of the normal shower head, hand held sprayer, rain head or multiple body sprays.
The showering has the look and feel second only to a professional spa. Entering the bathroom, sensors automatically turn on the lighting below the cabinets in the toe-kick area. Sensors also turn on the closet light as the door is opened, eliminating the need for a light switch. The bathroom also features a heated tile floor and bidet. Custom made recessed medicine cabinets finish off this bathroom making it a perfect mixture of luxury and functionality.
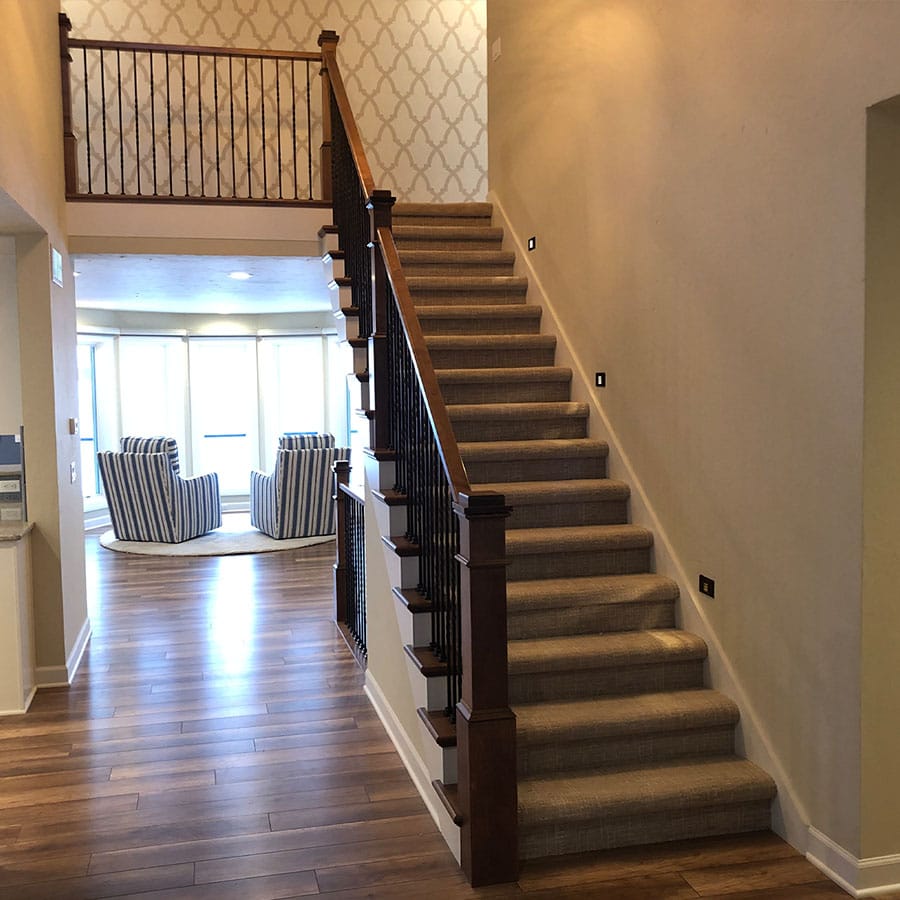
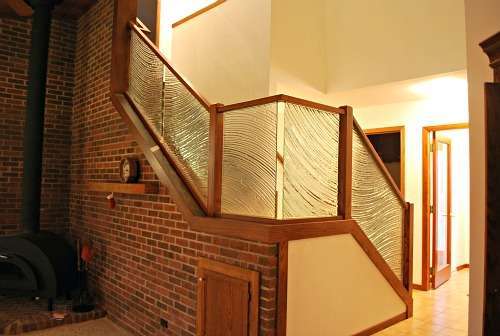
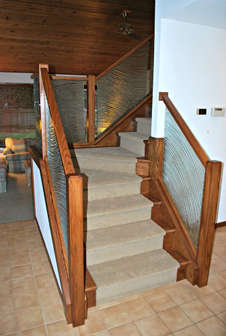
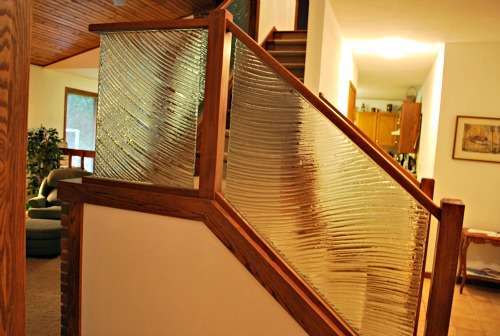
Award Winning Project, Residential Interior Element
This staircase remodel won first place in the local and in the regional Contractor of the Year (COTY) competition held by the National Association of The Remodeling Industry (NARI).
This is just one part of the total project we completed in this home. We also remodeled the foyer, bathroom, and completed a second floor refresh in addition to the staircase.
Now, the first thing a visitor sees when entering the home, is the beautiful decorative glass staircase. This turned out absolutely stunning and has become the focal point of the home.
We teamed up with Linda at Studio Glassworks for the custom glass panels which feature a swirl design that flows through the entire staircase. We are very proud and happy with how this project has turned out. It is truly a testament to the wonderful customers and suppliers we have been fortunate to work with over this past year. Back when this home was built, the staircase was built to the local building code requirements. Since we were doing new work to the staircase, it was required to be brought up to today’s standards. The balusters were spaced too far apart, the handrail was not a continuous unit and the top rail on the 90 degree corner of the landing was at two different heights. To comply, the staircase was completely rebuilt to meet current codes as well as incorporate the glass panels as the new baluster section of the staircase.


